Willkommen zu unserem neuen Video! Erfahre, wie Home Assistant dein Zuhause, ob mobil oder nicht schützt, indem es offene Fenster oder Türen erkennt, und damit vor Regen warnt und Einbrüche verhindert! Entdecke auch unseren Camper-Floorplan und triff unseren spannenden Gast, der dir auch einen Einblick in seine Lösungen gibt. Verpasse nicht diese spannende Einführung in die Welt der Smart (mobil) Home-Sicherheit!
Ich möchte euch heute einen allgemeinen Amazon-Link teilen, über den ihr eine Vielzahl von Produkten entdecken könnt. Egal, ob ihr nach Smart Home-Geräten, Gadgets oder anderen nützlichen Artikeln sucht, Amazon hat für jeden etwas zu bieten.
Wenn ihr über diesen Link einkauft, unterstützt ihr meinen Kanal, ohne dass es für euch zusätzliche Kosten verursacht. Das hilft mir, weiterhin spannende Inhalte für euch zu erstellen!
Hier ist der Link zu Amazon: https://amzn.to/3KsGngK
Vielen Dank für eure Unterstützung!
In meinem Shop findest du auch die verwendeten Produkte * aus dem Video
Um Alarmo installieren zu können benötigst du HACS. Wie du HACS installierst, erfährst du in diesem Video:

Wie du Home Assistant auf deinem Raspberry PI 4 oder 5 für z.B. deinen Camper installieren kannst, zeige ich dir in diesem kurzen Video:

Den Kanal von Daniel (smarthomeyourself) findest du hier:
Das ausführliche Alarmo Tutorial von Daniel könnt ihr hier finden:

Vielen Dank auch an Maxx für sein tolles Berechnungstool und natürlich auch für seine Klasse Videos im Blick auf Dashboards und Flurplänen. Schaut bei ihm gerne mal vorbei:
Position auf der Picture Elements Card berechnen! Von Pixel auf % – Smart Home Bastler
Den Kanal von Maxx findest du hier: Kanal
Im Video zeige ich euch , wie ihr einen einfachen Flurplan erstellt. Egal ob Camper oder Haus. Hier habt ihr den Beispielcode (Bildelemente Karte) aus dem Video:
type: picture-elements
elements:
  - type: state-icon
    entity: binary_sensor.fenster_hinten
    style:
      top: 43%
      left: 4%
      '--mdc-icon-size': 100%
      color: transparent
  - type: state-icon
    entity: binary_sensor.fenster_hinten_rechts
    style:
      top: 85%
      left: 21%
      '--mdc-icon-size': 100%
      color: transparent
  - type: state-icon
    entity: binary_sensor.fenster_mitte_rechts
    style:
      top: 85%
      left: 48%
      '--mdc-icon-size': 100%
      color: transparent
  - type: state-icon
    entity: binary_sensor.fenster_vorne_rechts_unten
    style:
      top: 85%
      left: 73%
      '--mdc-icon-size': 100%
      color: transparent
  - type: state-icon
    entity: binary_sensor.fenster_vorne_rechts_oben
    style:
      top: 85%
      left: 78%
      '--mdc-icon-size': 100%
      color: transparent
  - type: state-icon
    entity: binary_sensor.fenster_hinten_links
    style:
      top: 10%
      left: 21%
      '--mdc-icon-size': 100%
      background_colour: green
      color: transparent
  - type: state-icon
    entity: binary_sensor.fenster_vorne_links
    style:
      top: 10%
      left: 74%
      '--mdc-icon-size': 100%
      color: transparent
  - type: state-icon
    entity: binary_sensor.dachluke_hinten
    style:
      top: 48%
      left: 22%
      '--mdc-icon-size': 100%
      color: transparent
  - type: state-icon
    entity: binary_sensor.dachluke_mitte
    style:
      top: 48%
      left: 48%
      '--mdc-icon-size': 100%
      color: transparent
  - type: state-icon
    entity: binary_sensor.dachluke_vorne
    style:
      top: 48%
      left: 74%
      '--mdc-icon-size': 100%
      color: transparent
  - type: state-icon
    entity: binary_sensor.dachluke_mitte_links
    style:
      top: 29%
      left: 41%
      '--mdc-icon-size': 100%
      color: transparent
  - type: state-icon
    entity: binary_sensor.tuer
    style:
      top: 73%
      left: 36%
      '--mdc-icon-size': 100%
      color: transparent
  - type: state-icon
    entity: input_boolean.unterwegs
    tap_action:
      action: toggle
    style:
      top: 88%
      left: 34%
      '--mdc-icon-size': 100%
      color: transparent
image: /local/images/510TK.png
Um die Fenster zu überwachen wurde auch eine kleine Automatisierung vorgestellt.
Den YAML Code dazu findest du hier:
alias: Benachrichtigung , wenn Fenster noch geöffnet ist
description: ""
trigger:
  - platform: state
    entity_id:
      - input_boolean.unterwegs
    to: "on"
  - platform: time_pattern
    minutes: /30
condition:
  - condition: and
    conditions:
      - condition: state
        entity_id: binary_sensor.fenster_und_dachluken
        state: "on"
      - condition: state
        entity_id: input_boolean.unterwegs
        state: "on"
action:
  - service: notify.notify
    metadata: {}
    data:
      message: >-
        Achtung: {{ expand('binary_sensor.fenster_und_dachluken') |
        selectattr('state','eq','on') | map(attribute='name') | list | join
        (',\n') }} ist noch geöffnet
mode: single
Update 01.07.2024: Da mich schon ein paar Fragen zur Einbindung des Rauchmelders ereilt haben, möchte ich euch das Script für den Aqara Rauchmelder hier noch ergänzend zur Verfügung stellen.
Script Sirene einschalten:
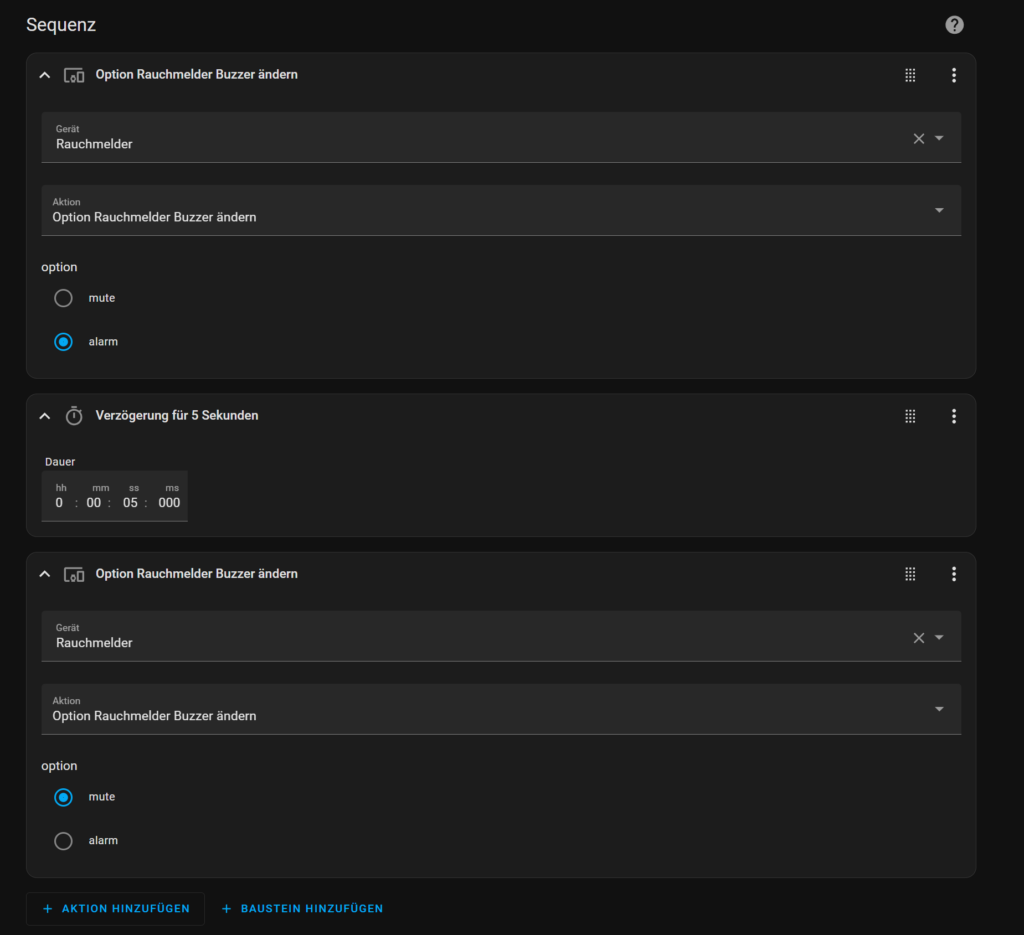
alias: Rauchmelder Sirene einschalten
sequence:
  - device_id: cb8b15beb28b9adf6ddcc79b2d193bea
    domain: select
    entity_id: 1a08cf7364ee5aee41aba55636f6db6b
    type: select_option
    option: alarm
  - delay:
      hours: 0
      minutes: 0
      seconds: 5
      milliseconds: 0
  - device_id: cb8b15beb28b9adf6ddcc79b2d193bea
    domain: select
    entity_id: 1a08cf7364ee5aee41aba55636f6db6b
    type: select_option
    option: mute
description: ""
icon: mdi:alarm-light
Rauchmelder Sirene ausschalten:

alias: Rauchmelder Sirene ausschalten
sequence:
  - device_id: cb8b15beb28b9adf6ddcc79b2d193bea
    domain: select
    entity_id: 1a08cf7364ee5aee41aba55636f6db6b
    type: select_option
    option: mute
description: ""
icon: mdi:alarm-light-off