Hinweis: Der folgende Link ist ein Affiliate-Link.
Die Erstellung meiner Skripte und Videos ist mit einem erheblichen zeitlichen Aufwand verbunden – von der technischen Vorbereitung über intensive Recherche bis hin zu Tests, Aufnahmen und Nachbearbeitung.
Alle Inhalte stelle ich dir dennoch vollständig kostenlos zur Verfügung.
Wenn du meine Arbeit unterstützen möchtest, kannst du das ganz einfach tun:
Für deine Amazon-Bestellungen nutze gern meinen Partner-Link. Für dich ändert sich am Preis nichts – ich erhalte lediglich eine kleine Provision. Vielen Dank für deinen Support!
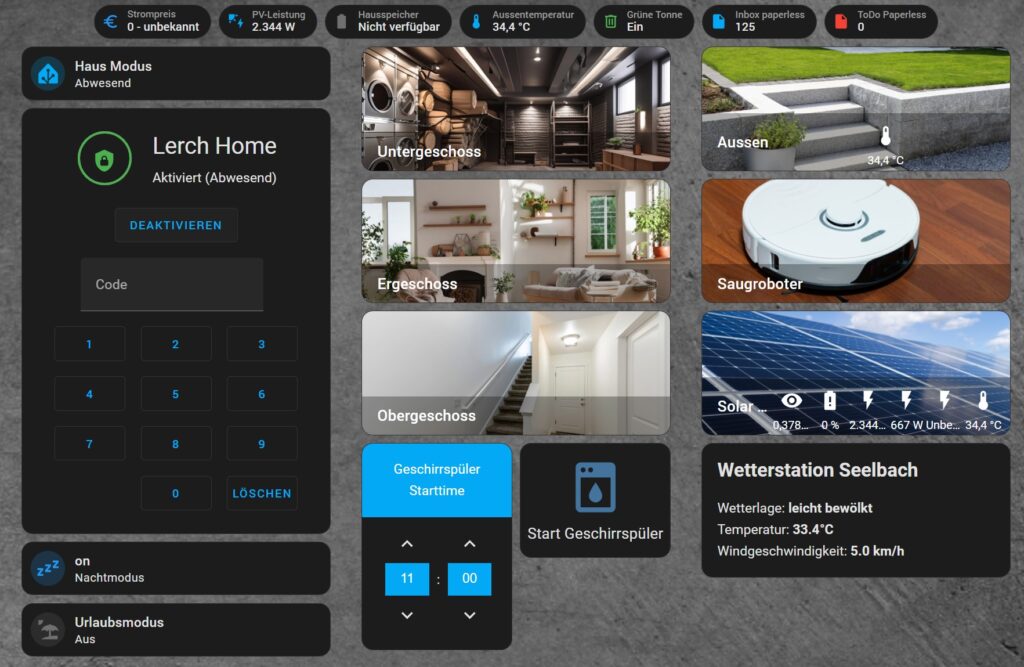
Diese Home Assistant Anleitung zeigt dir Schritt für Schritt, wie du die perfekte Smart-Home-Zentrale aufbaust – von der Hardware-Auswahl über die Einrichtung bis hin zu ersten Automatisierungen. Egal ob du kompletter Home Assistant Einsteiger bist oder schon Erfahrung mit Smart Home hast – hier findest du Tipps, die dir sofort weiterhelfen und auch Profis noch Mehrwert bieten.
1. Was ist Home Assistant und warum nutze ich es?
Home Assistant ist eine kostenlose Open-Source-Software, die dein komplettes Smart Home zentral steuert – unabhängig davon, ob deine Geräte über WLAN, Zigbee, Z-Wave, Matter oder andere Protokolle kommunizieren.
Das Beste: Du kannst Home Assistant komplett lokal betreiben – ohne Cloud-Zwang. Gerade bei sensiblen Daten wie Überwachungskameras im Garten ist das ein echter Vorteil.
2. Die passende Hardware für Home Assistant auswählen
Hier eine Übersicht der gängigsten Optionen – basierend auf meinen Erfahrungen:
Hardware-Option
Vorteile
Nachteile
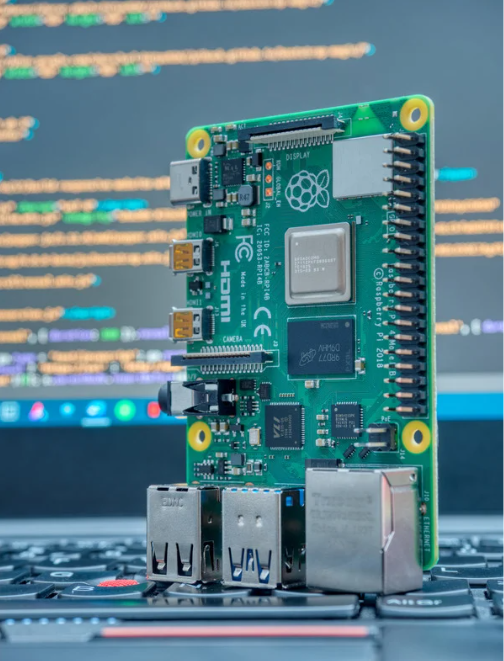
Raspberry Pi 5 mit SSD
Schnell, energieeffizient, lange Lebensdauer, flexibel
SSD benötigt Adapter + Gehäuse, teurer als Pi 4
Raspberry Pi 5 mit microSD
Günstig, einfacher Start, kaum Bastelarbeit
microSD hat begrenzte Lebensdauer, langsamer als SSD
Mit dieser Home Assistant Anleitung hast du die wichtigsten Grundlagen für deinen Einstieg ins Smart Home. Ob du nur ein paar Lampen steuern willst oder komplexe Automatisierungen planst – Home Assistant bietet dir die Freiheit, dein Smart Home so zu gestalten, wie du es willst.
Radon Sensoren in Home Assistant integrieren Guide – in diesem Beitrag zeige ich dir Schritt für Schritt, wie ich die Radonsensoren Air-Q, RadonEye RD200 und EcoCube in Home Assistant eingebunden habe, um Radonwerte dauerhaft zu überwachen und mein Smart Home sicherer zu machen.
Radon ist ein radioaktives Gas, das oft unbemerkt in Kellern oder schlecht belüfteten Räumen vorkommt. Ich habe mir deshalb angeschaut, wie sich Radon Sensoren in Home Assistant integrieren lassen, um die Raumluft jederzeit im Blick zu behalten. Dabei habe ich drei verschiedene Sensoren getestet, sie in Home Assistant eingebunden, die Werte analysiert und grafisch aufbereitet – sowohl direkt in der Oberfläche als auch mit Tools wie der Apex Chart Card und Grafana.
Warum eine Radonmessung im Smart Home wichtig ist
Radon kann sich in schlecht belüfteten Räumen ansammeln und langfristig gesundheitliche Probleme verursachen. Mit einer kontinuierlichen Messung erkennst du hohe Konzentrationen frühzeitig und kannst lüften oder andere Maßnahmen ergreifen. In einem smarten System wie Home Assistant lassen sich zudem Automationen erstellen, die bei Grenzwerten warnen oder Lüfter einschalten. Deshalb ist dieser Radon Sensoren in Home Assistant integrieren Guide besonders hilfreich, um Automationen und Warnsysteme aufzubauen.
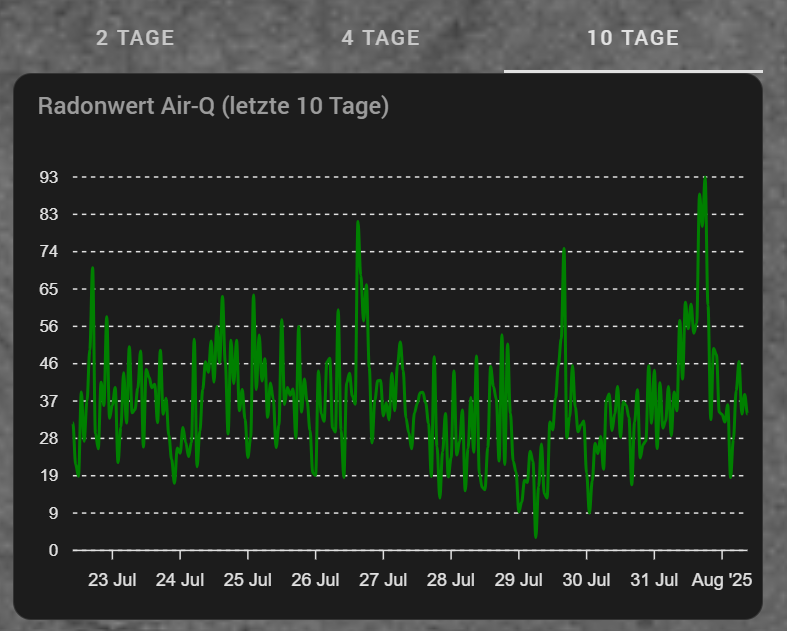
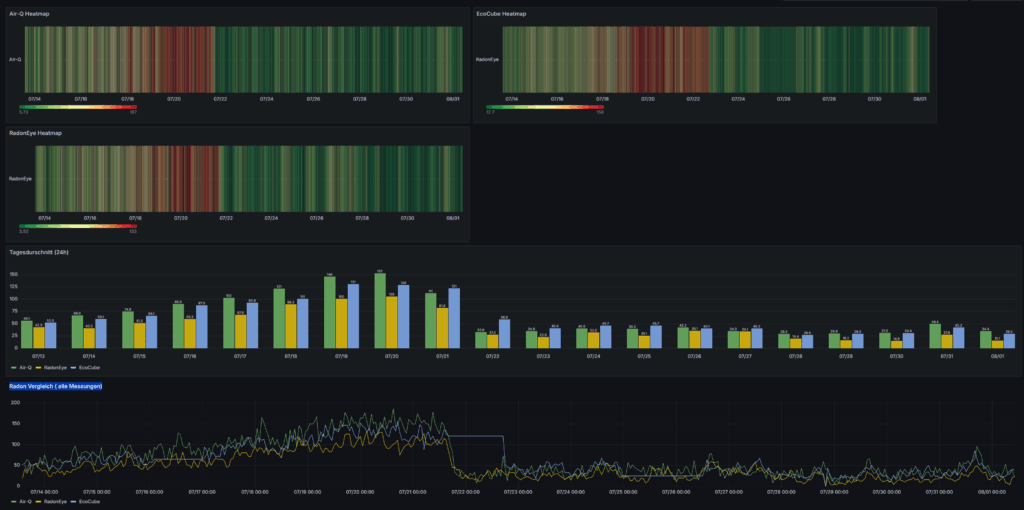
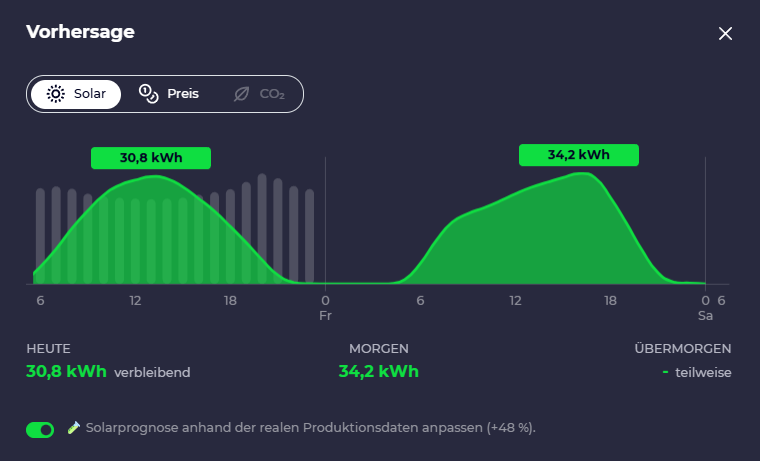
In dieser Grafik lässt sich sehr gut erkennen, wie durch gezieltes Lüften die Radon Werte sofort gesenkt werden können. Leider hatte der EcoSense Sensor genau in dieser Situation keine Werte aufgezeichnet, aber die anderen beiden Sensoren spiegeln die Situation sehr gut wieder.
Radon Sensoren in Home Assistant integrieren Guide – Überblick der getesteten Sensoren
Hinweis Transparenz: Bei den hier vorgestellten Produkten handelt es sich um Affiliate Links. Wenn ihr das Produkt über den Link kauft, erhalte ich dafür eine Vermittlungsprovision. Der Preis ändert sich für euch dabei nicht! Ich verlinke nur Produkte, die ich auch selber im Einsatz habe und empfehlen kann. Ihr unterstützt damit meine Arbeit und meinen Kanal und erlaubt es mir, einige Anschaffungen für die Erstellung der Videos zu tätigen. Vielen Dank 🙂
Bevor wir zur Integration kommen, lohnt sich ein Blick auf die drei Geräte im Test. Jedes hat seine eigenen Stärken und Schwächen.
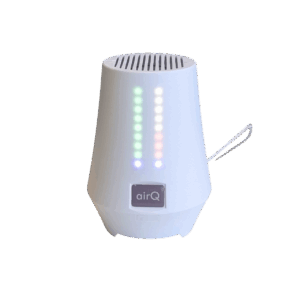
Air‑Q
Der Air‑Q‑Sensor ist in einer Science‑Variante erhältlich, die zusätzliche Messwerte wie Feinstaub liefert. Er arbeitet lokal auch ohne Cloud und bietet sehr präzise Radon‑Messungen. Allerdings ist er das teuerste Gerät im Vergleich.
Patentierter Hochpräzisions-Radon-Sensor misst zuverlässig radioaktives Gas und schützt vor Gesundheitsrisiken in Innenräumen.
Integrierte Sensoren überwachen zudem Feinstaub (PM1, PM2,5, PM10), VOC, CO2, Temperatur, Luftfeuchtigkeit und Luftdruck für ganzheitliche Raumluftanalyse.
Echtzeit-Messung mit 1,8 Sekunden Intervall sichert präzise Daten zur sofortigen Raumluftbewertung und effektiven Schadstoffkontrolle.
Benutzerfreundliche air-Q App mit KI-gestützter Analyse, individuellen Gesundheitstipps und flexibler Smart-Home-Integration, auch offline nutzbar. MQTT, IFTTT, Home Assistant und viele weitere Integrationen.
Erweiterbar mit Zusatzsensoren und professioneller Science-Option inkl. API-Zugriff und CSV-Export für intensive Datenanalyse und Anpassungen.
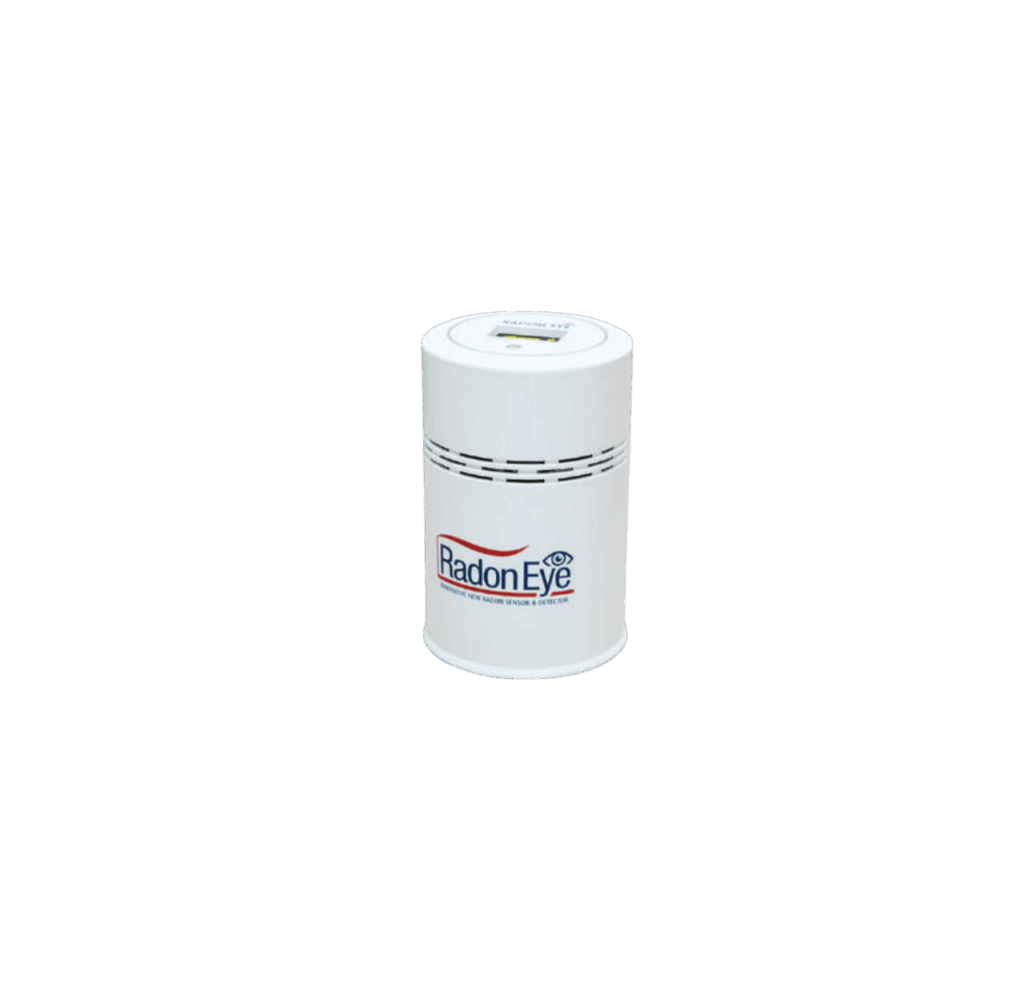
RadonEye RD200
Der RadonEye benötigt kein WLAN; er überträgt seine Daten per Bluetooth. Für Home Assistant brauchst du daher einen Bluetooth‑Proxy, z. B. den M5 Stack Atom.
✅ SCHNELL & EINFACH RADON MESSEN – Das Messgerät eignet sich bestens für die Kurz- & Langzeitmessung in privaten Wohnräumen. Es lässt sich kinderleicht bedienen & erfasst Radonwerte in Rekordzeit.
✅ RADON ECHTZEITWERT – Der schnellste Radonmesser auf dem Markt für Privatpersonen! Im Vergleich zu anderen Radon-Detektoren misst das RadonEye mit einem besonders kurzen Intervall von nur 10 Minuten.
✅ HOHE MESSGENAUIGKEIT – Radongas kann zur lebensbedrohlichen Gefahr werden. Das Gerät verwendet neuste Messtechnik & liefert präzise Messwerte. Bis zu 20x genauer als andere Radon Messgeräte.
✅ LIEFERUMFANG – Zusätzlich erhälst du eine deutsche Anleitung & Messtipps, um Radon richtig zu messen.
✌ INKL. SMARTPHONE APP – Verbinde dein Handy oder Tablet via Bluetooth mit dem RadonEye, um Werte detailliert abzulesen und zu exportieren (Excel). Bequeme & einfache Überwachung der Schutzmaßnahmen.
Mit diesem Proxy lassen sich die Daten zuverlässig an Home Assistant übermitteln.
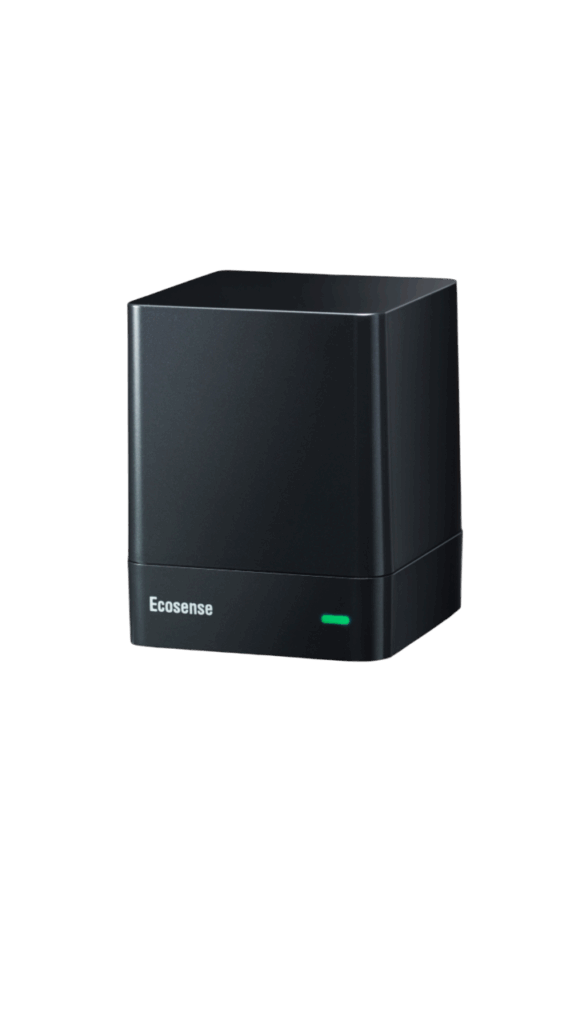
Der EcoCube ist der günstigste Sensor im Vergleich. Er erfordert jedoch eine Cloud‑Anbindung; ohne Internetverbindung gibt es derzeit Einschränkungen. Die Messwerte liegen nahe an denen des Air‑Q, jedoch treten gelegentlich Aussetzer auf.
PATENTIERTE PROFESSIONELLE HOHE ZÄHLEFFIZIENZ: Radonempfindlichkeit ist 15-mal höher als das Mindestmaß für professionelle Tests
ERSTE ERGEBNISSE IN MINUTEN: Erste Radonmessung bereits 10 Minuten nach Anschluss des Stromkabels
SCHNELLE UND PRÄZISE ERFASSUNG SCHWANKENDER RADONWERTE: Da sich Radonwerte ständig ändern, ist eine kontinuierliche Langzeitüberwachung der sicherste Schutz für Ihre Familie
INTELLIGENTE ANSICHT VON KURZ- UND LANGFRISTIGEN RADON-TRENDS: Stündliche Daten und Diagramme jederzeit und überall mit der kostenlosen Ecosense-App (iOS/Android); die Installation der App ist erforderlich, und Benutzer müssen Benachrichtigungen aktivieren, um eine erfolgreiche Verbindung herzustellen
Stellen Sie sicher, dass Ihr EcoQube sich in Reichweite Ihres WLANs befindet und mit einem 2,4-GHz-Netzwerk verbunden ist (5-GHz-Steuerung auf Dualband-Routern deaktivieren). Für Unterstützung zur Internetverbindung finden Sie den QR-Code in der Verpackung oder sehen Sie sich das Video zur WLAN-Fehlerbehebung an
Radon Sensoren in Home Assistant integrieren Guide – Schritt für Schritt erklärt
In diesem Radon Sensoren in Home Assistant integrieren Guide zeige ich dir, wie du jeden Sensor Schritt für Schritt einbindest.. Die Schritte sind ähnlich aufgebaut: Gerät einrichten, Integration hinzufügen und Daten abrufen. Für jede Integration findest du Platzhalter für die entsprechenden Code‑Snippets, die du später in Home Assistant bzw. in YAML einfügen kannst.
Air‑Q integrieren
Melde dich im Sensor an und stelle die Datenübertragung auf lokal um.
Öffne in Home Assistant Geräte & Dienste und klicke auf Integration hinzufügen.
Suche nach Air‑Q und gib IP‑Adresse sowie Passwort ein.
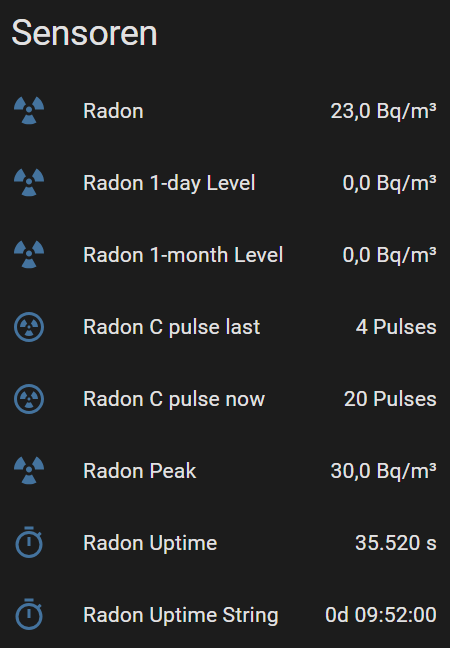
Speichere die Integration. Der Sensor erscheint sofort und liefert Radon‑Werte.
Der Air‑Q liefert sehr zuverlässige Daten; im Test gab es keine Aussetzer. Beachte jedoch den hohen Preis.
RadonEye RD200 integrieren
Für den RD200 ist ein Bluetooth‑Proxy erforderlich. Unser Tipp: der M5 Stack Atom* – einen Link zum Video mit den ESP‑Grundlagen findest du hier.
Konfiguriere den Bluetooth‑Proxy
Installiere über HACS die RD200‑Integration. Füge das Repository hinzu und starte Home Assistant neu.
Unter Geräte & Dienste taucht die RD200‑Integration auf. Klicke auf Einrichten, wähle Standort und speichere. Nun siehst du die Radon‑Werte in Home Assistant.
Der RD200 misst zuverlässig. Allerdings ist die Verbindung über Bluetooth weniger komfortabel, wenn du die App verwenden möchtest.
Ecosense EcoCube integrieren
Die EcoCube‑Integration funktioniert über die Cloud, daher musst du deine Anmeldedaten angeben. Die notwendigen Dateien bekommst du über HACS.
Starte Home Assistant neu und wähle unter Integration hinzufügen die EcoCube-Integration.
Gib Benutzername und Passwort ein und wähle Becquerel pro Kubikmeter als Einheit.
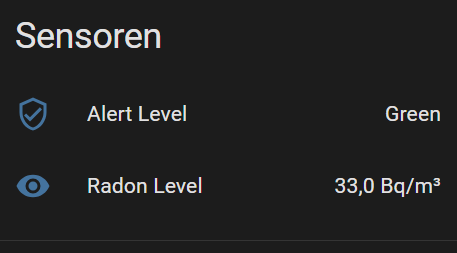
Nach der Einrichtung erscheint der Sensor mit Radon‑Wert und Alarmstufe.
Beachte, dass EcoCube gelegentlich Verbindungsprobleme hat und die Cloud‑Anbindung für viele Nutzer ein Nachteil ist.
Radonwerte visualisieren und analysieren
Mit den richtigen Dashboards kannst du deine Radon‑Daten anschaulich darstellen.
Apex Chart Card und Tabbed Cards
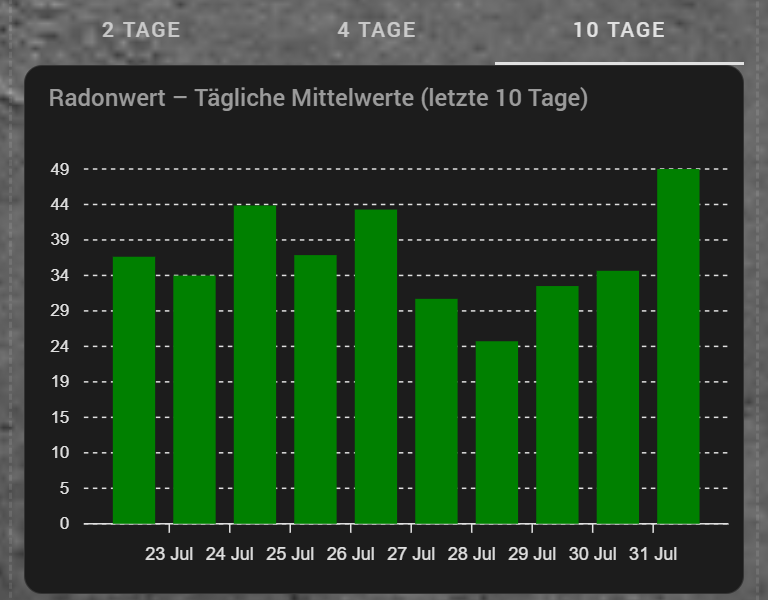
In Home Assistant lassen sich Radon‑Werte mit der Apex Chart Card grafisch aufbereiten. Du kannst Zeiträume wie 2, 4 oder 10 Tage wählen und Schwellenwerte als Linien einfügen. Eine Ampel zeigt dir an, ob der Wert unter 100 Bq/m³ (grün), zwischen 100 und 200 Bq/m³ (gelb) oder darüber (rot) liegt.
Für Langzeitstatistiken empfiehlt sich die Kombination aus InfluxDB und Grafana. Diese Lösung speichert große Datenmengen effizient und bietet vielfältige Auswertungen. Der Autor verlinkt ein eigenes Video zur Grafana‑Integration. Details findest du im Beitrag Grafana mit Home Assistant.
Fazit – Welcher Radon Sensor ist der richtige?
Wenn du noch unsicher bist, welcher Sensor für dich der richtige ist – dieser Radon Sensoren in Home Assistant integrieren Guide hilft dir bei der Entscheidung.
Alle drei Sensoren liefern brauchbare Messergebnisse. Der Air‑Q überzeugt mit sehr hoher Qualität, lokaler Datenverarbeitung und zusätzlichen Sensoren, ist aber teuer. Der RadonEye RD200 bietet ein gutes Preis‑Leistungs‑Verhältnis, erfordert jedoch einen Bluetooth‑Proxy. Der Ecosense EcoCube ist günstig und misst zuverlässig, benötigt aber die Cloud. Welche Lösung du wählst, hängt daher von deinem Budget und deinen Anforderungen ab.
Wenn du tiefer einsteigen möchtest, schau dir auch meine weiteren Blogbeiträge an. Dort findest du Video‑Tutorials zur Einrichtung, ESP, HACS‑Installation und zu Grafana. Hinterlasse gerne einen Kommentar, wenn du Fragen hast oder eigene Erfahrungen teilen möchtest – so hilfst du der Community und trägst zu einem sicheren Zuhause bei.
Teile gern deine Erfahrungen in den Youtube Kommentaren und sag mir, wie dir der Radon Sensoren in Home Assistant integrieren Guide geholfen hat.
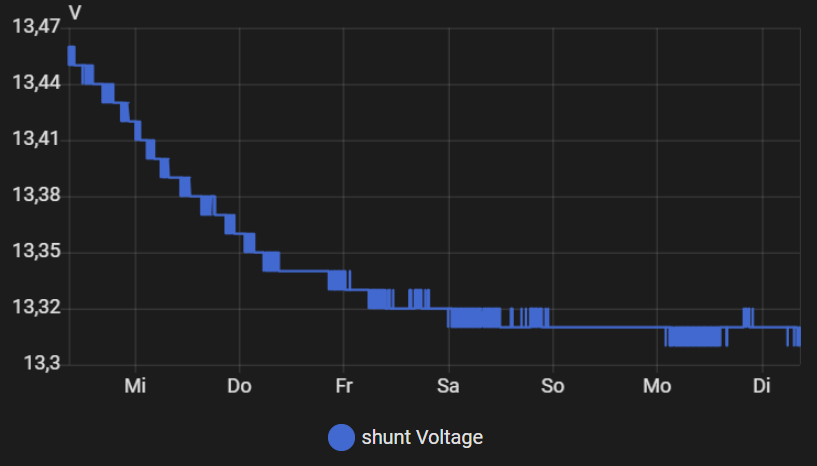
Als Technikliebhaber und Camper habe ich mich schon oft gefragt, wie viel Strom eigentlich noch in meiner Batterie steckt. Die Spannung ist ein guter Anhaltspunkt, aber sie verrät nicht immer, wie viel Kapazität wirklich übrig ist. Deshalb habe ich mich entschieden, den Victron SmartShunt zu installieren. Dieser kleine Helfer ersetzt klassische Batteriemonitore, misst Strom und Spannung und berechnet daraus den Ladezustand. In diesem Blogbeitrag nehme ich dich mit auf meine Reise und erkläre dir Schritt für Schritt, wie auch du den Victron SmartShunt installieren kannst, um deine Batterie in Camper, Auto oder Haus zuverlässig zu überwachen.
Ich arbeite mich dabei vom grundsätzlichen Verständnis bis zur vollständigen Integration in Home Assistant vor. Du erhältst Tipps zu verschiedenen Ausführungen des Shunts, zur Verkabelung, zur Einrichtung der Victron‑App und zur Nutzung eines Bluetooth‑Proxys. Außerdem zeige ich dir, wie ich den Victron SmartShunt installierenund anschließend in Home Assistant visualisieren konnte, inklusive einer hübschen Batterieanzeige und nützlichen Automatisierungen.
Warum den Victron SmartShunt installieren?
Als Erstes stellt sich die Frage: Warum sollte ich überhaupt einen Victron SmartShunt installieren? Die Antwort liegt in der präzisen Messung und Visualisierung. Anders als simple Spannungsmesser misst der SmartShunt nicht nur die Spannung, sondern auch den Stromfluss und berechnet daraus den Ladezustand der Batterie. In meinem Camper ermöglicht mir das eine verlässliche Autarkieplanung. Im Auto sehe ich, ob die Starterbatterie bei langen Standzeiten schwächelt, und im Haus kann ich Speicherbatterien von Solaranlagen überwachen. Ein weiterer Vorteil: Durch Bluetooth‑Funktionalität kann ich die Werte drahtlos auslesen und in mein Smart‑Home integrieren.
Wenn du regelmäßig campst oder ein autarkes Setup betreibst, wirst du es zu schätzen wissen, jederzeit zu wissen, wie viel Restkapazität zur Verfügung steht. Auch beim Überwintern des Autos kann es sinnvoll sein, den Victron SmartShunt zu installieren, damit die Batterie nicht unbemerkt tiefentladen wird. In Kombination mit Home Assistant ermöglicht der Shunt außerdem schicke Dashboards und Automationen – etwa eine Benachrichtigung, wenn der Ladezustand kritisch wird.
Funktionsweise des Victron SmartShunt
Bevor ich den Victron SmartShunt installieren konnte, habe ich mich mit seiner Funktionsweise beschäftigt. Der SmartShunt wird in die Masseleitung der Batterie eingebaut und misst den Strom, der hinein- und herausfließt. Zusammen mit der Batteriespannung kann er so die entnommene und zugeführte Energie berechnen und daraus den State of Charge (SoC) ermitteln. Der Vorteil: Du brauchst kein zusätzliches Display, denn die Daten lassen sich per Bluetooth oder über den integrierten VE.Direct‑Port auslesen. Ich habe mich für die Bluetooth Variante entschieden, da sie mir eine nahtlose und einfache Installation in Home Assistant ermöglicht.
Es gibt unterschiedliche Varianten: 300 A, 500 A und 1000 A. Für einen Camper reicht die 300‑A‑Variante zumeist völlig aus. In Hausinstallationen oder bei großen Off‑Grid‑Systemen können auch die größere Varianten sinnvoll sein. Bevor du den Victron SmartShunt* installierenwillst, solltest du dir also überlegen, welche Ströme in deinem Setup fließen. Achte darauf, dass die maximale Stromstärke der Verbraucher und der Ladevorgänge im Rahmen des Shunts liegt.
VICTRON ENERGY BATTERIEWÄCHTER: Victron Energy SmartShunt zeigt den Ladezustand der Batterie in % an und fungiert als Ladezustandsanzeige für Ihre Batterien
ALL-IN-ONE-BATTERIEMONITOR: Victron Energy Smartshunt ist ein hervorragender, einfach einzurichtender All-in-One-Batteriewächter. Es zeichnet Spannung, Strom, Energie und verbleibende Zeit und vieles mehr auf.
BLUETOOTH: Verbinden Sie Victron Energy Shunt über Bluetooth mit Ihrem Telefon oder Tablet und ändern Sie einfach die Einstellungen oder überwachen Sie Ihre Batterien – sparen Sie Platz, indem Sie kein eigenes Display verwenden
VERBINDEN SIE VICTRON ENERGY GX: Victron Energy GX-Gerät mit einem VE.Direct-Kabel an, um eine zweite Batterie, den Mittelpunkt der Bank oder die Temperatur zu überwachen (möglicherweise sind zusätzliche Teile erforderlich)
INSTALLATION: Eine unsachgemäße Installation kann gefährlich sein. Wenden Sie sich an einen Fachmann und befolgen Sie bei der Installation die elektrischen Vorschriften.
Vorbereitung für die Installation des Victron SmartShunt
Auswahl des richtigen Modells und Zubehörs
Bevor ich den Victron SmartShunt installieren konnte, musste ich das richtige Modell auswählen. Für mich war die 500‑A‑Variante passend ( nicht wegen der Leistung, sondern eher, da sie schneller lieferbar war 🙂 ) . Als Zubehör brauchst du außerdem passende Ringkabelschuhe mit einem auf die benötigte Leistung ausgelegten Kabelquerschnitt für die „Minus“ Seite (müssen dazugekauft werden), um die Kabel sicher anzuschließen, sowie eine geeignete Sicherung für den Pluspol ( wird mitgeliefert). Der SmartShunt wird zwar auf der Minus-Seite verbaut, aber der Pluspol des Geräts muss zur Stromversorgung angeschlossen werden.
Für die spätere Integration in Home Assistant habe ich mir außerdem einen ESP32* besorgt. Dieses kleine Modul dient als Bluetooth‑Proxy und leitet BLE‑Daten ins WLAN weiter. Dazu komme ich später noch.
Bevor du mit der Verkabelung beginnst und den Victron SmartShunt installieren möchtest, solltest du sicherstellen, dass deine Batterie spannungsfrei ist. Entferne gegebenenfalls die Sicherungen oder trenne das System vom Netz. Arbeite mit isoliertem Werkzeug und vermeide Kurzschlüsse. Eine saubere Installation erhöht nicht nur die Sicherheit, sondern sorgt auch für präzise Messwerte.
Verkabelung und Einbau des SmartShunt
Die Verkabelung war einfacher als gedacht, aber dennoch sind ein paar Dinge zu beachten. Um den Victron SmartShunt installieren zu können, wird der Shunt in die Minusleitung der Batterie eingebaut. Alle Verbraucher müssen hinter dem Shunt angeschlossen werden, damit der Stromfluss korrekt gemessen wird.
Minuspol trennen: Ich habe zunächst den Minuspol der Batterie abgeklemmt.
Shunt anschrauben: Der SmartShunt besitzt zwei große Schraubanschlüsse. Eine Seite (Batterieseite) wird direkt mit dem Minuspol der Batterie verbunden, die andere (Lastseite) führt zu den Verbrauchern.
Pluspol des Shunts: Am Gehäuse befindet sich eine kleine Schraubklemme für den Pluspol. Hier habe ich eine Leitung von der Batterie über eine Sicherung angeschlossen. Das versorgt die Elektronik des Shunts.
Hinweis: Achte unbedingt darauf, die Ein- und Ausgangsseite nicht zu vertauschen. Wenn du den Victron SmartShunt installieren möchtest und die Anschlüsse vertauschst, wird der Stromfluss invertiert – die Messwerte sind dann negativ. Du kannst es zwar softwareseitig korrigieren, aber besser ist eine korrekte Installation.
Victron SmartShunt installieren in der Victron‑App
Nachdem der Shunt angeschlossen war, habe ich die Victron‑App aus dem App Store heruntergeladen. Mit ihr lässt sich der SmartShunt via Bluetooth konfigurieren. Der Pairing‑Code lautet standardmäßig 000000, falls du das Gerät noch nicht geändert hast.
Pairing und erste Schritte
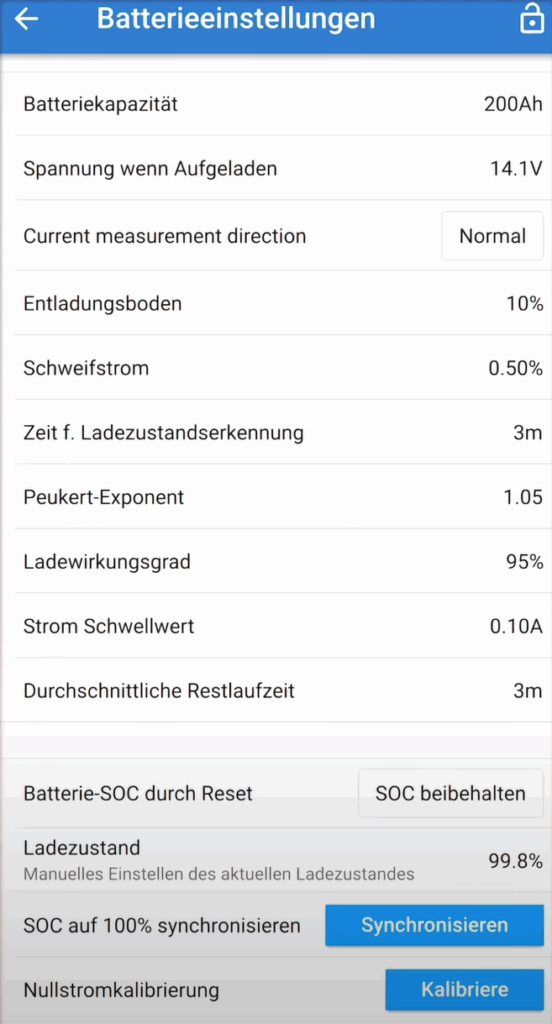
Nach dem Öffnen der App hat die App den SmartShunt automatisch gefunden. Ich habe das Gerät ausgewählt und die Verbindung hergestellt. Um den Victron SmartShunt zu installieren, musste ich einige grundlegende Einstellungen vornehmen:
Batterie‑Kapazität: Hier habe ich den Wert meiner LiFePo4‑Batterie (200 Ah) eingetragen.
Ladeschluss‑Spannung: In meinem Fall 14,1 V.
Entladeschwelle: Ich habe 10 % gewählt, um die Batterie zu schützen.
Schweifstrom: 0,5 %, damit der Shunt erkennt, wann die Batterie voll ist.
Ladewirkungsgrad: 95 %.
SOC‑Reset: Es gibt die Möglichkeit, den SoC manuell zurückzusetzen. Das ist nützlich nach einem vollständigen Ladezyklus.
Hinweis: Verwende die zu deiner Batterie passenden Einstellungen. Die hier gezeigten Settings dienen nur als Beispiel!
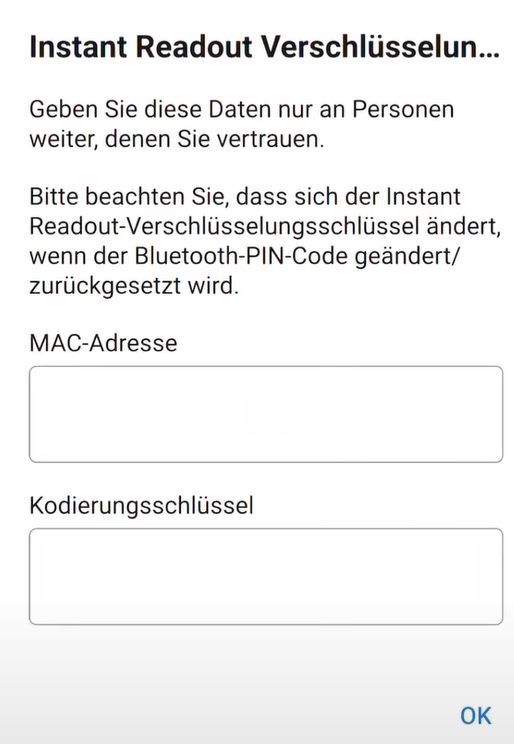
Die App zeigt auch die MAC‑Adresse und den Verschlüsselungkey an. Letzteren habe ich mir abgeschrieben, denn für die Integration in Home Assistant benötige ich die sogenannte Advertisement‑Key, um die verschlüsselten Daten zu entschlüsseln. Beim Victron SmartShunt installieren solltest du dir diesen Schlüssel unbedingt notieren.
Victron SmartShunt installieren und Bluetooth‑Proxy nutzen
Um die Daten des SmartShunts im ganzen Haus verfügbar zu machen, reicht die Bluetooth‑Verbindung allein oft nicht aus, insbesondere wenn der Camper oder die Garage etwas weiter entfernt ist. Deshalb habe ich einen ESP32 als Bluetooth‑Proxy eingerichtet. Damit lassen sich BLE‑Geräte wie der SmartShunt über das WLAN ins Smart‑Home integrieren.
ESP32 als Bluetooth‑Proxy einrichten
Zuerst habe ich den ESP32 per USB an meinen Computer angeschlossen und die ESP‑Home‑Bluetooth Proxy- Installer ‑Seite geöffnet. Über den Wizard lässt sich mit wenigen Klicks ein generisches Bluetooth‑Proxy‑Image flashen. Nachdem der Flash‑Vorgang abgeschlossen war, habe ich den ESP32 mit meinem WLAN verbunden.
Anschließend habe ich den ESP32 direkt mit meinem Home Assistant verbunden. Im Lovelace‑Dashboard erschien ein neues Gerät, das ich „Bluetooth Proxy Video WW“ genannt habe. Nun ist der Victron SmartShunt im wahrsten Sinne des Wortes bereit für die nächste Stufe.
Tipp: Du kannst mehrere Bluetooth‑Proxies im Haus verteilen, wenn du noch andere BLE‑Sensoren hast. Sie erweitern die Reichweite und bringen die Daten zuverlässig ins Netzwerk.
Victron SmartShunt installieren in Home Assistant
Der spannendste Teil für mich war die Integration in Home Assistant. Um die verschlüsselten Daten des SmartShunts auswerten zu können, braucht man eine passende Integration.
HACS installieren und Victron BLE Integration hinzufügen
Danach musste Home Assistant neu gestartet werden. Unter „Einstellungen → Geräte und Dienste“ konnte ich „Victron BLE“ als neue Integration auswählen. Es wurde der SmartShunt automatisch gefunden, und ich musste nur noch den vorher notierten Advertisement‑Key eingeben. Hier ist eine typische YAML‑Struktur, mit der der Schlüssel hinterlegt wird:
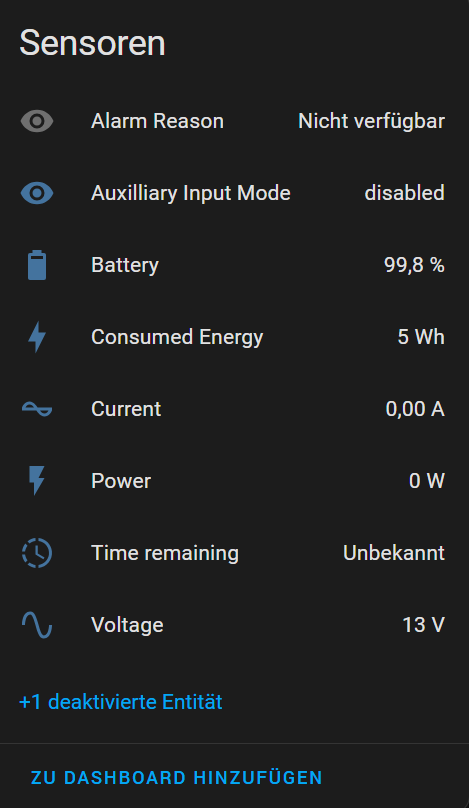
Nach dem Speichern erschienen neue Sensoren in meinem Home Assistant: Batteriespannung, Ladestrom, Ladezustand und vieles mehr. Damit war der Schritt erledigt und der Victron SmartShunt erfolgreich in Home Assistant integriert.
Dashboard mit Batterieanzeige erstellen
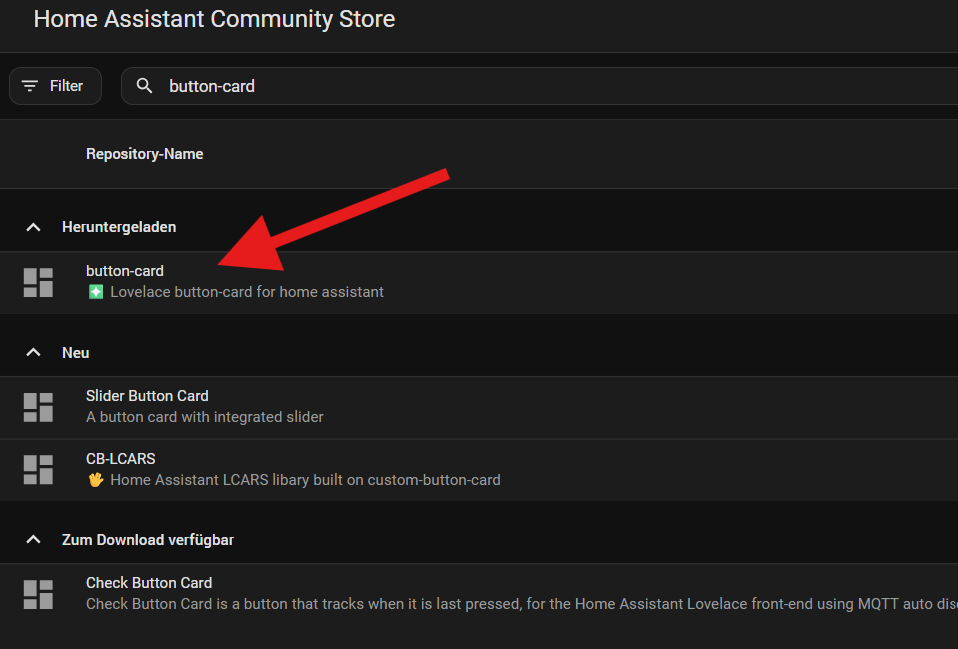
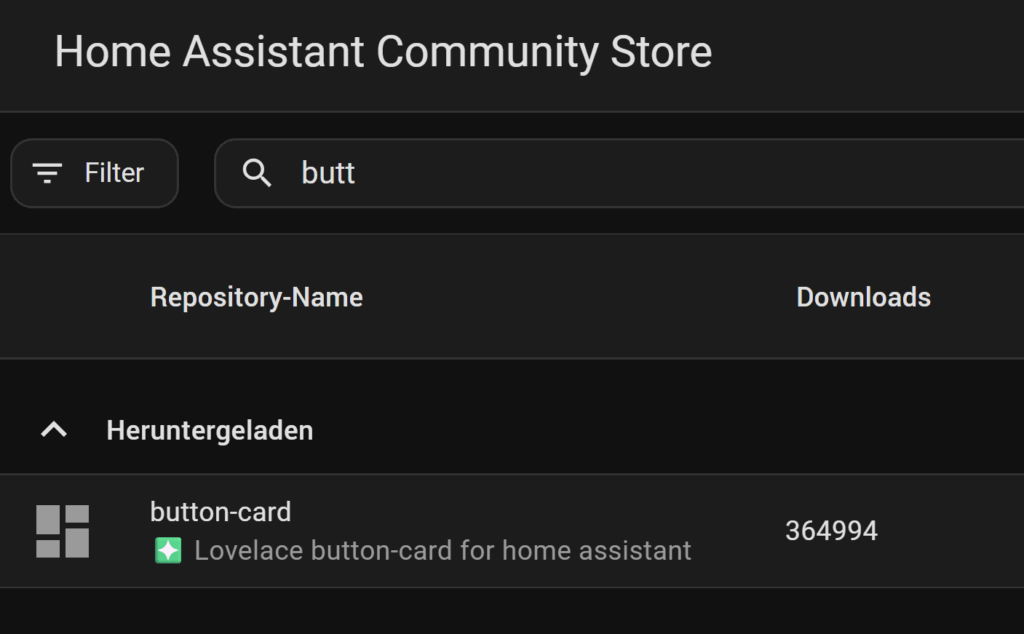
Jetzt wollte ich die Daten nicht nur sehen, sondern auch ansprechend präsentieren. Dafür eignet sich die Button‑Card aus HACS. Mit ihr lässt sich eine Batterieanzeige gestalten, die ihre Farbe abhängig vom Ladezustand ändert.
Button‑Card konfigurieren
Ich habe eine neue Button‑Card im Dashboard erstellt und folgende Konfiguration verwendet:
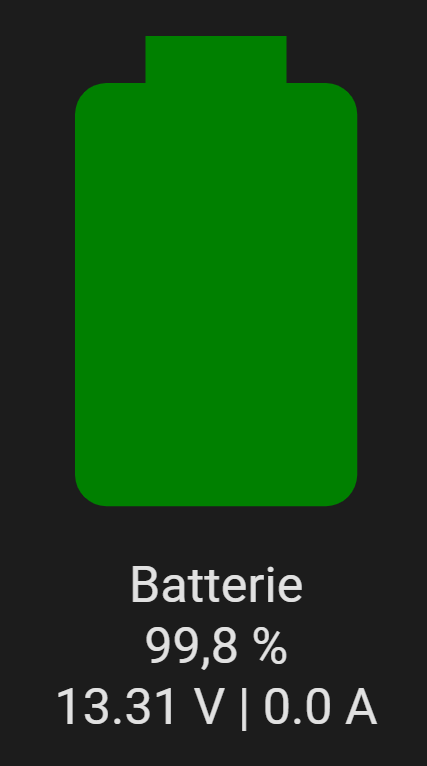
Diese Card zeigt mir den aktuellen Ladezustand, die Spannung und den Strom an. Die Farbe des Symbols wechselt bei 20 % auf Rot und bei 50 % auf Orange. Für mich war es wichtig, beim Victron SmartShunt installieren auch eine optische Rückmeldung zu haben, wann die Batterie sich dem Entladungsbereich nähert.
Automatisierungen und Benachrichtigungen
Ein weiterer großer Vorteil beim Victron SmartShunt installieren ist die Möglichkeit, Automatisierungen in Home Assistant zu nutzen. Ich wollte eine Benachrichtigung bekommen, sobald der Ladezustand unter 20 % fällt. Dafür habe ich eine einfache Automation erstellt:
Mit dieser Automation bekomme ich nach einer Minute unterhalb des Schwellenwerts eine Push‑Nachricht. Dadurch kann ich reagieren, bevor die Batterie zu tief entladen wird. Beim Victron SmartShunt installieren gehört für mich eine solche Benachrichtigung unbedingt dazu.
Verlaufdiagramme und Datenanalyse
Neben der aktuellen Anzeige möchte ich auch wissen, wie sich der Ladezustand über längere Zeit verändert. Home Assistant bietet eine Verlaufdiagramm‑Karte. Ich habe für meine Batterie ein Diagramm angelegt, das die letzten 168 Stunden (sieben Tage) darstellt. So kann ich sehen, wann ich besonders viel Strom verbraucht habe und wie sich das Laden und Entladen verhält.
Es wäre auch möglich, die Daten in Grafana auszuwerten oder in ein anderes Dashboard zu exportieren. Das bietet sich an, wenn du den Victron SmartShunt und die Daten langfristig beobachten möchtest.
Alternativ lassen sich Daten auch über Grafana und Influxdb in Home Assistant visualisieren. Darauf bin ich in einem anderen Blog Beitrag genauer eingegangen.
Weitere Anwendungsmöglichkeiten des Victron SmartShunt
Der Einsatz beschränkt sich nicht nur auf Camper. Auch im Auto kann man den Victron SmartShunt installieren, um die Starterbatterie zu überwachen. So weißt du immer, ob sie nach längerer Standzeit noch genügend Kapazität hat. Im Haus lässt sich der Shunt an Solarspeicher anschließen, um die Effizienz der Anlage zu überwachen.
Ein weiterer Vorteil: Über den VE.Direct‑Port kannst du den SmartShunt auch mit dem Cerbo GX oder anderen Victron‑Systemen verbinden. Das habe ich bisher nicht ausprobiert, es steht aber auf meiner To‑Do‑Liste. Wenn du dazu einen Erfahrungsbericht wünschst, lass es mich in den Kommentaren wissen.
Fazit: Lohnt es sich, den Victron SmartShunt zu installieren?
Für mich war es eine der lohnendsten Erweiterungen meines Campers. Seitdem ich den Victron SmartShunt installieren und in Home Assistant integrieren konnte, habe ich jederzeit einen Überblick über den Ladezustand meiner Batterie. Die Kombination aus präzisen Messwerten, ansprechender Visualisierung und praktischen Benachrichtigungen gibt mir die Sicherheit, länger autark zu bleiben und die Batterie vor Tiefentladung zu schützen.
Ich hoffe, diese ausführliche Anleitung hilft dir weiter. Falls du Fragen hast oder Anmerkungen, hinterlasse gerne einen Kommentar bei Youtube. Viel Spaß beim Basteln!
Wenn plötzlich Licht und WLAN nicht mehr funktionieren, weil der MQTT-Broker down ist – dann ist es zu spät. Ich zeige dir, wie du mit Uptime Kuma Home Assistant zuverlässig überwachst und automatisch informiert wirst, wenn etwas schiefläuft.
🔍 Warum ich Uptime Kuma Home Assistant nutze
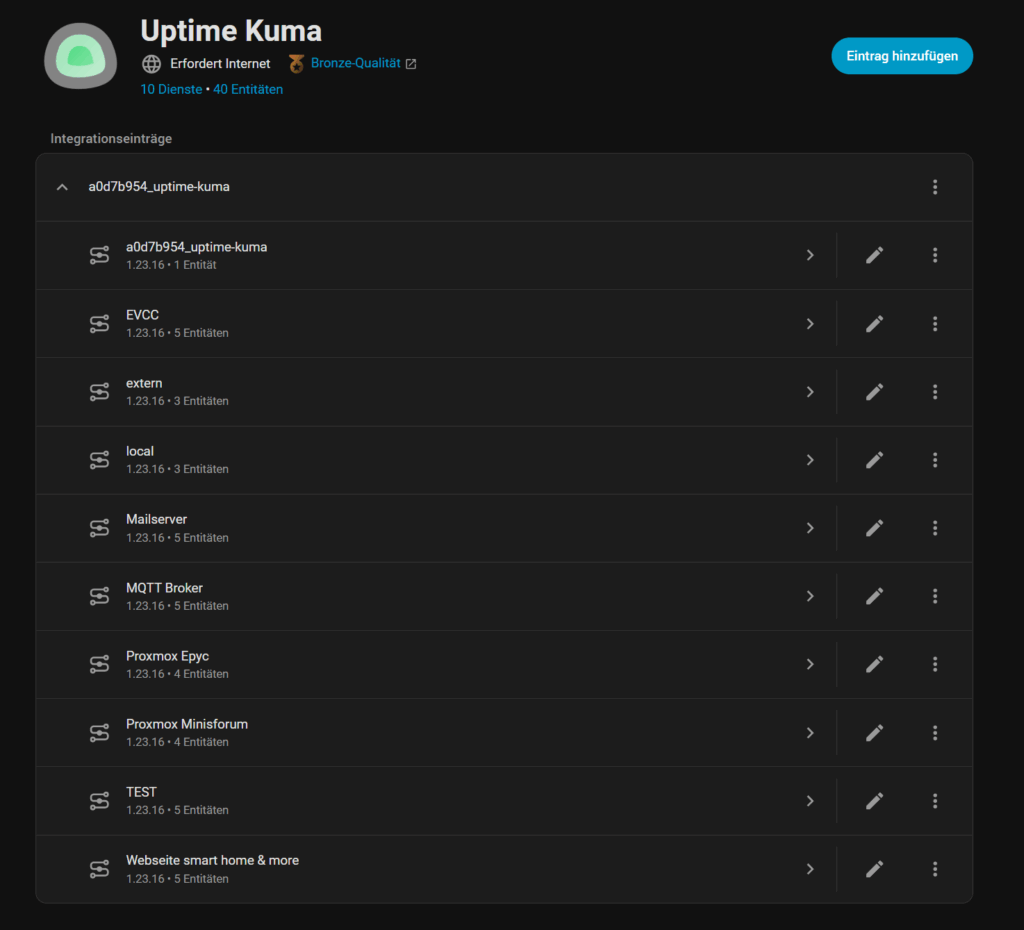
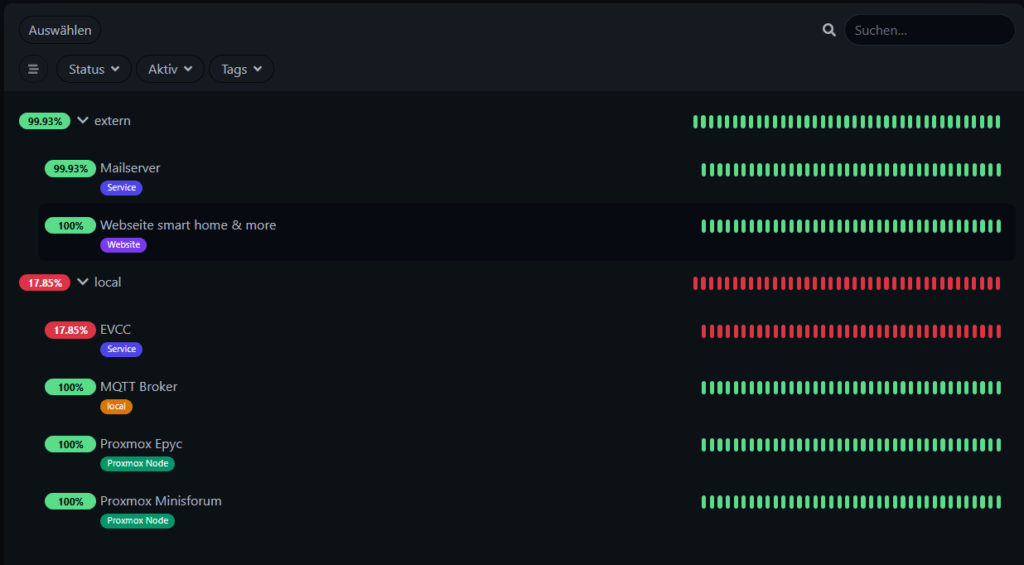
In meinem Smart Home gibt es viele Dienste: MQTT, EVCC, mein Blog, das Forum und mein Mailserver. Und alle sind kritisch. Was passiert, wenn einer davon ausfällt? Richtig – vieles funktioniert nicht mehr. Genau hier kommt Uptime Kuma Home Assistant ins Spiel.
Das kostenlose Monitoring-Tool Uptime Kuma ist nicht nur unglaublich einfach zu bedienen – es ist mittlerweile auch direkt in Home Assistant integrierbar. Dank der neuen Funktion im August 2025 Update werden Sensoren automatisch erkannt und eingebunden.
⚙️ Uptime Kuma in Home Assistant installieren
Die Installation geht schnell – ich führe dich durch jeden Schritt:
Add-On Store öffnen
Nach Uptime Kuma suchen
Installieren und starten
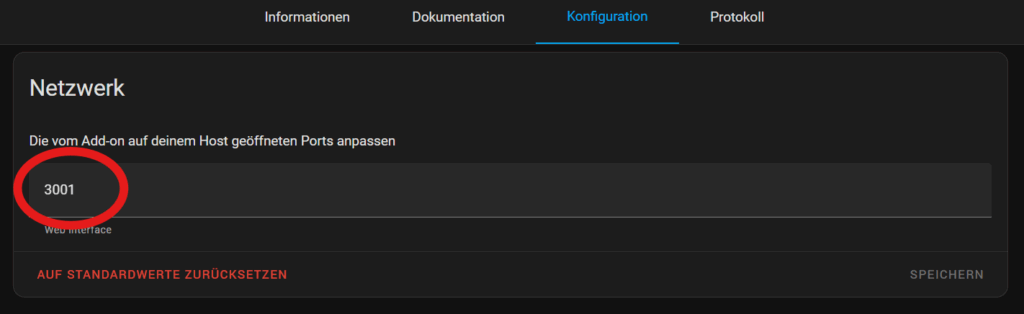
Wichtig: Achte auf Portkonflikte – z. B. nutzt Grafana bei mir bereits Port 3001, daher musste ich Kuma auf 3002 umstellen.
🧪 Ersten Dienst überwachen – HTTPS-Monitor anlegen
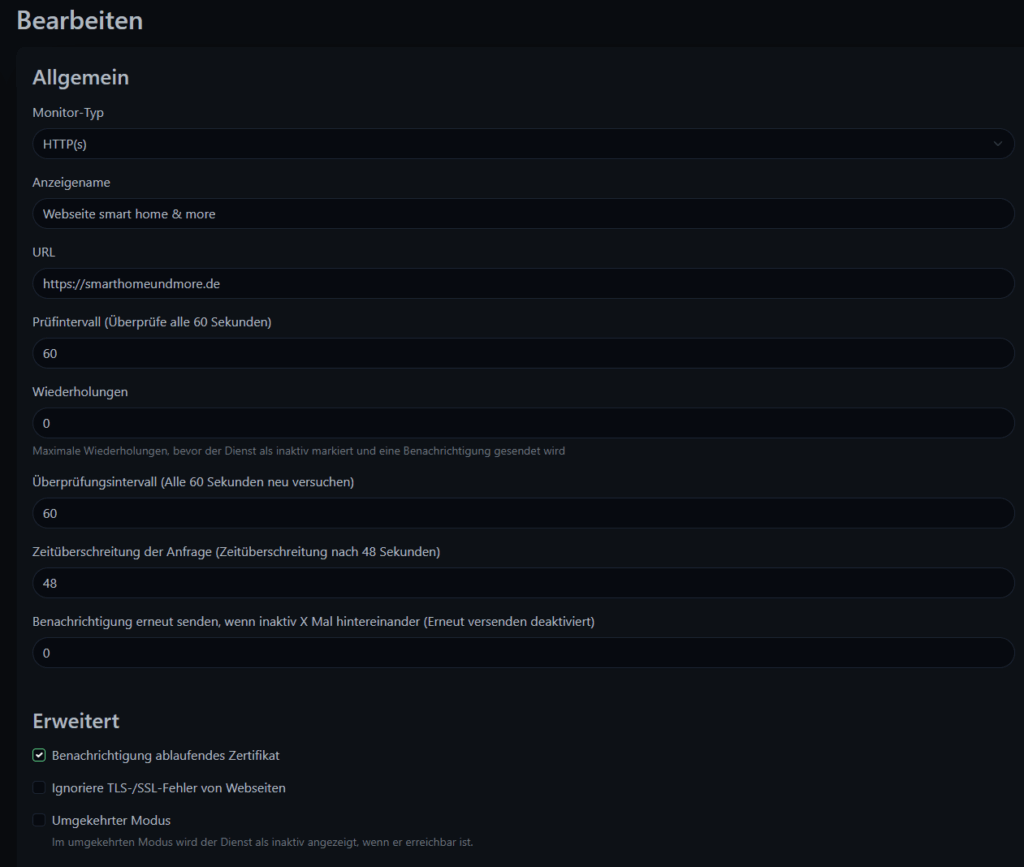
Ich beginne meist mit einem einfachen Monitor für meine eigene Website:
Typ: HTTPS
URL:https://smarthomeundmore.de
Zertifikatsüberwachung aktivieren
Gruppe: extern
Tag: Webseite
Mit einem Klick auf Speichern siehst du bereits ein erstes Diagramm zur Erreichbarkeit deiner Website.
📡 MQTT-Dienste überwachen mit Uptime Kuma Home Assistant
Jetzt wird’s spannender: MQTT ist das Herzstück vieler Home Assistant Setups.
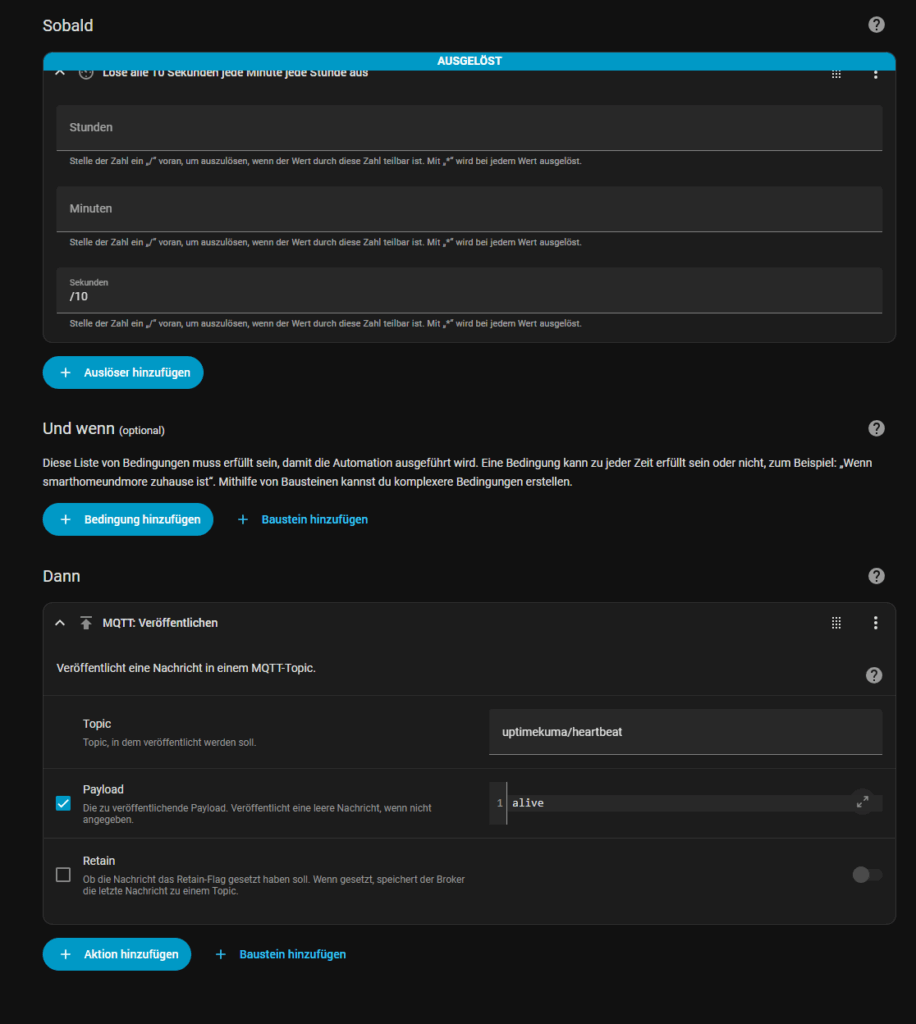
🔧 Automatisierung vorbereiten
Ich lasse Home Assistant alle 10 Sekunden eine MQTT-Nachricht senden ( es genügen auch alle 60 Sekunden):
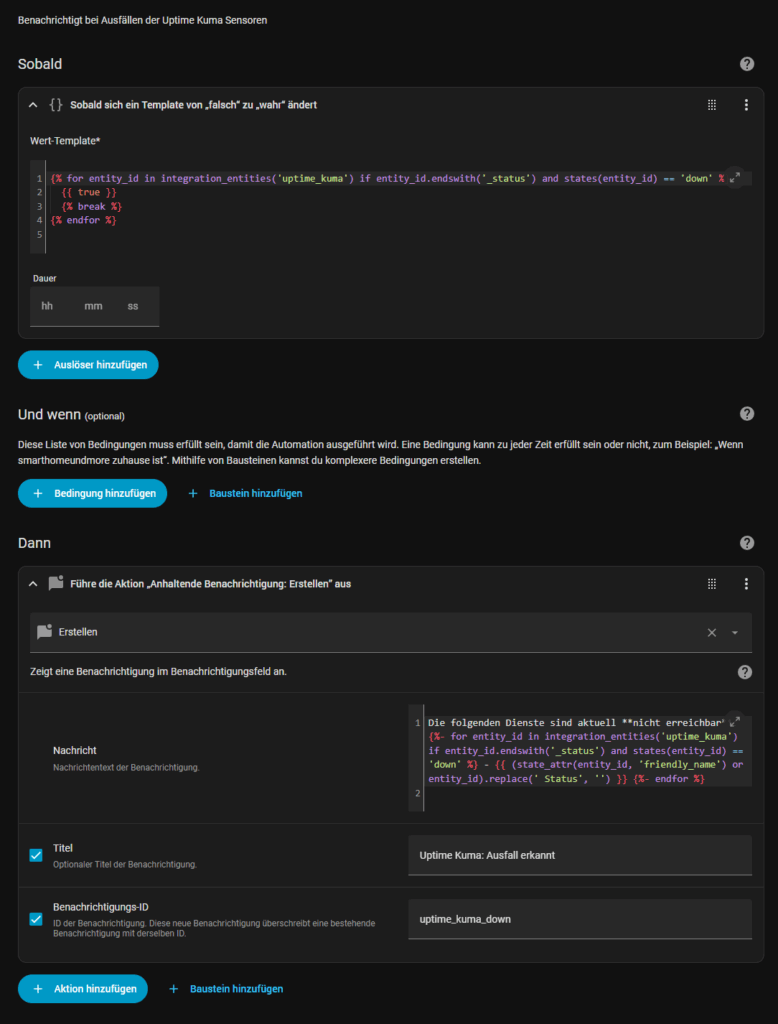
Besonders bei Diensten wie meinem Blog, Forum oder Mailserver ist mir wichtig, sofort zu erfahren, wenn etwas ausfällt. Dank der neuen Home Assistant Integration brauche ich keine Workarounds mehr – die Sensoren werden automatisch eingebunden, gruppiert und getrackt.
Radon messen im Smart Home – Geräte, Analyse und Home‑Assistant‑Integration
Radon ist ein radioaktives Edelgas, das aus dem Zerfall von Uran im Erdreich entsteht und durch Risse oder Undichtigkeiten in Gebäudefundamenten in unsere Wohnräume eindringen kann. Das Gas ist unsichtbar und geruchlos; die meisten Betroffenen bemerken seine Anwesenheit erst durch Messungen. Studien zeigen, dass Radon nach dem Rauchen eine der häufigsten Ursachen für Lungenkrebs in Deutschland ist – es wird geschätzt, dass rund fünf Prozent aller Lungenkrebstodesfälle im Land auf eine erhöhte Radonbelastung zurückzuführen sind. Mit der Verabschiedung der Strahlenschutzverordnung (StrlSchV) zum Jahresende 2018 gibt es in Deutschland erstmals verbindliche Referenzwerte für Innenräume: Für Neu‑ und Altbauten gilt im Jahresmittel ein Referenzwert von 300 Becquerel pro Kubikmeter (Bq/m³). Die Weltgesundheitsorganisation (WHO) und auch das Bundesamt für Strahlenschutz (BfS) empfehlen sogar, die Radonkonzentration möglichst unter 100 Bq/m³ zu halten. Ab etwa 100 Bq/m³ steigt das Risiko, an Lungenkrebs zu erkranken, deutlich an; bei 100 Bq/m³ erhöht sich das Risiko um bis zu 16 Prozent.
Patentierter Hochpräzisions-Radon-Sensor misst zuverlässig radioaktives Gas und schützt vor Gesundheitsrisiken in Innenräumen.
Integrierte Sensoren überwachen zudem Feinstaub (PM1, PM2,5, PM10), VOC, CO2, Temperatur, Luftfeuchtigkeit und Luftdruck für ganzheitliche Raumluftanalyse.
Echtzeit-Messung mit 1,8 Sekunden Intervall sichert präzise Daten zur sofortigen Raumluftbewertung und effektiven Schadstoffkontrolle.
Benutzerfreundliche air-Q App mit KI-gestützter Analyse, individuellen Gesundheitstipps und flexibler Smart-Home-Integration, auch offline nutzbar. MQTT, IFTTT, Home Assistant und viele weitere Integrationen.
Erweiterbar mit Zusatzsensoren und professioneller Science-Option inkl. API-Zugriff und CSV-Export für intensive Datenanalyse und Anpassungen.
Präzise Radon-Messung mit patentiertem Sensor plus 10 weitere Sensoren überwachen Feinstaub, VOC, CO2, Temperatur, Luftfeuchtigkeit und Luftdruck für umfassende Raumluftqualität.
Echtzeit-Luftqualitätsanalyse mit ca. 1,8 Sekunden Intervall liefert zuverlässige Daten für gesundes Wohnen und Arbeiten, auch ohne Internetverbindung
Intuitive App für iOS und Android mit detaillierten Diagrammen, KI-gestützten Analysen und individuellen Tipps zur Verbesserung der Luftqualität.
Flexible Erweiterbarkeit mit zusätzlichem Sensor und Science-Option für API-Zugriff, CSV-Export und individuelle Datenanpassung. IFTTT, MQTT, Home Assistant und viele weitere Integrationen.
Ideal für private Haushalte, Unternehmen, Forscher und Smart Home Nutzer zur dauerhaften Überwachung, Gefahrenwarnung und Verbesserung des Raumklimas.
Radon entsteht im natürlichen Zerfallsprozess von Uran und Radium. Im Boden bildet sich Radongas, das durch Diffusion und Unterdruck in den Oberboden aufsteigt. In Innenräumen kann es sich dann ungehindert anreichern, wenn es unbemerkt über Spalten, Fugen, Rohrdurchführungen oder poröse Materialien in Keller und Erdgeschoss eindringt. Besonders im Winter, wenn beheizte Innenräume einen höheren Unterdruck erzeugen und die Lüftung oft reduziert wird, steigt das Risiko für erhöhte Radonkonzentrationen, wie auch im Video erläutert wird. Die geografische Lage spielt ebenfalls eine Rolle: Die Radonkarte des Bundesamts für Strahlenschutz (BfS) zeigt, dass vor allem Süd‑ und Ostdeutschland, das Erzgebirge, der Schwarzwald oder ehemalige Bergbauregionen erhöhte Werte aufweisen. Dennoch können auch in radonarmen Gebieten hohe Werte auftreten, da die Werte von Gebäude zu Gebäude stark variieren.
Gesundheitliche Risiken und Grenzwerte
Radon zerfällt zu radioaktiven Tochterprodukten, die sich an kleinste Staubpartikel binden. Beim Einatmen dieser Partikel können die Radonfolgeprodukte in der Lunge verbleiben und das umliegende Gewebe durch ionisierende Strahlung schädigen. Epidemiologische Studien und Erfahrungen aus dem Bergbau belegen, dass Radon ein signifikanter Risikofaktor für Lungenkrebs ist. Der deutsche Gesetzgeber orientiert sich an der EU‑Richtlinie 2013/59/Euratom und hat einen Referenzwert von 300 Bq/m³ festgelegt; damit soll überprüft werden, ob Gegenmaßnahmen wie Lüftung oder Abdichtung erforderlich sind. Die WHO sieht bereits ab 100 Bq/m³ Handlungsbedarf.
Messgeräte im Vergleich: Exposimeter, Air‑Q, Radon Eye und EcoCube
Um die Radonkonzentration im eigenen Haus zu beurteilen, gibt es zwei grundsätzliche Messansätze: passive Messungen mit Exposimetern und aktive Messungen mit elektronischen Sensoren. Ich habe verschiedene Lösungen getestet und miteinander verglichen. Ziel des Tests war es, die Messgeräte zu bewerten und ihre Integration in Home Assistant zu untersuchen.
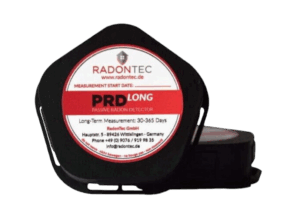
Exposimeter – die langfristige Methode zur Radonmessung
Ein Exposimeter ist eine kleine Messdose, die über einen längeren Zeitraum (typischerweise drei bis zwölf Monate) im Wohnraum platziert wird. Weil Radon schwerer als Luft ist, sollte das Exposimeter in Bodennähe stehen. Nach der Messung wird das Exposimeter an ein Labor geschickt und analysiert. Der Vorteil: Man erhält einen zuverlässigen Mittelwert über einen langen Zeitraum, der vom BfS anerkannt wird und für offizielle Messungen (beispielsweise im Rahmen der gesetzlichen Messpflicht) genutzt werden kann. Der Nachteil: Kurzfristige Spitzenwerte oder saisonale Schwankungen werden verschleiert; während einer Lüftungsphase kann der Mittelwert niedriger ausfallen, obwohl es vorher hohe Peaks gab. Deshalb empfehle ich, das Exposimeter nur als erste Indikation zu nutzen und parallele elektronische Messungen durchzuführen.
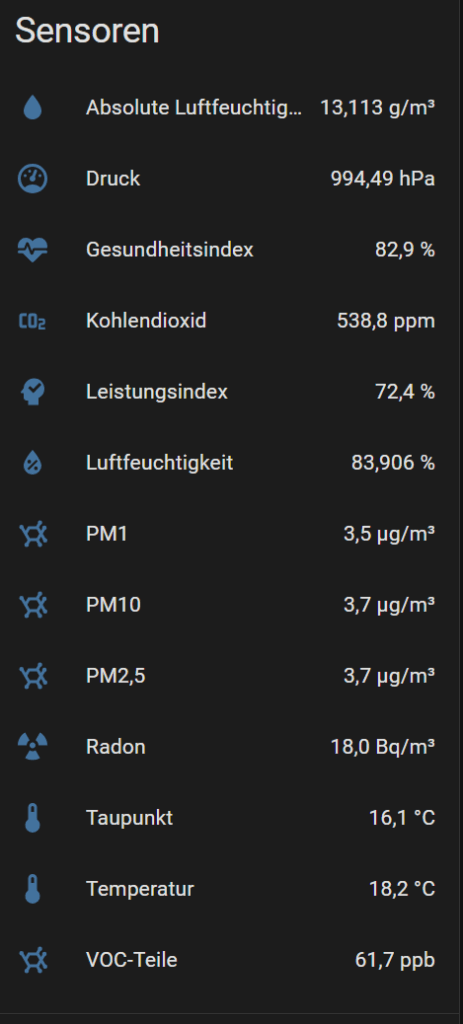
Air‑Q Radon (Science) – High‑End‑Sensor mit vielen Messgrößen
Der Air‑Q Radon (Science) zählt zu den umfangreichsten Radon‑Messgeräten auf dem Markt. Ich habe die „Science“-Variante verwendet, die neben Radon noch flüchtige organische Verbindungen (VOCs), Feinstaub in verschiedenen Größenklassen (PM 1, 2,5, 4, 10), Temperatur, relative und absolute Luftfeuchtigkeit, Luftdruck sowie den Taupunkt misst. Dank dieser Sensorvielfalt erhält man ein umfassendes Bild der Raumluftqualität und kann Korrelationen zwischen Radon und anderen Parametern erkennen. Die Daten werden lokal per WLAN bereitgestellt; eine Cloud‑Anbindung ist optional und lässt sich komplett deaktivieren, was im Hinblick auf Datenschutz positiv hervorzuheben ist. Das Gerät hat in der gesamten Testphase absolut zuverlässig und mit einer hohen Messfrequenz gearbeitet: Alle paar Sekunden liefert der Air‑Q einen neuen Wert. Allerdings hat die Qualität ihren Preis – je nach Ausstattung liegen die Kosten zwischen 400 und 700 Euro.
Radon Eye – Bluetooth‑Sensor mit gutem Preis‑Leistungs‑Verhältnis
Der Radon Eye ist ein elektronischer Radon‑Sensor, der über Bluetooth kommuniziert. Im Gegensatz zum Air‑Q setzt der Hersteller vollständig auf lokale Datenübertragung; das Gerät sendet keine Daten ins Internet. Der Messintervall liegt bei etwa einer Stunde, wodurch eine gewisse Glättung erfolgt. Für viele Anwendungen reicht dieser Intervall aus, denn Radonkonzentrationen ändern sich nicht sekündlich. Der Radon Eye kostet rund 180 Euro und ist damit deutlich günstiger als der Air‑Q. Für Home‑Assistant‑Nutzer gibt es eine Integration über HACS (Home Assistant Community Store), die den Sensor problemlos in Dashboards einbindet. Wer keinen Home Assistant nutzt, kann die Werte nur vor Ort per App abrufen; eine Fernüberwachung ist ohne Heimautomation nicht vorgesehen.
EcoCube – Kompakter WLAN‑Sensor mit Cloud‑Anbindung
Der EcoCube misst Radon ebenfalls elektronisch, allerdings werden die Daten zwingend über die Cloud des Herstellers synchronisiert. Diese Abhängigkeit empfinde ich als ein wenig störend, da man sich registrieren und persönliche Daten angeben muss. In meinen Tests hat der Sensor allerdings gute Werte geliefert; die Messfrequenz ist geringer als beim Air‑Q, aber vermutlich höher als beim Radon Eye (geschätzt kürzer als eine Stunde). Der EcoCube lässt sich über eine eigene App auslesen und per HACS in Home Assistant integrieren – allerdings funktioniert die Integration nur über die Cloud. Während der Testphase kam es zu Aussetzern, bei denen der Sensor neu gestartet werden musste; ob dies ein Einzelfall war, lässt sich nicht abschließend beurteilen. Mit einem Preis im Bereich des Radon Eye und durch seine kompakte Bauform ist der EcoCube dennoch eine interessante Option für Nutzer, die ihre Räumlichkeiten überwachen wollen.
Messstrategie: Platzierung, Auswertung und Vergleich
Die Praxistests im Video zeigen, dass die Positionierung der Sensoren entscheidend ist. Weil Radon schwerer als Luft ist, sollte man alle Geräte in Bodennähe aufstellen – idealerweise im Keller oder Erdgeschoss. Ich habe die Sensoren in meinem Studio getestet, wobei ich sie direkt nebeneinander platziert habe, um direkte Vergleiche zu ermöglichen. Radon hat eine Halbwertszeit von 3,8 Tagen. Dieser radioaktive Zerfall führt zu Messabweichungen: Selbst wenn zwei Geräte nebeneinander stehen, messen sie den Zerfall zeitlich leicht versetzt. Deshalb ist es sinnvoll, Tagesmittelwerte zu betrachten und differenzielle Analysen durchzuführen. In meinen Auswertungen, die über Grafana und ApexCharts visualisiert werden, erkennt man die Abweichungen zwischen den Tageswerten der Geräte. Die Differenzen liegen bei wenigen Becquerel – der Radon Eye misst im Schnitt etwa 3,3 Bq/m³ weniger als der Air‑Q und der EcoCube liegt 0,27 Bq/m³ darüber. Trotz unterschiedlicher Messfrequenzen verlaufen die Kurven weitgehend parallel, was für eine gute Vergleichbarkeit spricht.
Um eine Extremsituation nachzustellen, habe ich einen Lüftungsstopp simuliert, indem ich alle Türen und Fenster für einen Tag in dem Raum verschlossen gehalten habe. Innerhalb kurzer Zeit stiegen die Radonwerte auf über 175 Bq/m³ an. Sobald gelüftet wird, sinkt die Konzentration rasch wieder ab. Für Smart‑Home‑Nutzer eröffnet sich hier ein einfaches Anwendungsfeld: Man kann einen Schwellenwert definieren (zum Beispiel 100 Bq/m³) und mit Hilfe von Home Assistant eine Benachrichtigung auslösen oder automatisch Fenster‑Aktoren ansteuern. In der Grafik lässt sich erkennen, wie durch gezieltes Lüften – selbst ohne bauliche Maßnahmen – die Werte zuverlässig unter 100 Bq/m³ bleiben.
Integration in Home Assistant
Ein wesentlicher Aspekt des Videos ist die Integration der Messgeräte in Home Assistant. Ich nutze diese Plattform, um alle Sensoren zu visualisieren und Automatisierungen zu erstellen.
Air‑Q‑Integration: Der Air‑Q kann per WLAN mit Home Assistant verbunden werden, ohne dass Daten das lokale Netzwerk verlassen. Dank der umfangreichen Sensorik lassen sich Korrelationen zwischen Luftfeuchtigkeit, Temperatur und Radonwerten visualisieren. Ich habe die Cloud‑Funktion deaktiviert und ausschließlich auf die lokalen Daten zugegriffen.
Radon Eye: Für den Radon Eye steht eine HACS‑Integration zur Verfügung. Diese verwendet Bluetooth‑Low‑Energy (BLE). Voraussetzung ist ein passender BLE‑Adapter im Home‑Assistant‑Server (z. B. ein ESP32 oder ein Atom M5 Lite). Die Werte werden stündlich aktualisiert und können in Dashboards oder Automatisierungen genutzt werden.
EcoCube: Der EcoCube lässt sich ebenfalls per HACS einbinden – jedoch nur über die Cloud. Diese Abhängigkeit hat einen entscheidenden Nachteil: Wenn eine Internetverbindung nicht verfügbar ist oder die Server nicht erreichbar sind, erhalte ich keine Messwerte. Wer Wert auf Datenschutz legt, sollte besser zu einem der anderen Geräte greifen.
Wenn Messungen dauerhaft Werte über 300 Bq/m³ ergeben, sollten Hausbesitzer weitere Schritte einleiten. Zunächst ist regelmäßiges Stoßlüften die einfachste Maßnahme; wie die Tests zeigen, reduziert dies die Konzentration schnell. In Regionen mit sehr hoher Bodenbelastung oder bei großen Rissen im Fundament kann allerdings Lüften allein nicht ausreichen. Dann ist es sinnvoll, die Ursachen zu beseitigen. Ich bin kein Experte auf dem Gebiet, deshalb empfehle ich in solchen Fällen, sich an einen Radon‑Fachbetrieb zu wenden und entsprechende Maßnahmen zu erörtern.
Fazit und Ausblick
Ich hoffe, ihr konntet verstehen, wie wichtig eine Radonmessung im eigenen Zuhause ist. Obwohl die gesetzliche Schwelle bei 300 Bq/m³ liegt, empfiehlt es sich, Werte möglichst unter 100 Bq/m³ zu halten. Einfache Maßnahmen wie regelmäßiges Stoßlüften können Radon innerhalb kurzer Zeit senken. Moderne elektronische Sensoren erleichtern die Überwachung und ermöglichen mit Home Assistant automatisierte Maßnahmen. Der Air‑Q liefert extrem detaillierte Daten, ist jedoch kostenintensiv; der Radon Eye bietet ein gutes Preis‑Leistungs‑Verhältnis und arbeitet ohne Cloud; der EcoCube ist kompakt, erfordert aber eine Cloud‑Anbindung. Das passive Exposimeter liefert einen Langzeitwert und eignet sich zur behördlich anerkannten Messung.
Für Smart‑Home‑Enthusiasten lohnt sich die Integration der Sensoren in Home Assistant. Mit Grafana und ApexCharts lassen sich die Daten übersichtlich darstellen, Trends erkennen und Aktionen automatisieren. In einem Folgevideo werde ich die Integration der drei Sensoren in Home Assistant zeigen, wie Anbindung und Visualisierung eingerichtet werden. Den Code für die Apex‑Chart‑Cards und auch das Grafana‑Dashboard werde ich auf meinem Blog verfügbar machen.
Proxmox API Home Assistant Backup – in diesem Praxis‑Guide lernst du, wie du mithilfe der Proxmox API den Zustand deiner virtuellen Maschinen abfragst, Dashboards in Home Assistant erstellst und Backups automatisierst. Statt auf HACS setzt du dabei auf REST‑Sensoren und API‑Calls, um deine VMs sicher zu überwachen und zu sichern.
Vorbereitung in Proxmox – Benutzer, Token und Rechte einrichten
Bevor du in Home Assistant loslegen kannst, musst du Proxmox entsprechend vorbereiten.
API‑Benutzer und Token anlegen
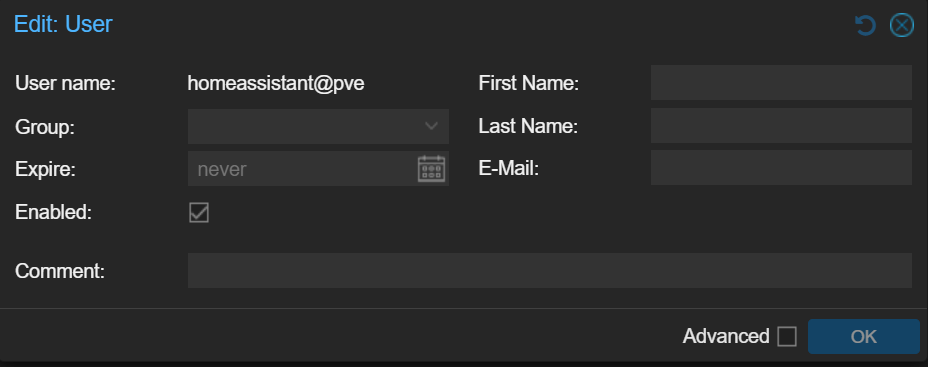
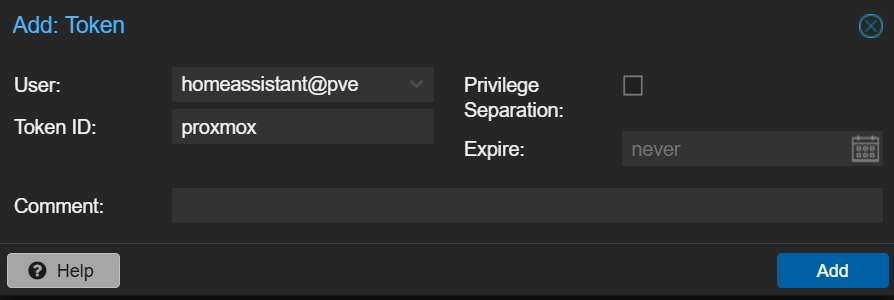
Erstelle im Proxmox DataCenter einen neuen User (z. B. homeassistant) ohne Passwort, denn wir arbeiten mit API‑Tokens. Wähle als Realm pve und lege anschließend unter API Token einen neuen Token für diesen User an. Achte darauf, Privilege Separation zu deaktivieren. Kopiere dir den Token sofort, da er später nicht mehr angezeigt wird.
Rollen konfigurieren
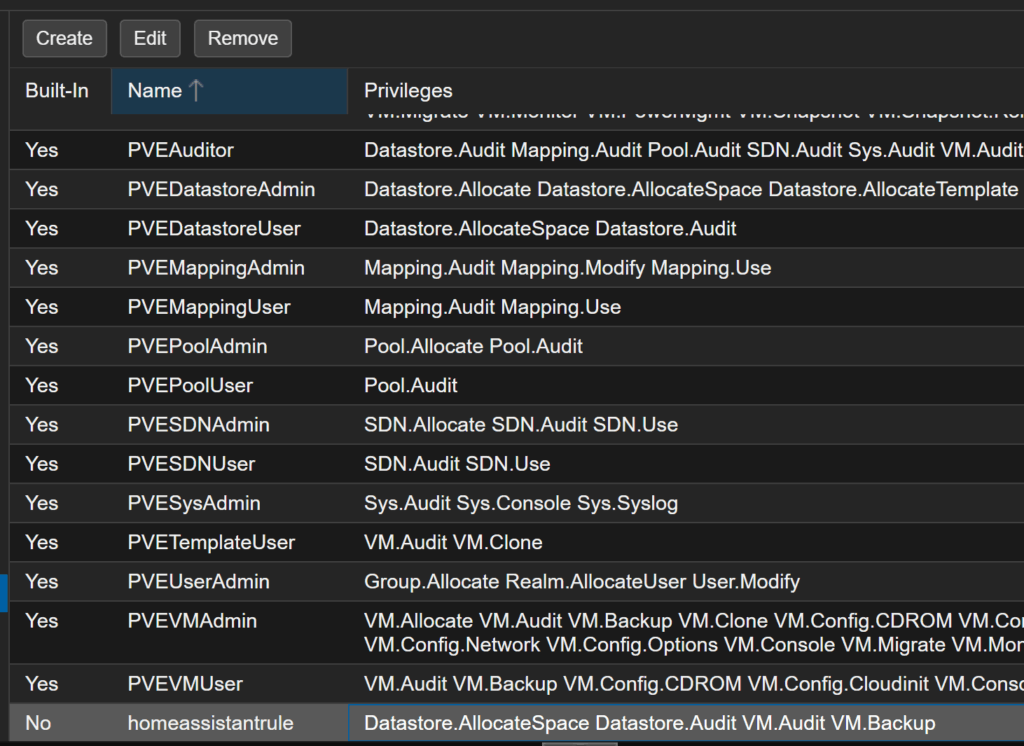
Für den Zugriff auf VM‑Informationen und Backups benötigen wir passende Rollen:
Lege eine neue Rolle (z. B. homeassistant-role) mit den Privilegien VM.Audit, Datastore.Audit und Datastore.AllocateSpace, VM.Backup an.
Weise diese Rolle dem User auf den benötigten Pfaden zu: dem Node (/nodes/pve-lerch) und den VMs (/vms/*).
Diese granularen Berechtigungen sorgen dafür, dass Home Assistant lediglich die benötigten Daten abrufen und einen Proxmox API Home Assistant Backup auslösen darf.
Home Assistant konfigurieren – REST‑Sensoren anlegen
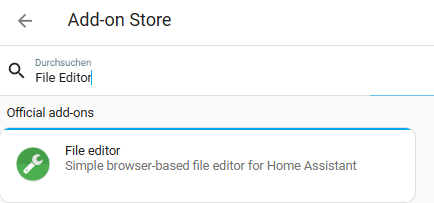
Im nächsten Schritt richten wir Home Assistant ein. Falls du noch keinen File Editor installiert hast, installiere diesen im Add-on Store von Home Assistant.
REST‑Sensor für VM‑Informationen
Über den YAML‑Eintrag rest: definieren wir einen Sensor, der regelmäßig einen GET‑Request an die Proxmox API sendet. Die URL lautet beispielsweise:
Als Header gibst du Authorization: PVEAPIToken=<user>@pve!<token-id>=<token> an. Im value_template kannst du die JSON‑Antwort weiterverarbeiten und die Daten in Attributen speichern.
  - resource: https://192.168.101.69:8006/api2/json/nodes/pvelerch/qemu
    method: GET
    headers:
      Authorization: "PVEAPIToken=homeassistant@pve!proxmox=be729a21-e76b-430b-84bf-40d096d035a6"
    verify_ssl: false
    scan_interval: 10
    sensor:
      - name: "PVELerch VM Raw"
        unique_id: pvelerch_vm_raw
        value_template: "OK"
        json_attributes:
          - data
Vergiss nicht, Home Assistant neu zu starten, damit der Sensor angelegt wird. Anschließend siehst du eine Liste aller VMs als JSON‑Attribut, inklusive ihrer Namen, IDs und Status.
REST‑Sensor für LXC‑Container
Für LXC‑Container wiederholst du den Sensor mit dem Endpunkt .../lxc. Denke daran, dass nicht alle API‑Attribute identisch sind – die Belegung des Festplattenspeichers (disk-usage) steht nur bei Containern zur Verfügung.
Dashboard gestalten – Markdown‑Karte für VM‑Übersicht
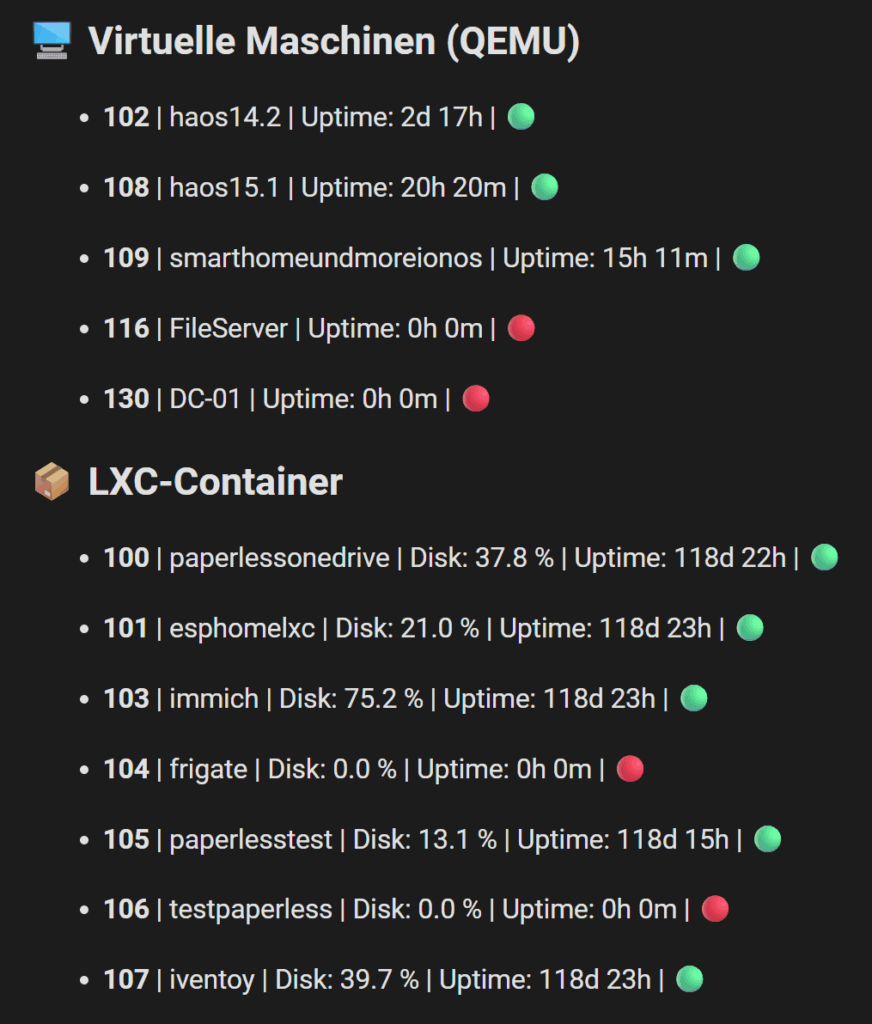
Um die Daten ansprechend zu visualisieren, kannst du eine Markdown‑Karte in deinem Home‑Assistant‑Dashboard einfügen. Im Template liest du die Attribute der Sensoren aus und listest jede VM mit Name, Uptime, Status und, bei LXC‑Containern, prozentual belegtem Speicherplatz auf.
{% set vms = state_attr('sensor.pvelerch_vm_raw', 'data') or [] %}
{% set lxcs = state_attr('sensor.pvelerch_lxc_raw', 'data') or [] %}

## 🖥️ Virtuelle Maschinen (QEMU)

{% for vm in vms | sort(attribute='vmid') %}
  {% set days = vm.uptime // 86400 %}
  {% set hours = (vm.uptime % 86400) // 3600 %}
  {% set minutes = (vm.uptime % 3600) // 60 %}
  {% if days > 0 %}
    {% set uptime_str = days ~ 'd ' ~ hours ~ 'h' %}
  {% else %}
    {% set uptime_str = hours ~ 'h ' ~ minutes ~ 'm' %}
  {% endif %}
- **{{ vm.vmid }}** | {{ vm.name }} | Uptime: {{ uptime_str }} | {{ "🟢" if vm.status == "running" else "🔴" }}
{% endfor %}

## 📦 LXC-Container

{% for lxc in lxcs | sort(attribute='vmid') %}
  {% set days = lxc.uptime // 86400 %}
  {% set hours = (lxc.uptime % 86400) // 3600 %}
  {% set minutes = (lxc.uptime % 3600) // 60 %}
  {% if days > 0 %}
    {% set uptime_str = days ~ 'd ' ~ hours ~ 'h' %}
  {% else %}
    {% set uptime_str = hours ~ 'h ' ~ minutes ~ 'm' %}
  {% endif %}
- **{{ lxc.vmid }}** | {{ lxc.name }} | Disk: {{ ((lxc.disk / lxc.maxdisk) * 100) | round(1) if lxc.maxdisk and lxc.maxdisk > 0 else 'n/a' }} % | Uptime: {{ uptime_str }} | {{ "🟢" if lxc.status == "running" else "🔴" }}
{% endfor %}
So siehst du live, wenn eine VM gestoppt wird oder startet. Über Automationen kannst du sogar Benachrichtigungen verschicken, wenn sich der Status ändert. Achte darauf, dass du die Entitäten auf deine Entitätsnamen anpasst.
sensor.pvelerch_vm_raw
sensor.pvelerch_lxc_raw
Monitoring & Test – Live‑Überwachung von VMs
Teste deine Konfiguration, indem du eine VM in Proxmox stoppst und wieder startest. Die Änderungen sollten in der Markdown‑Karte nach dem nächsten Scan‑Intervall sichtbar sein. Dieses Szenario zeigt, wie zuverlässig die REST‑API im Zusammenspiel mit Home Assistant funktioniert.
Backups per API auslösen
Eines der mächtigsten Features der Proxmox API ist die Möglichkeit, Backups zu starten.
Rollen erweitern
Erweitere deine Rolle um die Berechtigungen VM.Backup und Datastore.AllocateSpace, damit der User Backups auslösen darf ( haben wir schon im ersten Schritt getan ). Vergiss nicht, auch den Storage‑Pfad (/storage) mit dieser Rolle zu verknüpfen.
REST‑Command für VZDump
In Home Assistant legst du unter rest_command: einen neuen Befehl an. Die URL endet diesmal auf /vzdump, die Methode ist POST, und als Payload übergibst du Parameter wie vmid, mode (z. B. snapshot), storage und compress.
Ein Aufruf dieses REST‑Commands startet sofort den Backup‑Job in Proxmox. Über die Home‑Assistant‑Entwicklerwerkzeuge kannst du den Befehl testen. In einer Automation oder auf einem Button platziert, kannst du einen Proxmox API Home Assistant Backup sogar zeit‑ oder ereignisgesteuert auslösen.
Fazit & Ausblick
Mit ein wenig Konfigurationsaufwand lässt sich die Proxmox API hervorragend in Home Assistant integrieren. Du kannst den Zustand deiner VMs und LXC‑Container überwachen, in Dashboards visualisieren und sogar Backups per Knopfdruck starten. Nutze diese Lösung als Grundlage für weitere Automatisierungen, zum Beispiel um Benachrichtigungen zu verschicken oder externe Dienste einzubinden.
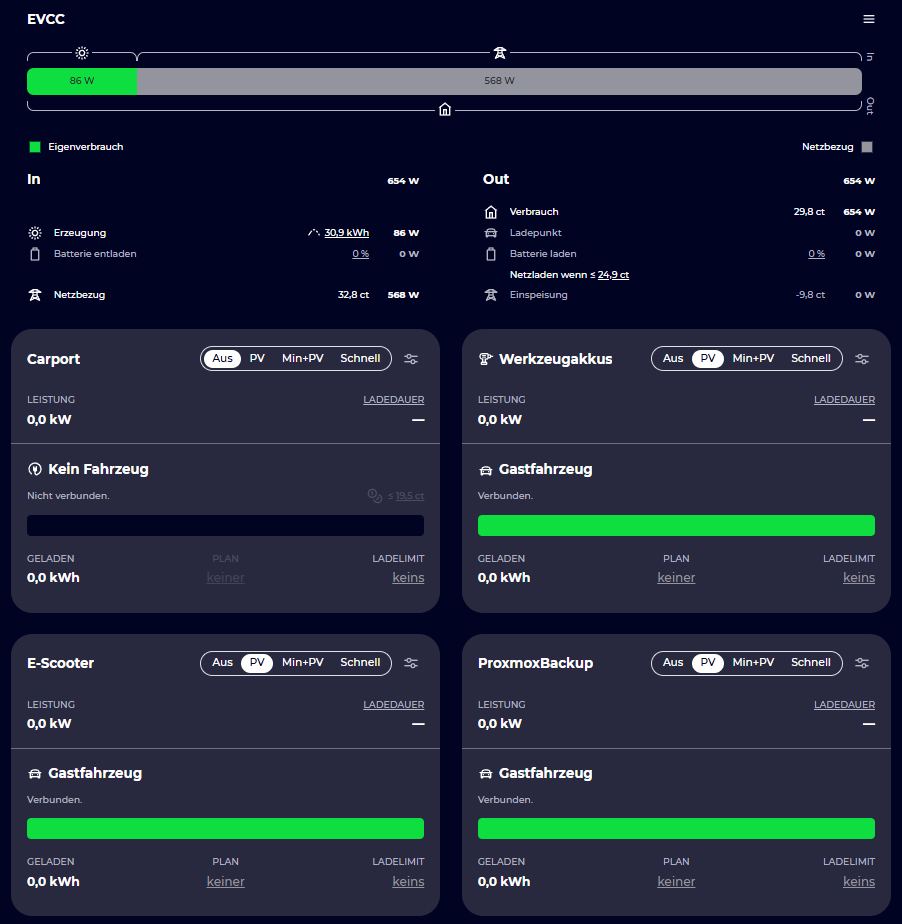
EVCC mit Home Assistant ist eine extrem leistungsfähige Kombination für dein Smart Home: Du kannst Geräte wie Smart Plugs, Poolpumpen, Werkzeugakkus oder sogar Backup-Server vollständig automatisiert per PV-Überschuss, Strompreis oder Zeitfenster schalten – auch ganz ohne Elektroauto!
In diesem Beitrag zeige ich dir praxisnah, wie du das Ganze umsetzt, was du dafür brauchst und wie du es für dein Energiemanagement optimal nutzt.
Was ist EVCC mit Home Assistant?
EVCC (Electric Vehicle Charge Controller) ist eine Open-Source-Lösung, mit der ursprünglich PV-Überschussladen von Elektroautos möglich wurde. Dank der neuen Funktion lassen sich jetzt beliebige Home Assistant Schalter als Ladepunkte konfigurieren.
Damit wird EVCC mit Home Assistant zu einem vollwertigen, modularen Energiemanagementsystem – auch ohne E-Auto. Ideal für:
Haushalte mit PV-Anlage
Smart Home-Enthusiasten
Nutzer mit Strompreis-Tarifen wie Tibber
Was du für die Integration brauchst
Voraussetzungen im Überblick:
PV-Anlage mit kompatiblem Wechselrichter (z. B. SolarEdge, SMA, Kostal)
Home Assistant Installation (z. B. auf Raspberry Pi oder Proxmox)
Schaltbare Geräte wie Tuya- oder Shelly-Steckdosen
EVCC als Add-on in Home Assistant (kostenlos)
Tipp: Kein Sponsoring oder Premium-Account bei EVCC nötig – funktioniert rein lokal über deine Home Assistant-Instanz, solange du nur mit Home Assistant Schaltern arbeitest oder eine „Open Source / Open Hardware “ Wallbox hast. Allerdings finde ich persönlich, dass es sich lohnt das Projekt aktiv zu unterstützen. Letztlich spare ich damit etwas und unterstütze ein geniales Projekt.
Home Assistant Schalter als Ladepunkt verwenden
Du kannst jetzt jeden beliebigen Home Assistant Schalter wie eine Wallbox in EVCC integrieren. Beispielhafte Konfiguration:
Smart Plug 1: Werkzeugakkus
Smart Plug 2: Gartenbewässerung
Smart Plug 3: NAS-Backup
Einfach als Ladepunkt anlegen, Home Assistant Token einfügen und mit Entity-ID sowie optionaler Leistungsmessung verknüpfen.
So funktioniert das PV-Überschuss-Schalten
EVCC mit Home Assistant prüft:
Gibt es aktuell PV-Überschuss?
Ist die definierte Mindestleistung erreicht?
Ist der minimale Strombedarf für das Gerät erfüllt?
Wenn ja, wird geschaltet – sonst bleibt das Gerät aus. Alternativ kannst du zusätzlich mit Strompreis (z. B. Tibber) oder Zeitplänen arbeiten.
Beispiele aus der Praxis
Werkzeugakkus laden
Die Steckdose wird nur eingeschaltet, wenn Überschuss vorhanden ist – ideal für Ladegeräte oder Akku-Werkzeuge.
Poolpumpe
Anstatt starrer Zeitschaltung läuft die Pumpe bei ausreichender Sonneneinstrahlung automatisch.
Proxmox Backup starten
Backups kosten Energie – also automatisiert starten, wenn genug PV-Leistung verfügbar ist.
EVCC mit Home Assistant konfigurieren – Schritt für Schritt
1. File Editor installieren
Unter „Add-ons“ in Home Assistant installieren und starten.
In der File Editor Konfiguration muss jetzt noch Enforce Basepath auf „false“ gesetzt werden.
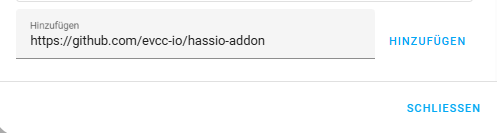
2. EVCC Add-on hinzufügen
Repository einfügen, EVCC installieren, einmal starten. EVCC legt dabei automatisch ein Verzeichnis an.
3. Konfigurationsdatei anlegen
Im Verzeichnis add-on-config/xyzabsdef_evcc die Datei evcc.yaml anlegen – sonst startet das Add-on nicht korrekt. Die Bezeichnung vor „_evcc“ ist im Verzeichnisnamen Variabel und dient hier nur als Beispiel.
Trage Standort, Ausrichtung & kWp ein – EVCC berücksichtigt dann die Prognose bei der Steuerung.
Strompreis (z. B. Tibber)
Stelle ein, ab welchem Cent-Betrag ein Gerät schalten darf – ideal für günstige Tariffenster.
Prioritäten
Lege fest, welches Gerät zuerst mit Strom versorgt wird. 10 = höchste Priorität, 0 = niedrigste.
Beispiel:
Werkzeugakkus = Priorität 4
Poolpumpe = Priorität 5
Backup = Priorität 9
Fazit: Warum EVCC mit Home Assistant ein Gamechanger ist
Mit dem neuen Schalter-Feature wird EVCC mit Home Assistant zur echten Steuerzentrale für dein Smart Home:
Nutze PV-Überschuss effizient
Automatisiere stromhungrige Prozesse
Spare Energie & Kosten
Auch ohne Elektroauto nutzbar
Kombinierbar mit Preis, Prognose & Zeitplan
Fazit: Kein Bastel-YAML mehr nötig – alles bequem über die UI steuerbar! Dadurch konnte ich viele Automatisierungen entfernen und spare dadurch Zeit für Pflege und Wartung. EVCC nimmt mir nun diese Arbeit ab.
Home Assistant Erfahrungen: Warum ich trotz aller Kritik dabei bleibe
Meine Home Assistant Erfahrungen zeigen: Das System ist nicht perfekt – doch ich bleibe trotzdem dabei. Warum? Genau das erkläre ich in diesem Beitrag.
Home Assistant – nicht perfekt, aber wertvoll
Ja, es stimmt: YAML kann anstrengend sein, die Benutzeroberfläche wirkt manchmal chaotisch, und Updates sorgen gelegentlich für mehr Frust als Fortschritt. Und dennoch bleibt Home Assistant mein System der Wahl. Warum? Weil es mehr ist als nur ein Smart-Home-Tool – es ist ein System, das mit mir wächst und das mir auf lange Sicht viele Möglichkeiten eröffnet.
5 Home Assistant Erfahrungen, die mich überzeugt haben
1. Vollständige Kontrolle ohne Cloud-Zwang
Ich bestimme, was passiert. Home Assistant lässt sich komplett lokal betreiben – ohne Abhängigkeit von Cloud-Diensten. Das bedeutet: Auch ohne Internet läuft mein Zuhause stabil weiter. Diese Unabhängigkeit ist besonders wichtig im Hinblick auf Datenschutz und Systemsicherheit. Ich weiß, dass meine Daten auf meinen eigenen Servern bleiben – und das beruhigt ungemein.
2. Gerätevielfalt unter einem Dach
Egal ob Zigbee, WLAN, Bluetooth oder Cloud-Anbindungen wie Home Connect – Home Assistant bringt alles zusammen. Ich nutze Geräte von verschiedensten Herstellern: Fernseher von Samsung, eine Spülmaschine von Siemens, eine Waschmaschine von LG und viele weitere Komponenten. Durch Home Assistant bekomme ich alles unter eine Oberfläche – ein echter Mehrwert im Alltag.
3. Echte Automatisierung mit echtem Nutzen
Mit Home Assistant automatisiere ich nicht nur aus Spaß an der Technik, sondern weil es meinen Alltag erleichtert. Beispiele? PV-Überschussladen mit EVCC, ein Awtrix-Display mit Müllkalender und Timer für den Geschirrspüler oder intelligente Benachrichtigungen. Solche Lösungen sparen mir Zeit, Geld und manchmal auch Nerven.
4. Eine starke Community
Home Assistant lebt von seiner Community. In Foren, auf YouTube oder in Discord-Servern findet man schnell Hilfe, Austausch und neue Ideen. Ich selbst bin durch die Community gewachsen, habe Dinge gelernt und weiterentwickelt. Dieser Zusammenhalt ist ein großer Pluspunkt, den ich nicht mehr missen möchte.
5. Es ist mein System – exakt so, wie ich es brauche
Mein Dashboard sieht heute ganz anders aus als noch vor einem Jahr – weil ich es mir so gestalten kann, wie ich es brauche. Ob einfache Steuerung für die Familie, komplexe Automatisierungen oder benutzerfreundliche Oberflächen – Home Assistant erlaubt mir die komplette Freiheit.
Was passiert, wenn ich mal ausfalle?
Eine häufige und absolut berechtigte Frage aus der Community. Was, wenn ich als zentrale Person für das Smart Home plötzlich ausfalle? Deshalb achte ich darauf, einfache Dashboards für die Familie bereitzustellen, Automatisierungen zu dokumentieren und regelmäßige Backups durchzuführen – z. B. über die Nabucasa Cloud. So bleibt das System auch im Notfall benutzbar und nachvollziehbar.
Updates – aber mit Bedacht
Updates können riskant sein, vor allem direkt nach Veröffentlichung. Ich warte in der Regel bis zum Monatsende mit dem Update und habe mir dafür eine Benachrichtigung eingerichtet. Das erspart mir viele Probleme und lässt anderen den Vortritt, neue Bugs zu entdecken.
Fazit – Home Assistant ist nicht perfekt. Aber es ist einzigartig.
Trotz aller Kritik bleibe ich bei Home Assistant. Die Möglichkeiten sind enorm, die Anpassbarkeit ist groß und der Community-Support ist herausragend. Wer bereit ist, sich einzuarbeiten, wird mit einem System belohnt, das individuell, zuverlässig und leistungsfähig ist – und das ohne Lizenzkosten.
Wie siehst du das?
Was sind deine Gründe, bei Home Assistant zu bleiben – oder vielleicht auch zu wechseln? Schreib mir gerne einen Kommentar oder diskutiere mit in der Community. Ich bin gespannt auf deine Sichtweise!
Ein Blick zurück – Meine Anfänge mit Home Assistant
Als ich mit Home Assistant begonnen habe, war ich begeistert, als ich das erste Mal Sensordaten auslesen konnte. Ich erinnere mich noch gut an den Moment, als ich zum ersten Mal einen einfachen Temperatursensor in meinem Dashboard angezeigt bekam. Das klingt rückblickend banal – aber es war der erste Schritt in eine neue Welt. Eine Welt voller Möglichkeiten, in der ich Stück für Stück gewachsen bin, zusammen mit den Herausforderungen, die dieses System mit sich bringt.
Wachstum durch Herausforderungen
Home Assistant ist nicht nur ein System, es ist ein Prozess. Ich habe erlebt, wie aus einfachen Automatisierungen wie dem Ein- und Ausschalten von Licht komplexe Abläufe wurden: PV-Überschussmanagement, Speicherlogik, Awtrix-Anzeigen mit Live-Daten und vieles mehr. Mit jedem neuen Anwendungsfall wurde ich sicherer, kreativer und effizienter. Das System hat mir die Möglichkeit gegeben, auf reale Anforderungen in meinem Alltag zu reagieren – und das mit einem hohen Maß an Individualisierung.
Familienfreundlich – oder nur was für Nerds?
Ein Kritikpunkt, der häufig auftaucht – und den ich auch verstehe – betrifft die Nutzbarkeit im Familienkontext. Was passiert, wenn die eine Person ausfällt, die alles eingerichtet hat? Genau hier setze ich an: mit Dokumentation, vereinfachten Dashboards, klar benannten Automationen und einem abgestuften Systemverständnis. Meine Frau soll nicht YAML-Dateien durchforsten, sondern einfach das Licht einschalten können, wenn der Bewegungsmelder mal streikt. Das ist nicht nur sinnvoll, sondern notwendig – für jedes ernst gemeinte Smart Home Setup.
Community – das vielleicht größte Feature
Neben allen technischen Vorzügen darf man eines nicht vergessen: Die Home Assistant Community ist unglaublich aktiv und hilfsbereit. Egal ob in Foren, auf Discord, YouTube oder Reddit – die Geschwindigkeit, mit der Fragen beantwortet und Probleme gelöst werden, ist beeindruckend. Ich selbst habe unzählige Impulse aus der Community bekommen, bin mit Entwicklern ins Gespräch gekommen und habe sogar Funktionen mitgestaltet. Diese Dynamik findet man so in kaum einem anderen Smart Home System.
Mein Setup heute – und wie es sich verändert hat
Wenn ich mein heutiges Home Assistant Setup mit dem von vor Jahren vergleiche, liegen Welten dazwischen. Was als Spielerei mit ein paar Sensoren begann, ist heute eine zentrale Steuerungsinstanz meines Hauses. Es gibt Automationen für Energieoptimierung, Sicherheitsfunktionen, Erinnerungen an Mülltage, Statusanzeigen, anwesenheitsbasierte Aktionen und vieles mehr. Und das Beste daran: Alles genau so, wie ich es brauche – nicht wie ein Hersteller es mir vorgibt.
Wohin geht die Reise?
Ich glaube nicht, dass Home Assistant je ‚fertig‘ ist – und das ist auch gut so. Neue Geräte, neue Anforderungen und neue Ideen aus der Community sorgen ständig für Weiterentwicklung. Ob neue Dashboard-Konzepte, Integrationen wie Matter oder clevere Visualisierungen mit Grafana – ich freue mich auf alles, was kommt. Und ich bleibe dabei – weil ich weiß, dass ich ein System nutze, das sich meinen Bedürfnissen anpasst. Nicht umgekehrt.
Auf meinem YouTube-Kanal Smart Home & More geht es normalerweise um clevere Technik für dein Zuhause. Heute aber ein Thema, das mir persönlich sehr nahegeht – und das dich ebenfalls treffen kann, wenn du nicht aufpasst: Ein dreister Betrugsfall durch einen vermeintlichen Schädlingsbekämpfer.
In diesem Blogbeitrag teile ich unsere Geschichte und spreche mit einem echten Profi darüber, wie man solche Abzocker erkennt – und wie man sich davor schützt.
Der Auslöser: Ein gefährlicher Wespenstich
Alles begann mit einem Wespenstich, den ich mir am Wochenende durch ein verstecktes Nest unter unserem Terrassenstuhl eingefangen habe. Die Folge: ein anaphylaktischer Schock und der Rettungswagen. Zum Glück wurde ich schnell behandelt – an dieser Stelle mein großer Dank an die Retter vor Ort!
Da ich nun allergisch reagiere, war sofort klar: Das Wespennest muss weg. Meine Frau hat sich darum gekümmert und im Internet nach einem lokalen Schädlingsbekämpfer gesucht – scheinbar seriös, mit Ortsangabe und Telefonnummer.
Die „Firma Steinbach“ – professionell? Fehlanzeige!
Am selben Tag kam jemand vorbei. Er wirkte zunächst kompetent, erklärte, er würde drei verschiedene Mittel einsetzen, und begann mit der Arbeit. Nach etwa 20 Minuten war er wieder weg – mit über 618 € auf der Rechnung.
Wir waren schockiert. Andere Anbieter, die wir im Nachhinein kontaktierten, nannten Preise um die 150 €, maximal 200 €.
Meine Frau hatte bereits mit EC-Karte und PIN gezahlt – ein Fehler, wie sich später herausstellte. Denn: Solche Zahlungen kann man nicht zurückholen, anders als z. B. bei einer Überweisung oder Kreditkartenzahlung.
Die Recherche: Abzocke im großen Stil
Ich begann zu recherchieren – und stieß auf einen TikTok-Post eines echten Schädlingsbekämpfers: Tim von Detek Schädlingsbekämpfung. Er warnte vor genau dieser „Firma“, denn sie nutzte Bilder von seiner Website, um Seriosität vorzutäuschen.
Die Masche: Professionell wirkende Webseiten, Google-Anzeigen, Ortsangabe per Geo-Targeting und am Ende ein überhöhter Preis. Ich nahm Kontakt zu Tim auf – und führte ein ausführliches Interview mit ihm auf meinem Kanal.
Das Interview: So erkennst du unseriöse Schädlingsbekämpfer
Tim erklärte mir im Interview zahlreiche Hinweise auf Betrug, die man leicht übersehen kann. Hier ein paar der wichtigsten:
Callcenter statt Fachberatung: Wenn du keine echte Beratung bekommst, sondern sofort jemand losgeschickt wird, ist Vorsicht geboten.
Falsche Adressen im Impressum: Oft stehen nur fiktive Ortsangaben da, die dynamisch erzeugt werden.
Unvollständige Protokolle: Ein echter Schädlingsbekämpfer dokumentiert exakt, welche Mittel in welcher Menge eingesetzt wurden – inklusive möglicher Gegenmittel.
Unprofessionelles Auftreten: Kein gebrandetes Fahrzeug, keine Schutzkleidung, hektisches Arbeiten – alles Hinweise.
Viertelstundenabrechnung oder überzogene Pauschalen: Ein absolutes Warnsignal!
Laut Tim kostet die Entfernung eines Wespennests normalerweise 150–200 € inkl. MwSt. – je nach Aufwand. Bei seinem Unternehmen gibt es transparente Preise und schriftliche Rechnungen – keine EC-Zahlung mit PIN.
Fazit: Reagiere überlegt – und schütze dich!
Wir haben den Vorfall zur Anzeige gebracht, mit der Bank gesprochen – doch viel können wir nicht mehr tun. Aber du kannst etwas tun: Lass dich nicht unter Druck setzen, verlange eine transparente Kostenaufstellung und zahle niemals direkt mit EC-Karte und PIN, wenn dir etwas seltsam vorkommt.
Wenn du auf Nummer sicher gehen willst: Sprich mit einem echten Experten – wie Tim von Detek Schädlingsbekämpfung. Den Link zu seinem YouTube-Kanal findest du weiter unten.
Du willst keine Schädlinge – und kein Chaos im Smart Home?
Dann abonniere meinen Kanal, um clevere Techniklösungen und ehrliche Einblicke in den Alltag zu erhalten. Wenn dir dieser Beitrag geholfen hat, teile ihn mit Freunden und Familie – vielleicht schützt du damit jemanden vor Betrug.
Ich liebe Home Assistant, keine Frage – aber heute geht es um die weniger schönen Seiten. In diesem Beitrag spreche ich offen über die häufigsten Home Assistant Probleme, die mich im Alltag stören. Vielleicht kennst du einige dieser Punkte ja selbst? Hier teile ich meine persönlichen Erfahrungen, Frustpunkte und auch einige Workarounds.
1. Updates und Breaking Changes
Home Assistant Probleme beginnen für viele Nutzer bei den monatlichen Updates. Zwar bringen sie regelmäßig neue Features, aber leider auch unerwartete Fehler. Gerade bei komplexeren Setups führen diese Updates immer wieder zu Ausfällen. Mein Tipp: Backups machen und mit Updates warten!
2. Langzeitstabilität
Ein häufiges Home Assistant Problem ist die Stabilität. Viele berichten von Ausfällen – sei es Zigbee, WLAN-Integrationen oder Automatisierungen. Neustarts gehören bei vielen zum Alltag. Das sollte bei einem Smart Home nicht die Regel sein.
3. Die Dokumentation
Ein weiteres Home Assistant Problem ist die Dokumentation. Für Entwickler oft ausreichend, für Einsteiger meist verwirrend. Beispiele fehlen, Anleitungen sind lückenhaft – und viele weichen auf YouTube-Tutorials aus, um durchzublicken.
4. Einstiegshürden
Home Assistant hat eine hohe Einstiegshürde. Die Benutzeroberfläche wirkt modern, aber der Einstieg ist komplex. Viele verstehen nicht, wie Integrationen funktionieren oder was ein Trigger ist. Hier fehlt ein echtes Onboarding.
5. YAML – Segen und Fluch
YAML ist ein zentrales Home Assistant Thema – und gleichzeitig ein häufiges Problem. Fehleranfälligkeit durch Einrückungen, kryptische Fehlermeldungen und technische Einstiegshürden machen YAML für viele zur Frustquelle.
6. Fehlermeldungen
Home Assistant Probleme äußern sich oft durch unverständliche Fehlermeldungen. Texte wie ‚Unknown options legacy action sensor‘ helfen niemandem weiter. Eine klarere Fehlerbeschreibung wäre wünschenswert.
7. Risiken durch HACS
Der Community Store HACS ist beliebt, aber auch ein Risiko. Komponenten verschwinden, sind nicht mehr kompatibel oder funktionieren nach Updates nicht mehr. Ein klarer Nachteil für alle, die auf ein stabiles Setup setzen.
8. Home Assistant als ewige Baustelle?
Viele Home Assistant Probleme entstehen durch ständige Veränderungen. Für Tüftler spannend – für Normalnutzer eher anstrengend. Man hat nie das Gefühl, dass das System ‚fertig‘ ist – und das kann auf Dauer ermüden.
Fazit – Home Assistant Probleme, aber trotzdem empfehlenswert
Trotz all dieser Home Assistant Probleme bleibe ich bei diesem System. Die Flexibilität, die Community und die Offenheit machen es weiterhin zum besten Smart-Home-System auf dem Markt – für alle, die bereit sind, sich einzuarbeiten.
Was sind deine Home Assistant Probleme?
Welche Frustpunkte hast du erlebt? Was stört dich am meisten – und welche Lösungen hast du gefunden? Schreib mir gerne einen Kommentar. Ich freue mich auf den Austausch mit der Community!
Home Assistant Probleme im Alltag – ein persönlicher Erfahrungsbericht
In meinem Alltag als Content Creator und technikbegeisterter Nutzer erlebe ich regelmäßig Situationen, in denen Home Assistant Probleme verursacht, die nicht sofort nachvollziehbar sind. Sei es eine fehlerhafte Automation, die plötzlich nicht mehr ausgelöst wird, oder eine Entität, die sich aus unerklärlichen Gründen nicht mehr aktualisiert – solche Dinge sind frustrierend. Vor allem dann, wenn das System eigentlich zuverlässig laufen sollte, beispielsweise wenn man nicht zu Hause ist.
Smart Home soll helfen – nicht frustrieren
Ein Smart Home ist dann wirklich smart, wenn es zuverlässig arbeitet, ohne dass man ständig eingreifen muss. Doch genau hier entstehen häufig Home Assistant Probleme: Automationen, die in 95 % der Fälle laufen, aber genau dann versagen, wenn man sich darauf verlassen will. Für viele Nutzer ist das ein echtes Ärgernis, denn man will schließlich nicht jeden Abend kontrollieren, ob das Licht wirklich ausgegangen ist oder die Türverriegelung aktiv ist.
Was bedeutet das für Einsteiger?
Gerade Einsteiger schrecken diese Unzuverlässigkeiten ab. Man liest in Foren von den vielen Möglichkeiten – und steht dann einem System gegenüber, das regelmäßig Aufmerksamkeit braucht. Viele Home Assistant Probleme lassen sich mit der Zeit lösen, doch der Weg dorthin ist für Neulinge oft steinig. Wer keine Geduld oder technische Erfahrung mitbringt, könnte schnell frustriert aufgeben.
Warum ich trotzdem dabeibleibe
Trotz aller Home Assistant Probleme sehe ich in diesem System nach wie vor das größte Potenzial für ein flexibles, lokal gesteuertes und datenschutzfreundliches Smart Home. Ich habe gelernt, mit den Schwächen umzugehen – und die Vorteile zu nutzen. Für mich überwiegt der Mehrwert, den Home Assistant bietet. Doch ich wünsche mir, dass das System langfristig benutzerfreundlicher und robuster wird – für alle, nicht nur für Geeks.