In diesem Video zeige ich dir, wie du Home Assistant mit InfluxDB und Grafana verknüpfst – perfekt für Einsteiger! 🚀📊 Schritt für Schritt lernst du, wie du deine Smart Home-Daten speicherst und visualisierst. Egal ob du Anfänger bist oder deine Smart Home-Fähigkeiten erweitern möchtest, dieses Tutorial hilft dir dabei, alles einfach und verständlich einzurichten. Schau rein und mach dein Smart Home noch smarter! 🏡✨
Ich möchte euch heute einen allgemeinen Amazon-Link teilen, über den ihr eine Vielzahl von Produkten entdecken könnt. Egal, ob ihr nach Smart Home-Geräten, Gadgets oder anderen nützlichen Artikeln sucht, Amazon hat für jeden etwas zu bieten.
Wenn ihr über diesen Link einkauft, unterstützt ihr meinen Kanal, ohne dass es für euch zusätzliche Kosten verursacht. Das hilft mir, weiterhin spannende Inhalte für euch zu erstellen!
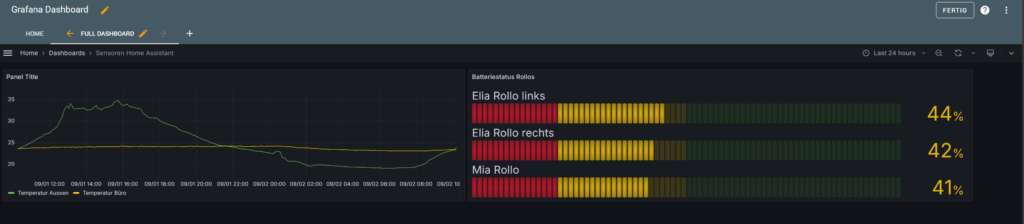
InfluxDB ist eine zeitbasierte Datenbank, die es ermöglicht Langzeitdaten komfortabel , einfach und schnell abgreifbar handzuhaben.
In der Kombination mit Grafana ( einem Tool zur einfachen Visualisierung von Metriken ) lassen sich schnell und unkompliziert ansprechende Visualisierungen durchführen.
Die InfluxDB ist hinsichtlich der Abfragesyntax an MySQL angelegt, so dass sich mit ein wenig Datenbankkenntnissen auch schnell gezielte Abfragen erstellen lassen. Aber auch ohne Kenntnisse von SQL Programmierung lässt sich mit der Grafana GUI schnell und einfach ein ansehnliches Ergebnis produzieren.
Folgende Videos können dir dabei helfen die nötigen Programme zur Verwendung und Konfiguration der Datenbank und Grafana zu installieren.
Du benötigst den File Editor um die Konfiguration der Datenbank in der Configuration.YAML durchzuführen
Folgende Beispielkonfiguration musst du in der Configuration.yaml erstellen:
Weiterführende Informationen zum Thema „include“ und „exclude“ mit Beispielen findet man auch auf der Home Assistant Dokumentatsionsseite zum Thema Influx DB
Sollte nach einem Neustart von Home Assistant das Grafana Dashboard nicht angezeigt werden, dann hilft es, einmal das Grafana Add-On aufzurufen. Ich haben diesen Fehler einmal gehabt und konnte ihn allerdings nicht mehr reproduzieren.
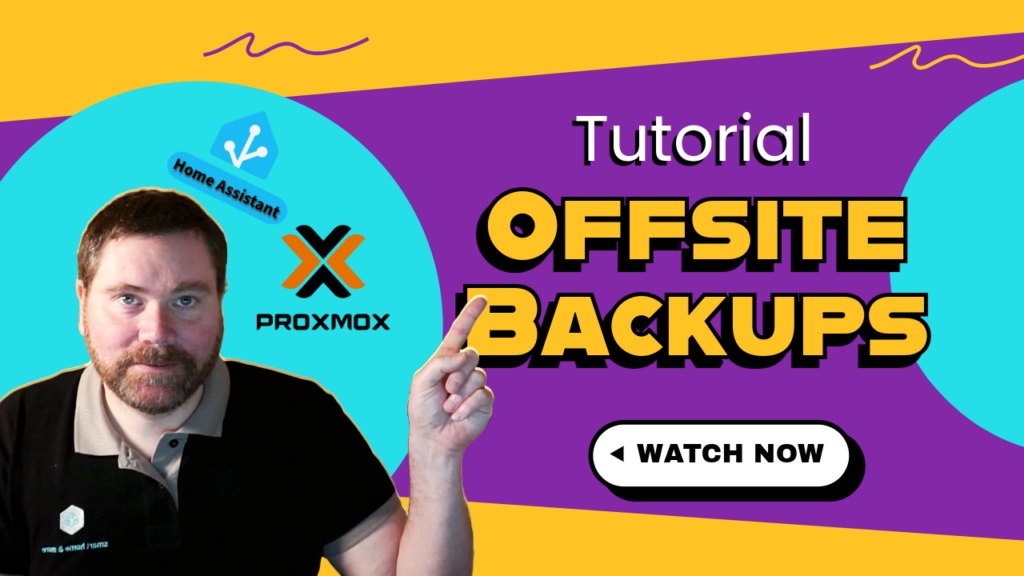
In diesem Video zeige ich euch, wie ihr die Hetzner Storage Box für Offsite Backups von Home Assistant einrichten könnt. Zusätzlich erkläre ich, wie ihr die Storage Box in Proxmox VE integrieren könnt, ohne dabei die Konsole nutzen zu müssen. So könnt ihr eure Backups und Speicherkapazitäten ganz einfach verwalten, auch wenn ihr keine tiefergehenden Linux-Kenntnisse habt.
Viel Spaß beim Anschauen! 😊
Ich möchte euch heute einen allgemeinen Amazon-Link teilen, über den ihr eine Vielzahl von Produkten entdecken könnt. Egal, ob ihr nach Smart Home-Geräten, Gadgets oder anderen nützlichen Artikeln sucht, Amazon hat für jeden etwas zu bieten.
Wenn ihr über diesen Link einkauft, unterstützt ihr meinen Kanal, ohne dass es für euch zusätzliche Kosten verursacht. Das hilft mir, weiterhin spannende Inhalte für euch zu erstellen!
In diesem Video zeige ich euch Schritt für Schritt, wie ihr die Geolocation für eure Camper Home Assistant Instanz setzt und eine Automatisierung dazu erstellt. Außerdem gehe ich auf die Vor- und Nachteile meiner Stromversorgungslösung für den Raspberry Pi ein.
Viel Spaß beim Anschauen! 😊
Ich möchte euch heute einen allgemeinen Amazon-Link teilen, über den ihr eine Vielzahl von Produkten entdecken könnt. Egal, ob ihr nach Smart Home-Geräten, Gadgets oder anderen nützlichen Artikeln sucht, Amazon hat für jeden etwas zu bieten.
Wenn ihr über diesen Link einkauft, unterstützt ihr meinen Kanal, ohne dass es für euch zusätzliche Kosten verursacht. Das hilft mir, weiterhin spannende Inhalte für euch zu erstellen!
Falls du es noch nicht kennst, hier findest du auch meine Playlist zu weiteren Videos meiner Reihe „smarter Camper“
Automatisierung zum setzen der Geolocation deiner Camper Home Assistanz Instanz
YAML Code:
alias: NFC Tag Location ist gescannt
description: ""
trigger:
  - platform: tag
    tag_id: a0d180ea-d552-447f-b160-ff8a7e673f97
condition:
  - condition: and
    conditions:
      - condition: state
        entity_id: tag.location
        attribute: last_scanned_by_device_id
        state: deineDeviceID
      - condition: state
        entity_id: sensor.iphone_tobias_ssid
        state: DEINE_WLAN_SSID
action:
  - service: homeassistant.set_location
    metadata: {}
    data:
      latitude: "{{ state_attr('device_tracker.iphone_tobias','latitude') }}"
      longitude: "{{ state_attr('device_tracker.iphone_tobias','longitude') }}"
  - service: notify.mobile_app_iphone_tobias
    metadata: {}
    data:
      message: Camper Standort wurde übernommen!
      title: Camper Standort
mode: single
Als Tags verwende ich in diesem Beispiel NFC- Klebetags. Ich habe festgestellt, dass es immer mal wieder Probleme mit Tags und zumindest dem IPhone gibt. Die von mir im Video verwendeten Tags haben alle ohne Probleme funktioniert.
Inhalt: 10 Stück selbstklebende NFC Tags (Typ NXP NTAG21x Chip, 27mm Durchmesser, Farbe weiß) Die Aufkleber sind so klein wie ein 50 Cent Stück und so dünn wie ein Blatt Papier und besitzen genügend Speicherplatz für alle wichtigen Funktionen (Smart Home Automatisierung Trigger, WLAN Passwörter, digitale Visitenkarten, Produktkennzeichnung, Lagermanagement, …)
Kompatibilität: Unsere NFC Tags können sowohl mit Apple iOS (ab iPhone Xs), Google Android NFC-Smartphones als auch mit allen gängigen NFC Lese- / Schreibgeräten verwendet und programmiert werden
Apple: Ab iOS 13 oder neuer und einem iPhone Xr, Xs oder neuer können die NFC Tags als Auslöser einer Automation in der Apple Kurzbefehle-App genutzt werden (unterstütze iPhones: XS, XR, XS MAX, 11, 11 Pro, 11 Pro Max, 12, 12 Pro, 12 Pro Max, 12 Mini) Neben der Kurzbefehle Application lassen sich die Tags auch mit anderen iOS NFC-Apps (z.B. „NFC Tools“) lesen bzw. beschreiben
Google Android: Unsere NFC Tags sind mit allen NFC-fähigen Android Smartphones nutzbar. Programmieren Sie die NFC Tags mit deinem Android Smartphone und einer kostenlosen NFC App (z.B. „NFC Tools“) mit einer beliebigen Funktion und platzieren Sie den Sticker an der gewünschten Stelle in Ihrer Wohnung, im Auto oder im Büro
NFC Reader: Unsere NFC Tags können mit allen gängigen NFC Readern beschrieben und auslesen werden. Perfekt für den Einsatz im privaten als auch gewerblichen Bereich
Ein Anwendungsfall ist mir im Nachgang zur Aufnahme dann doch noch eingefallen, warum man ggf. eine permanente Aktualisierung seiner Camper Location haben möchte. Für den Fall, dass das Fahrzeug entwendet wird, möchte man vielleicht wissen, wo es sich gerade befindet. Auch dafür würde sich mit etwas zusätzlicher Hardware eine Lösung finden lassen, in dem die Geolocation zyklisch aktualisiert wird. Wenn du ein zyklisches Update deiner Geolocation haben möchtest, kannst du ein älteres Smartphone oder ein Tablet mit GPS verwenden, die Companion App darauf installieren und eine Automatisierung schreiben, die zyklisch die Koordinaten übergibt. Bei einer Änderung könnte man sich informieren lassen.
Eine Automatisierung für ein zyklisches Update könnte wie folgt aussehen ( im Beispiel alle 5 Minuten ausgeführt)
Mit der Versorgung des Raspberry PI´s im Camper ist meine derzeitige Lösung noch nicht zufriedenstellend. Ich verwende eine Powerbank mit Passthrough. D.h. man kann ein Ladekabel an die Powerbank anschließen und die USB Ausgänge bleiben geschaltet und die Powerbank wird zudem aufgeladen. Das funktioniert grundsätzlich auch mit diesem Setup und die Powerbank hat beeindruckende Leistungsdaten. Allerdings scheint ein Schutzmechanismus in dem Speicher verbaut zu sein, der nach einmaligen Aufladen der Bank den Ladevorgang stoppt. Erst, wenn ich das Netzteil für den Aufladevorgang einmal entferne und wieder verbinde, wird der Ladevorgang erneut gestartet. Über eine smarte Steckdose kann ich diesen Vorgang 1x am Tag automatisieren, bei einer reinen 12V Spannung, müsste dies über ein 12V Relais gelöst werden . Mit der Lösung bin ich nicht absolut zufrieden, da ich nun aber schon einige Powerbanken erfolglos getestet habe, und diese andere Probleme hatten ( z.B. Spannung am USB Ausgang nicht gehalten ),
habe ich mich entschieden zunächst mit dieser Powerbank weiterzuarbeiten. Letztlich spricht die Stabilität, Leistung und Kapazität für diese Powerbank. Probleme mit der Stabilität der Ausgangsspannung hatte ich in dieser Kombination nicht mehr* .
🚀【65 W PD Schnellladung】Die Baseus Powerbank 65 W kann Laptops mit voller Geschwindigkeit aufladen. Mit dem mitgelieferten USB-C auf C-Kabel kann dieser USB-C-Netzteil in nur 50 Minuten das 13-Zoll MacBook Pro von 0% auf 50% aufladen, ideal für Geschäftsreisen oder den Outdoor-Einsatz.
🚀【5 Ausgänge + 3 Eingänge】Dieses vielseitige tragbare Laptop-Netzteil kann gleichzeitig 3-5 Geräte aufladen, der USB-C-Port unterstützt maximale Eingänge und kann in nur etwa 3 Stunden vollständig aufgeladen werden. Durch das lange Drücken der Ein-/Aus-Taste für 3 Sekunden kann der Niedrigstrommodus aktiviert werden, um gleichzeitig Kopfhörer und andere kleine Geräte aufzuladen.
🚀【Riesige Kapazität】Mit einer Batteriekapazität von 26800 mAh bietet dieses Netzteil 7 Tage lang sorgenfreie Energie und lädt das iPhone 14 Pro 5,4 Mal, das Samsung S23 Ultra 3,8 Mal, das iPad Pro 4 2,3 Mal oder das 13-Zoll MacBook Pro auf. Keine Sorge mehr wegen leerem Akku.
🚀【Intelligentes LED-Display】Die Baseus 65W USB C Powerbank ist mit einem LED-Zifferndisplay ausgestattet, das drei Modi unterstützt und den Strom, die Spannung und die Leistung in Echtzeit überwacht und Sie über den Ladezustand informiert. Kompatibel mit fast allen USB-C- und USB-A-Stromversorgungsgeräten, unterstützt PD3.0, QC3.0, SCP und kann MacBook Pro, Dell XPS, iPhone 15, 14, 13, 12, iPad Pro, Samsung Galaxy S23, Google Pixel, Steam Deck, Rog Ally und andere Geräte schnell aufladen.
🚀【Mehrfachschutz】Unsere Powerbank integriert ein intelligentes Identifikationssystem und verfügt über fortschrittliche Überhitzungs-, Überstrom-, Überentladungs-, Überspannungs- und Kurzschlussschutzfunktionen. Sie erhalten eine 26800 mAh Kapazität Powerbank, 1 schnelles Type-C zu Type-C-Ladekabel, eine 24-monatige Garantiekarte und einen 24-Stunden-Service für Ihre Fragen (auch wenn das Rückgabefenster bereits geschlossen ist, können Sie uns kontaktieren, wenn Sie Probleme haben).
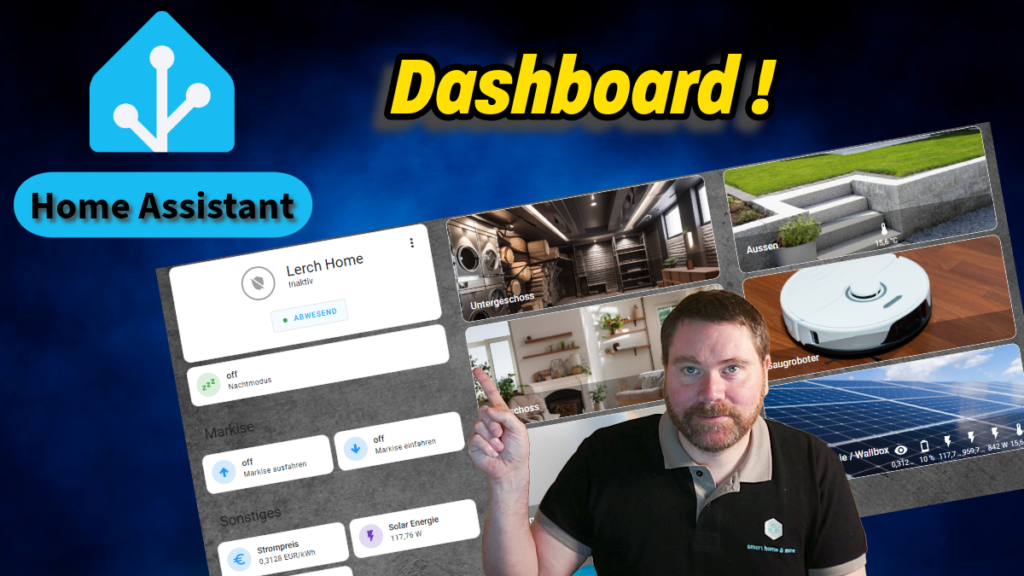
In diesem Video zeige ich dir mein individuelles Home Assistant Dashboard und gehe auf die Funktionen und Designs ein, die es zu bieten hat. Egal ob du ein erfahrener Nutzer oder ein Neuling bist, hier gibt es jede Menge Inspiration und nützliche Tipps für dich!
Vergiss nicht, einen Daumen hoch zu geben 👍 und den Kanal zu abonnieren, um keine weiteren spannenden Videos zu verpassen! Lass mich in den Kommentaren wissen, was du von meinem Dashboard hältst und welche Features du am meisten nutzt. Viel Spaß beim Anschauen! 😊
Ich möchte euch heute einen allgemeinen Amazon-Link teilen, über den ihr eine Vielzahl von Produkten entdecken könnt. Egal, ob ihr nach Smart Home-Geräten, Gadgets oder anderen nützlichen Artikeln sucht, Amazon hat für jeden etwas zu bieten.
Wenn ihr über diesen Link einkauft, unterstützt ihr meinen Kanal, ohne dass es für euch zusätzliche Kosten verursacht. Das hilft mir, weiterhin spannende Inhalte für euch zu erstellen!
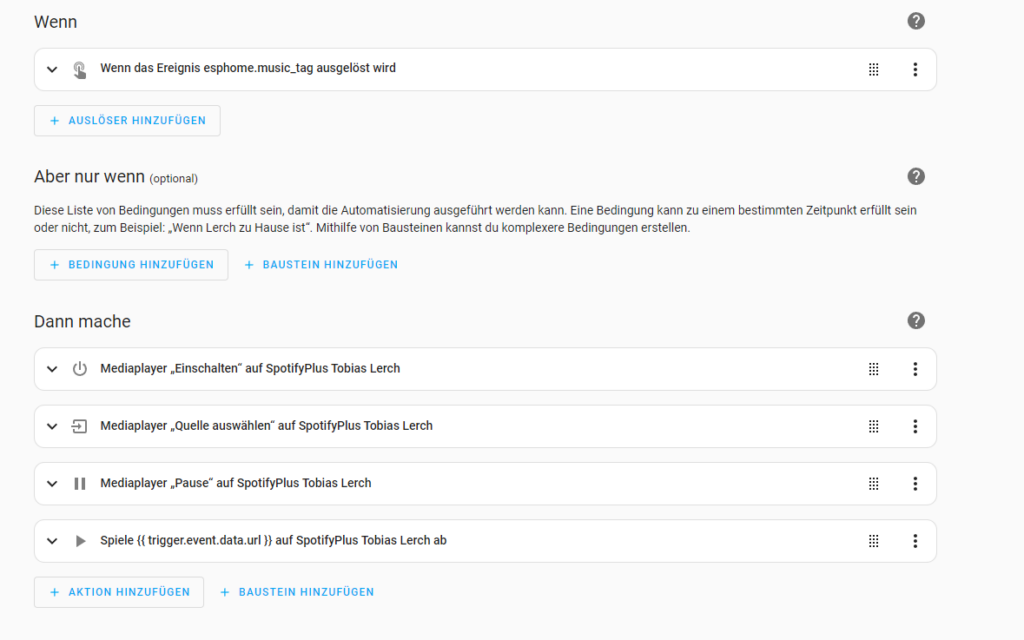
🔔 Verwandle Dein Smart Home mit Home Assistant: Spotify-Jukebox & Alarmo-Steuerung! 🎶
In diesem Video zeige ich Dir, wie Du Dein Home Assistant Setup auf das nächste Level hebst! 🌟
➡️ Inhalte des Videos:
3D-gedrucktes Gehäuse: Perfekt angepasst für Dein DIY-Projekt.
Integration eines RFID Readers: Für die einfache Steuerung Deiner Geräte.
Spezielle Spotify Integration: Verwandle Spotify in eine ultimative Jukebox für die Kids oder Dich
Verwendung von Tags: Einfaches Hinzufügen und Verwalten von Funktionen.
Steuerung von Alarmo: Alles, was Du wissen musst, um Dein Sicherheitssystem zu meistern.
Schritt für Schritt erkläre ich Dir, wie Du all diese Komponenten zusammenfügst und Dein Zuhause smarter machst. Verpasse nicht, Dein Home Assistant Setup mit diesen coolen Features zu erweitern!
Jetzt anschauen und loslegen! 💡🔧
Abonniere und aktiviere die Glocke, um keine weiteren Tipps und Tricks rund um Home Assistant zu verpassen! 📲🔔
Ich möchte euch heute einen allgemeinen Amazon-Link teilen, über den ihr eine Vielzahl von Produkten entdecken könnt. Egal, ob ihr nach Smart Home-Geräten, Gadgets oder anderen nützlichen Artikeln sucht, Amazon hat für jeden etwas zu bieten.
Wenn ihr über diesen Link einkauft, unterstützt ihr meinen Kanal, ohne dass es für euch zusätzliche Kosten verursacht. Das hilft mir, weiterhin spannende Inhalte für euch zu erstellen!
Jumper Kabel für die Verbindung zwischen ESP und HC-SR04
Aufbau Skizze:
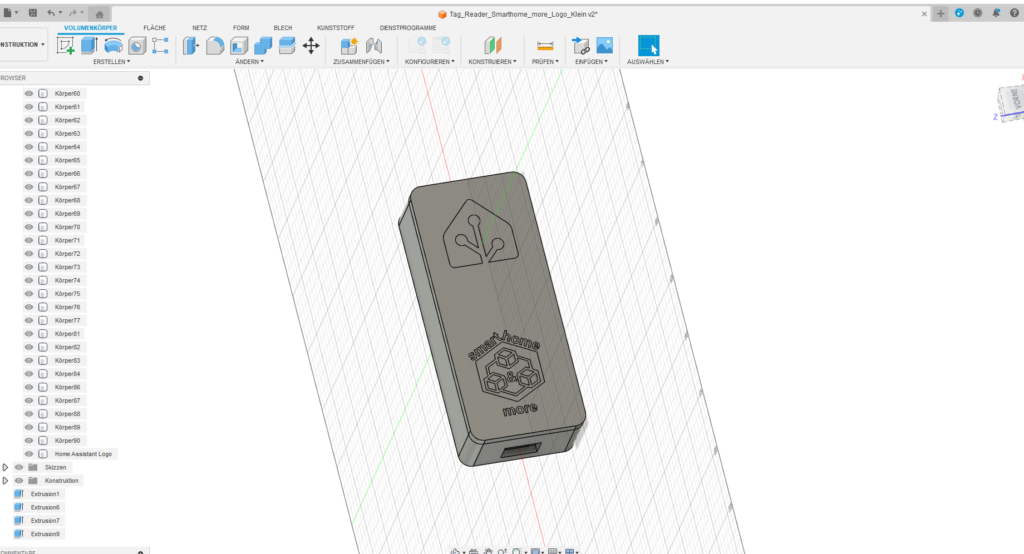
3D Druck
Gedruckt habe ich das Gehäuse in PETG als auch in PLA. Dabei habe ich den Bambulab P1S mit AMS für den Mehrfarbdruck verwendet. Die Konstruktionsdateien wurden in Fusion 360 erzeugt.
Gerne dürft ihr die Dateien verändern und für eure Bedürfnisse anpassen. Eine kommerzielle Nutzung ( z.B. der Verkauf ) ist nicht gestattet. Ich würde mich sehr freuen, wenn ihr mir eure Optimierungen zukommen lassen würdet 🙂 Dazu seid ihr gerne auch auf meinen Discord Server eingeladen.
ESPHOME
Den Quellcode vom Entwickler Andrea Donno findet ihr hier. An dieser Stelle nochmal vielen Dank für die tolle Arbeit !
Weitere Informationen zu ESPhome findet ihr auf der Dokumentationsseite von ESPHome.
Für die Installation der Spotify Plus Integration benötigt ihr HACS. Die Installation zeige ich euch in diesem Video in wenigen Minuten:
Die Spotify Plus Integration
Alle Informationen zur Spotify Plus Custom Component findet ihr auf der github Seite des Entwicklers Todd Lucas.
Vielen Dank an dieser Stelle auch an Daniel & Jörg vom Kanal Smarthome Symphonie, die mir in diesem Video mit ihrem Podcast als Beispiel für die Integration gedient haben.
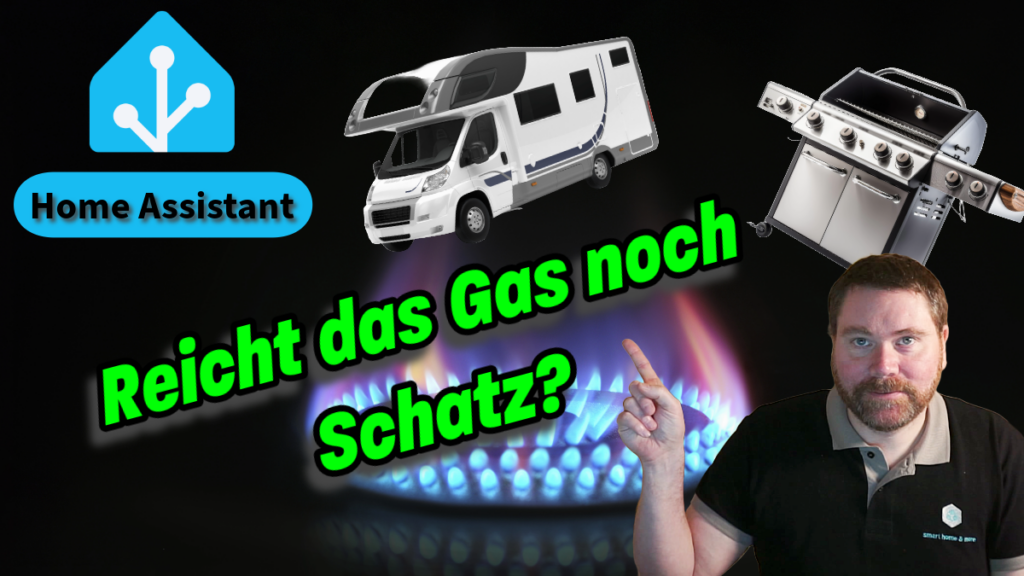
In diesem Video zeige ich dir, wie du den Füllstand deiner Gasflasche mit Home Assistant ganz einfach überwachen kannst – egal ob beim Grillen im Garten oder unterwegs im Camper! 🚐🔥 Ich erkläre Schritt für Schritt, welche Sensoren du benötigst, wie du sie einrichtest und in dein Home Assistant System integrierst. Nie wieder überraschend leere Gasflaschen! Abonniere den Kanal für mehr praktische Tipps und Tricks rund um Smart Home und Outdoor-Technik. 🔧📲
Ich möchte euch heute einen allgemeinen Amazon-Link teilen, über den ihr eine Vielzahl von Produkten entdecken könnt. Egal, ob ihr nach Smart Home-Geräten, Gadgets oder anderen nützlichen Artikeln sucht, Amazon hat für jeden etwas zu bieten.
Wenn ihr über diesen Link einkauft, unterstützt ihr meinen Kanal, ohne dass es für euch zusätzliche Kosten verursacht. Das hilft mir, weiterhin spannende Inhalte für euch zu erstellen!
Wenn ihr wissen wollt, wie die Karte angelegt wird , oder aber auch der Wasserfüllstand , Fernzugriff u.s.w. funktioniert, dann schaut euch diese Playlist von mir an:
Home Assistant mit ESPHome und Ultraschallsensor: Automatisierung leicht gemacht! In diesem Projekt nutzt du ESPHome und einen Ultraschallsensor, um eine spannende Automatisierung zu erstellen. Wenn du mehr über ESPHome erfahren möchtest, findest du in diesem Video spannende Informationen.
Viel Erfolg bei deinem Projekt! 😊🛠️
Ich möchte euch heute einen allgemeinen Amazon-Link teilen, über den ihr eine Vielzahl von Produkten entdecken könnt. Egal, ob ihr nach Smart Home-Geräten, Gadgets oder anderen nützlichen Artikeln sucht, Amazon hat für jeden etwas zu bieten.
Wenn ihr über diesen Link einkauft, unterstützt ihr meinen Kanal, ohne dass es für euch zusätzliche Kosten verursacht. Das hilft mir, weiterhin spannende Inhalte für euch zu erstellen!
Jumper Kabel für die Verbindung zwischen ESP und HC-SR04
1
Hinweis: Den M5 Stack Atom Lite kann man bei anderen Quellen günstiger bekommen. Sucht danach im Internet , falls ihr meinen Kanal unterstützen wollt, freue ich mich natürlich aber auch über einen Einkauf über den Amazon Link.
Verkabelung Wemos D1 Mini mit HC-SR04
Verkabelung M5Stack ATom Lite mit HC-SR04
ESPHome Code ( hier sind für Euch die Stellen ab sensor: -> Enable logger interessant):
substitutions:
  name: esphome-web-684d66
  friendly_name: Wemos_D1Mini_Ultraschall_V1

esphome:
  name: ${name}
  friendly_name: ${friendly_name}
  name_add_mac_suffix: false
  project:
    name: esphome.web
    version: '1.0'

esp8266:
  board: esp01_1m

# Example configuration entry
sensor:
  - platform: ultrasonic
    trigger_pin: GPIO2
    echo_pin: GPIO0
    name: "Ultraschall für Video"
    id: ultraschall_video
    update_interval: 1s
    # Example filters:
    filters:
      - filter_out: nan
      - median:
          window_size: 5
          send_every: 5
          send_first_at: 1


  - platform: wifi_signal # Reports the WiFi signal strength/RSSI in dB
    name: "WiFi Signal dB"
    id: wifi_signal_db
    update_interval: 60s
    entity_category: "diagnostic"

  - platform: copy # Reports the WiFi signal strength in %
    source_id: wifi_signal_db
    name: "WiFi Signal Percent"
    filters:
      - lambda: return min(max(2 * (x + 100.0), 0.0), 100.0);
    unit_of_measurement: "Signal %"
    entity_category: "diagnostic"
    device_class: ""


binary_sensor:
  - platform: template
    name: "PKW unter Carport"
    lambda: |-
      if ((id(ultraschall_video).state >= 0.5) ) {
        // Pkw ist nicht unter Carport
        return false;
      } else {
        // PKW ist unter Carport
        return true;
      }

# Enable logging
logger:

# Enable Home Assistant API
api:

# Allow Over-The-Air updates
ota:
  platform: esphome
  password: xxxxxxxxxxxxxxxxxxxxx


# Allow provisioning Wi-Fi via serial
improv_serial:

wifi:
  # Set up a wifi access point
  ap: {}

# In combination with the `ap` this allows the user
# to provision wifi credentials to the device via WiFi AP.
captive_portal:

dashboard_import:
  package_import_url: github://esphome/example-configs/esphome-web/esp8266.yaml@main
  import_full_config: true

# To have a "next url" for improv serial
web_server:
Visualisierung auf dem Dashboard
Falls ihr nicht den binären Sensor aus dem ESP nutzen wollt, könnt ihr euch auch einen binären Template Helfer anlegen und die Schwellen für „PKW vorhanden“ und „PKW nicht vorhanden“ darüber definieren.
In dieser Playlist findet ihr noch weitere Informationen zu EVCC , PV – Überschussladen und auch MQTT Sensoren wie z.B. den Charge Mode:
PV-Modus Prognose Template Helfer:
{% set value_prognose = (float(states.sensor.solcast_pv_forecast_prognose_nachste_stunde.state) / 1000.0) %}
{% if  value_prognose > 1.5 %}
pv
{% elif value_prognose > 0 %}
minpv
{% else %}
now
{%endif%}
Update 20.06.2024: Um beim Neustart von Home Assistant keine fehlerhaften Ergebnisse zu erhalten, ist es besser den Status mit state(’sensor.entity‘) abzufragen. In diesem Beispiel wäre es:
{% set value_prognose = (float(states('sensor.solcast_pv_forecast_prognose_nachste_stunde')) / 1000.0) %}
{% if  value_prognose > 1.5 %}
pv
{% elif value_prognose > 0 %}
minpv
{% else %}
now
{%endif%}
Ultraschall Sensor Automatisierung YAML :
alias: Carport_Ultraschallsensor
description: ""
trigger:
  - platform: state
    entity_id:
      -  binary_sensor.esphome_web_684d66_pkw_unter_carport
    to: "on"
    id: PKW Trigger On
  - platform: state
    entity_id:
      -  binary_sensor.esphome_web_684d66_pkw_unter_carport
    to: "off"
  - platform: time_pattern
    minutes: /30
  - platform: sun
    event: sunrise
    offset: 0
  - platform: sun
    event: sunset
    offset: 0
condition: []
action:
  - if:
      - condition: and
        conditions:
          - condition: state
            entity_id:  binary_sensor.esphome_web_684d66_pkw_unter_carport
            state: "on"
          - condition: or
            conditions:
              - condition: state
                entity_id: device_tracker.tlerch
                state: home
              - condition: state
                entity_id: device_tracker.slerch
                state: home
            alias: Eine Person ist zu Hause & Auto steht unter Carport
    then:
      - service: select.select_option
        metadata: {}
        data:
          option: "{{ states.sensor.helfer_pv_prognose_lademodus.state }}"
        target:
          entity_id: select.charge_mode
      - condition: trigger
        id:
          - PKW Trigger On
      - service: media_player.volume_set
        metadata: {}
        data:
          volume_level: 0.33
        target:
          entity_id: media_player.kuche
      - service: notify.alexa_media_kuche
        metadata: {}
        data:
          message: >-
            PKW unter Carport angekommen. Lademodus {{
            states.sensor.helfer_pv_prognose_lademodus.state }} selektiert
      - service: media_player.volume_set
        metadata: {}
        data:
          volume_level: 0.1
        target:
          entity_id: media_player.kuche
      - service: notify.mobile_app_tlerch
        metadata: {}
        data:
          message: >-
            Fahrzeug unter Carport angekommen. Lademodus {{
            states.sensor.helfer_pv_prognose_lademodus.state }} eingeschaltet
      - if:
          - condition: and
            conditions:
              - condition: sun
                before: sunrise
                after: sunrise
                enabled: false
              - condition: trigger
                id:
                  - PKW Trigger On
        then:
          - service: light.turn_on
            metadata: {}
            data:
              brightness_pct: 100
            target:
              entity_id: light.aussenbeleuchtung
          - delay:
              hours: 0
              minutes: 3
              seconds: 0
              milliseconds: 0
          - service: light.turn_off
            metadata: {}
            data: {}
            target:
              entity_id: light.aussenbeleuchtung
    else:
      - condition: trigger
        id:
          - PKW Trigger On
      - service: select.select_option
        metadata: {}
        data:
          option: "off"
        target:
          entity_id: select.charge_mode
      - service: notify.mobile_app_tlerch
        metadata: {}
        data:
          message: Unbekanntes Fahrzeug unter Carport erkannt!
          title: 🚨🚨 CARPORT 🚨🚨
          data:
            notification_icon: mdi:alert
            channel: Notfall
            priority: high
            ttl: 0
            color: red
            push:
              sound:
                name: default
                critical: 1
                volume: 1
mode: single
Update der ESPHome funktioniert nicht (mehr) 20.06.2024:
Solltet ihr das Problem haben, dass ihr beim Update der ESPHome Revision bei eurem Device eine Fehlermeldung bekommt, dass das Update nicht durchgeführt werden kann, dann muss eine Zeile im YAML Code ergänzt werden ( ich habe das im veröffentlichten Code korrigiert ! )
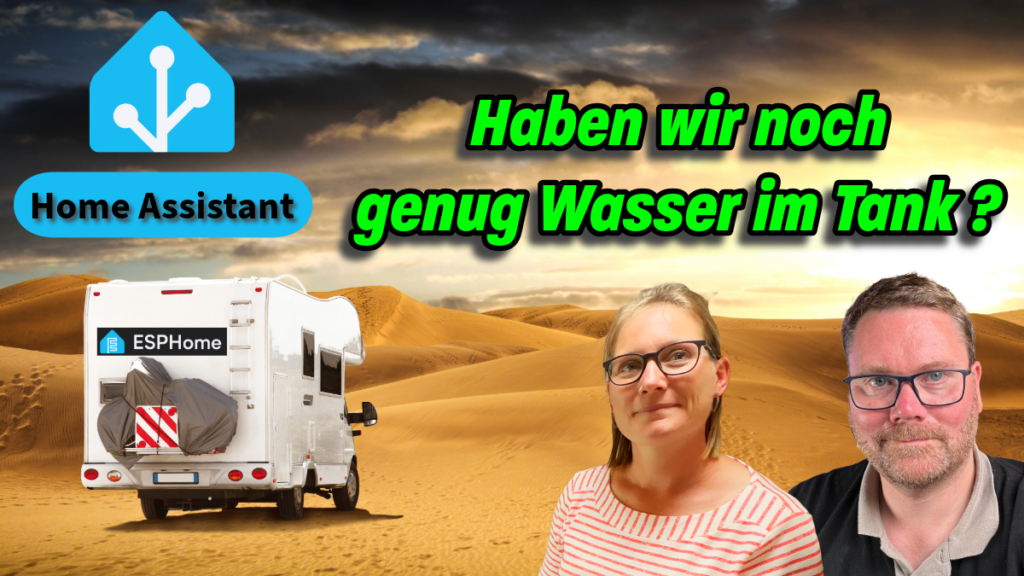
Entdecke in diesem Video, wie du mit Home Assistant und ESPHome den Füllstand deines Wassertanks präzise messen kannst – egal ob im Camper, Wohnmobil oder sogar Zuhause! 🚐💧 Wir zeigen dir Schritt für Schritt, wie du mit einfachen Mitteln und ohne Vorkenntnisse in die Welt von Home Assistant und ESPHome einsteigst. Erfahre, wie du die Daten deines Wassertanks überwachen und in Echtzeit auslesen kannst. Perfekt für Anfänger und alle Technikbegeisterten! 🌟
Ich möchte euch heute einen allgemeinen Amazon-Link teilen, über den ihr eine Vielzahl von Produkten entdecken könnt. Egal, ob ihr nach Smart Home-Geräten, Gadgets oder anderen nützlichen Artikeln sucht, Amazon hat für jeden etwas zu bieten.
Wenn ihr über diesen Link einkauft, unterstützt ihr meinen Kanal, ohne dass es für euch zusätzliche Kosten verursacht. Das hilft mir, weiterhin spannende Inhalte für euch zu erstellen!
3. Schritt-für-Schritt-Anleitung zur Installation und Konfiguration
4. Live-Demo: Wassertankfüllstand im Camper ermitteln
5. Tipps und Tricks zur Optimierung und Anwendung auch in anderen Bereichen
6. Verpasse nicht diese einfache und effektive Lösung zur Füllstandsmessung. Abonniere jetzt und bleibe auf dem Laufenden! 👍🔔 Wenn du weitere Anpassungen oder Ideen hast, lass es mich wissen! 😊👍
Wichtiger Hinweis:
Hallo Zusammen, kurzer Hinweis und viele Dank an @bernhardpasman157 👍
Im Video habe ich ein paarmal vom Widerstand des Kondensators gesprochen, was natürlich Blödsinn ist. Ein Kodensator hat eine Kapazität😊
Hinweis: Den M5 Stack Atom Lite kann man bei anderen Quellen günstiger bekommen. Sucht danach im Internet , falls ihr meinen Kanal unterstützen wollt, freue ich mich natürlich aber auch über einen Einkauf über den Amazon Link.
Die Verdahtung lässt sich relativ einfach gestalten. Wer es etwas professioneller möchte, verwendet noch PinHeader und lötet sich die Kabel zusammen ( entweder auf einer Platine oder direkt). Mir ging es hier darum euch eine Lösung zu zeigen, die man auch ohne Lötkenntnisse umsetzen kann.
Sollte Interesse an einer fertigen Platinen mit Anschlussklemmen bestehen, so könnt ihr mir das gerne auf meinem Discord Server smart home & more Discord Server mitteilen. Sollte es genügend Anfragen geben, so werden wir gerne eine Platine dafür erstellen.
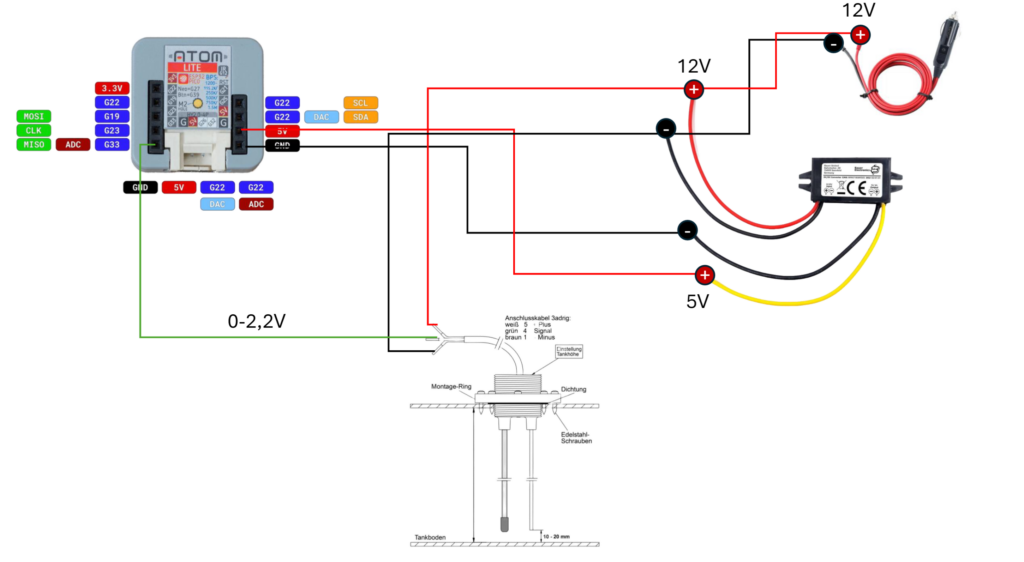
Code ESPHome ( ersetzt bei euch nur den Teil unter „sensor:“ , die anderen Elemente werden automatisch angelegt ):
esphome:
  name: fuellstand-camper
  friendly_name: Fuellstand_Camper

esp32:
  board: m5stack-atom
  framework:
    type: arduino

# Example configuration entry
sensor:
  - platform: adc
    pin: GPIO33
    name: "Füllstand Frischwasser"
    update_interval: 1s
    attenuation: auto
    unit_of_measurement: "%"
    icon: mdi:water-pump
    # Example filters:
    filters:
      - filter_out: nan # Update: 20.06.2024 Filter, falls keine Werte vom Sensor erhalten werden
      - calibrate_linear:
          - 0.0 -> 0.0
          - 1.1 -> 50.0
          - 2.2 -> 100.0
      - median:
          window_size: 5
          send_every: 5
          send_first_at: 1

  - platform: wifi_signal # Reports the WiFi signal strength/RSSI in dB
    name: "WiFi Signal dB"
    id: wifi_signal_db
    update_interval: 60s
    entity_category: "diagnostic"

  - platform: copy # Reports the WiFi signal strength in %
    source_id: wifi_signal_db
    name: "WiFi Signal Percent"
    filters:
      - lambda: return min(max(2 * (x + 100.0), 0.0), 100.0);
    unit_of_measurement: "Signal %"
    entity_category: "diagnostic"
    device_class: ""

# Enable logging
logger:

# Enable Home Assistant API
api:
  encryption:
    key: "junLQaHVpQKVMtpZx04qQwpLx6qbZLail8/PWfQsefw="
ota:
  platform: esphome # Wichtiger Hinweis!: mit dem Update der ESPHome Software vom 20.06.2024, muss diese Zeile ergänzt werden, um für die Version ein Update durchzuführen
  password: "1520ab9d0c8fea0f99fd36dceafb902e"

wifi:
  ssid: !secret wifi_ssid
  password: !secret wifi_password
  manual_ip:
    static_ip: 192.168.101.156
    gateway: 192.168.101.1
    subnet: 255.255.255.0

  # Enable fallback hotspot (captive portal) in case wifi connection fails
  ap:
    ssid: "Fuellstand-Camper"
    password: "gE2KT8jGjALI"

captive_portal:
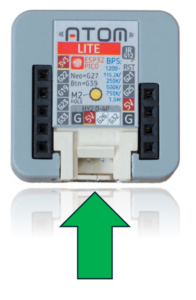
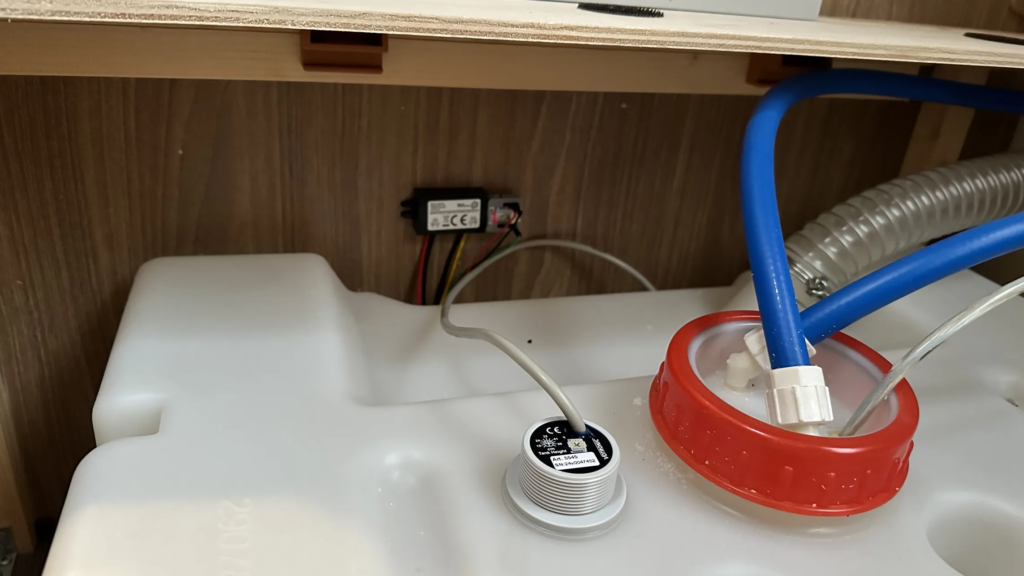
Solltet ihr nicht die Buchsenleiste verwenden wollen, so steht euch auch der Steckanschluss zur Verfügung. Geeignete Kabel könnt ihr hier z.B. beziehen. Eine Seite vom Kabel müsstet ihr dann abschneiden und die Kabelenden abisolieren.
Im Code muss jetzt noch diese Zeile verändert werden:
  #  pin: GPIO33 # wir ändern GPIO33 in GPIO32
     pin: GPIO22 # damit nutzen wir den Steckanschluss am Atom Lite
Grundsätzlich könnt ihr darüber auch eine zweite Sonde anschließen, z.B. für den Füllstand eures Abwassers. Dazu ergänzt unter den Sensoren lediglich einen weiteren Sensor und nutzt den zweiten ADC Eingang (GPIO22) für einen weiteren Sensor.
Ich habe den Code anders als im Video noch erweitert, so dass auch der Füllstand in Prozent mit ausgeben wird.
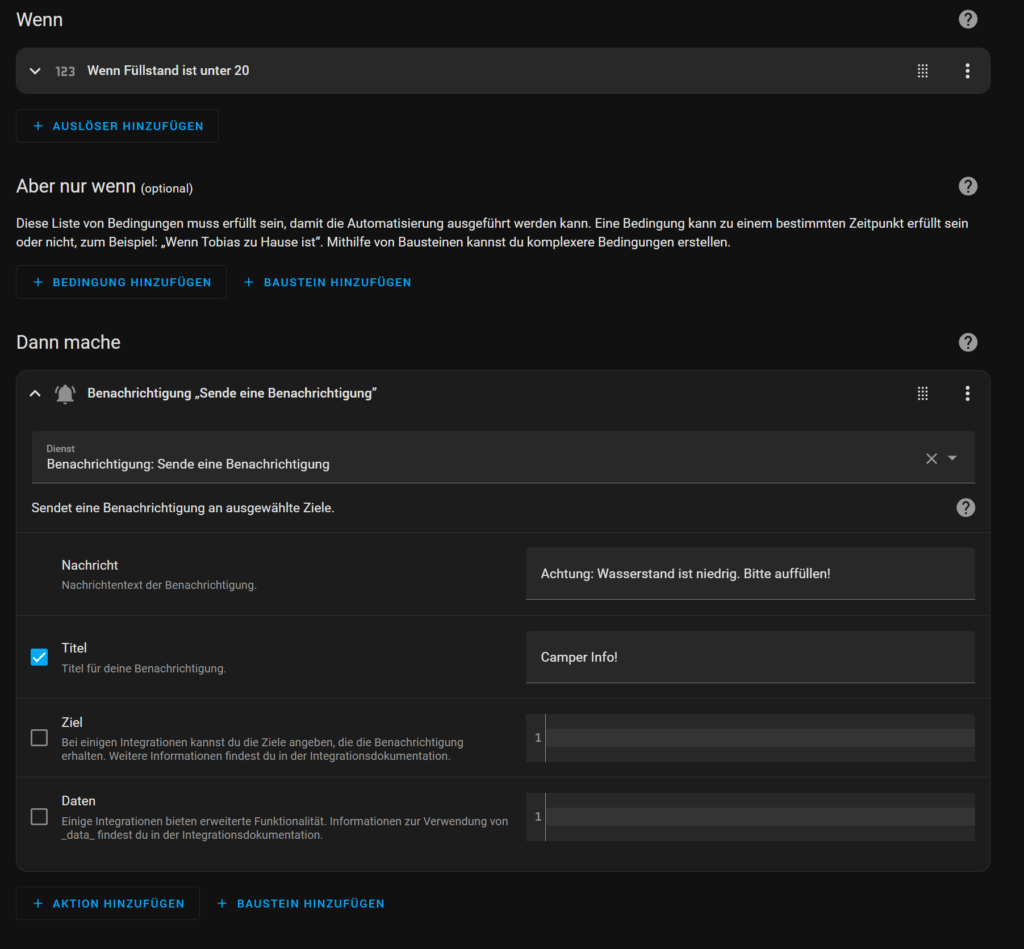
alias: Wasserstand ist niedrig
description: ""
trigger:
  - platform: numeric_state
    entity_id:
      - sensor.fuellstand_camper_f_llstand_frischwasser
    below: 20
condition: []
action:
  - service: notify.notify
    metadata: {}
    data:
      message: >-
        Achtung: Wasserstand ist bei
        {{states.sensor.fuellstand_camper_f_llstand_frischwasser.state}}% .
        Bitte auffüllen!
      title: Camper Info!
mode: single
Für den Einbau habe ich den Buck Converter und den M5Stack mit 3M Klebeband an der Wand unter der Sitzleiste neben dem Wassertank angebracht. Dort stört er nicht und ist im Bedarfsfall aber noch zugänglich.
Weitere Videos zum Thema Camper findest du in folgender Playlist:
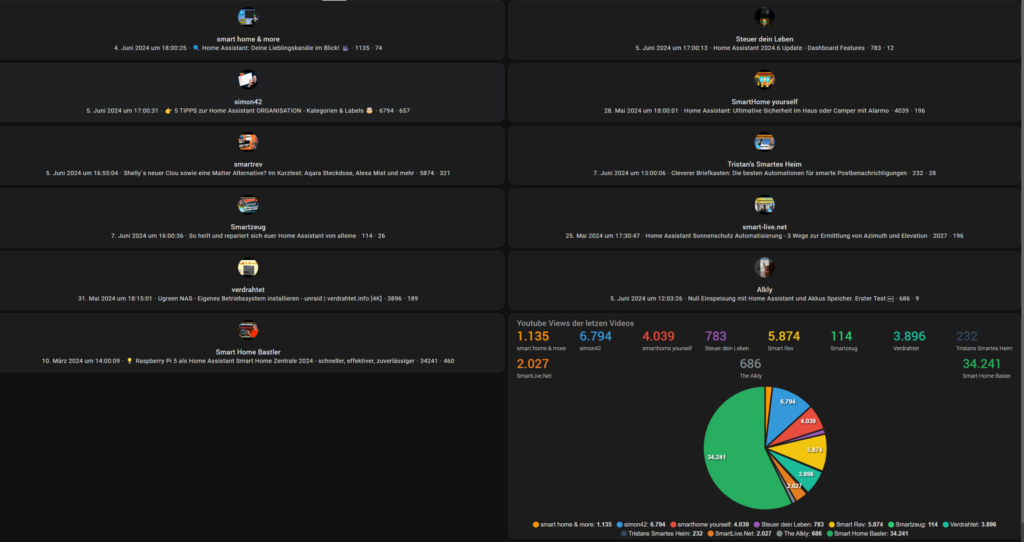
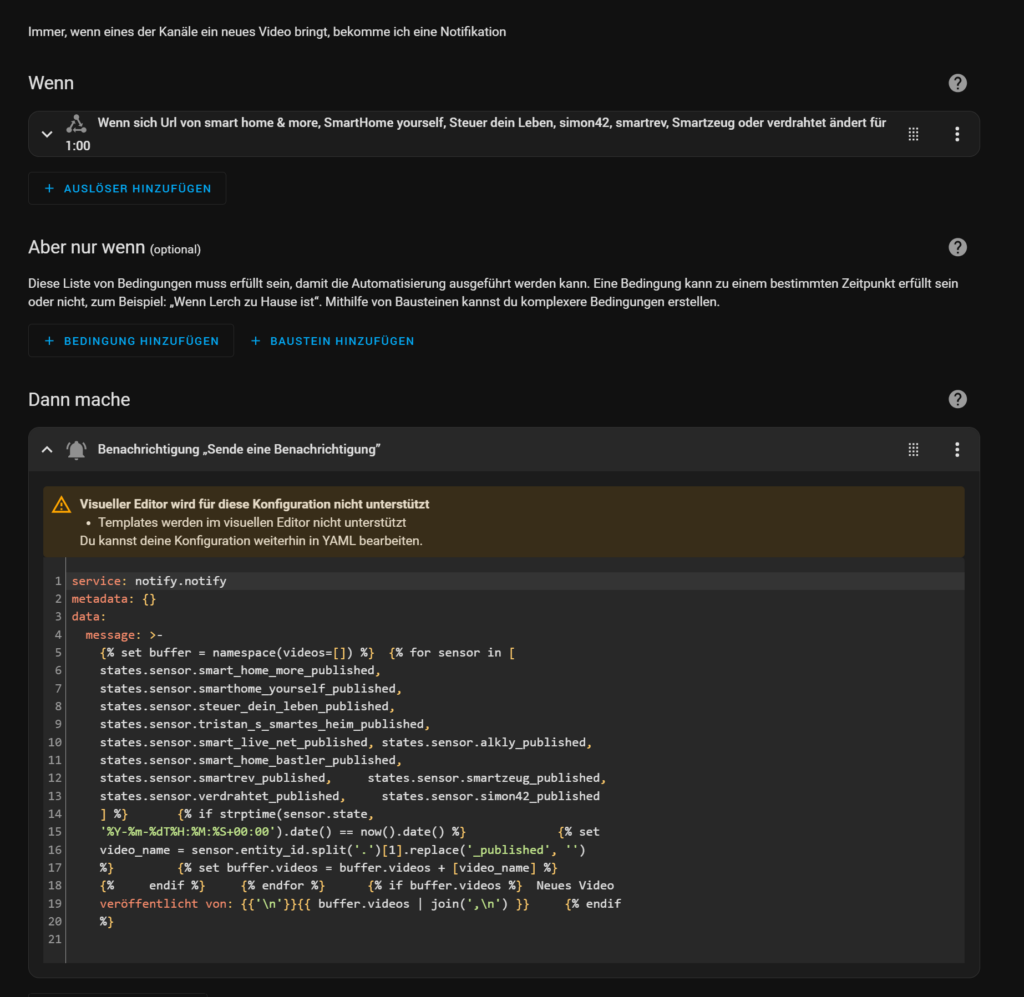
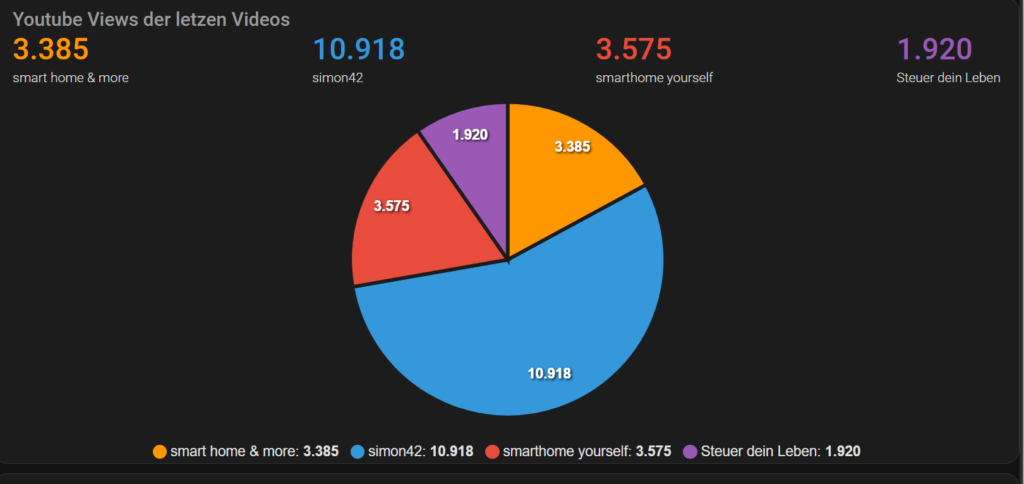
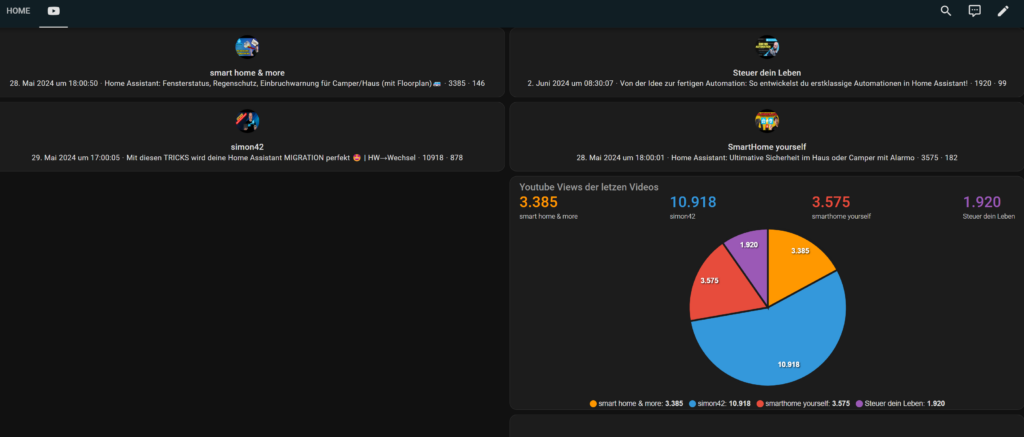
In diesem Video zeige ich dir, wie du mit Home Assistant deine Lieblings-YouTube-Kanäle im Blick behältst und du automatisch benachrichtigt wirst, wenn neue Videos veröffentlicht werden. Dabei verwenden wir Templates, For-Schleifen und erstellen sogar ein Pie-Chart für die Creator.
🔍 Inhalte des Videos:
1. YouTube-Tracking: Wir setzen Sensoren ein, um die Veröffentlichungen deiner Lieblingskanäle zu überwachen.
2. Automatisierung mit Notification: Du erhältst Benachrichtigungen, sobald neue Videos verfügbar sind.
3. For-Schleife und Variablen in Templates: Wir nutzen diese leistungsstarken Funktionen, um unsere Automatisierung zu optimieren.
4. Pie-Chart für die Creator: Wir visualisieren die Daten mit einem schicken Diagramm. Bleib auf dem Laufenden und abonniere meinen Kanal!
🚀 Wenn du weitere Anpassungen oder Ideen hast, lass es mich wissen! 😊👍
Ich möchte euch heute einen allgemeinen Amazon-Link teilen, über den ihr eine Vielzahl von Produkten entdecken könnt. Egal, ob ihr nach Smart Home-Geräten, Gadgets oder anderen nützlichen Artikeln sucht, Amazon hat für jeden etwas zu bieten.
Wenn ihr über diesen Link einkauft, unterstützt ihr meinen Kanal, ohne dass es für euch zusätzliche Kosten verursacht. Das hilft mir, weiterhin spannende Inhalte für euch zu erstellen!
Ich würde mich sehr über einige Dashboards auf Basis dieses Videos freuen. Kommt dazu gerne auf meinen Discord Server https://discord.gg/tCGy3RWFwJ und teilt Eure Ideen. Vielen Dank 🙂
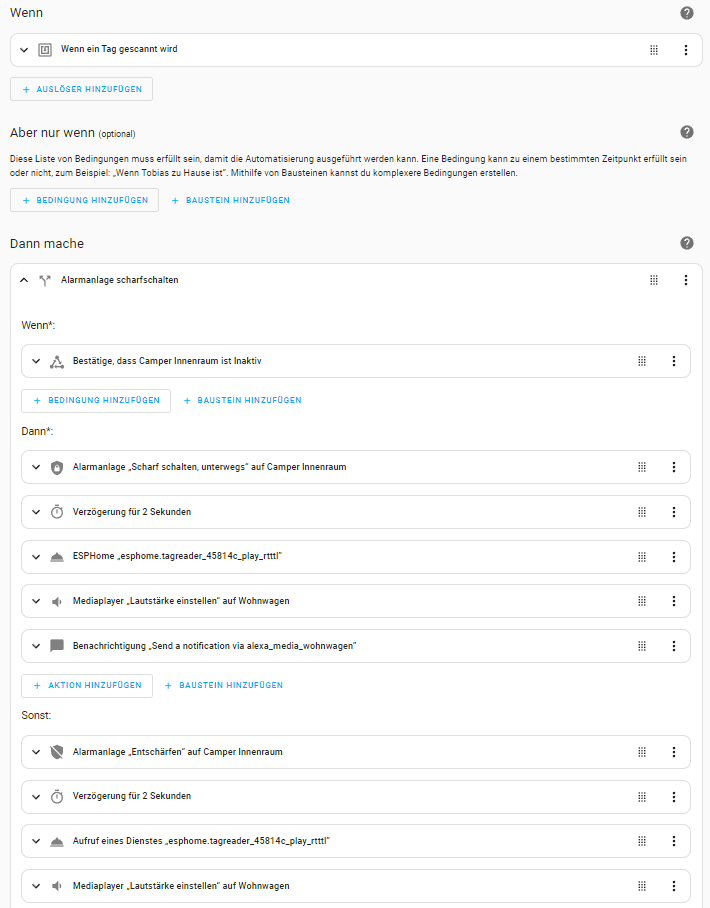
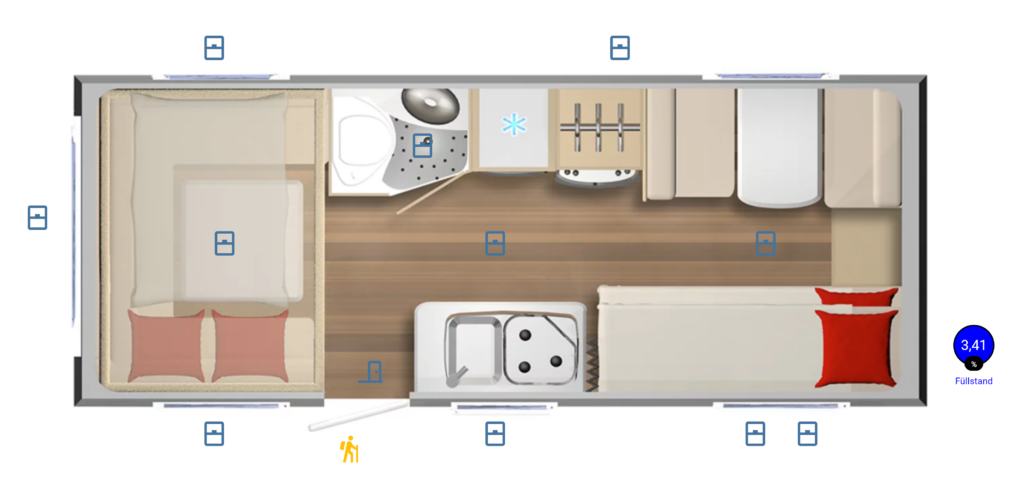
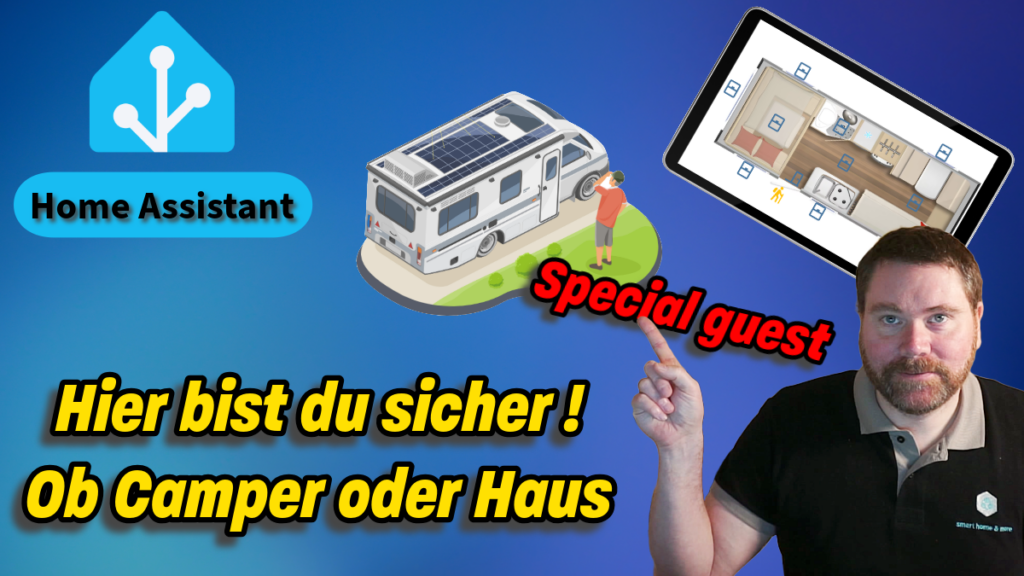
Willkommen zu unserem neuen Video! Erfahre, wie Home Assistant dein Zuhause, ob mobil oder nicht schützt, indem es offene Fenster oder Türen erkennt, und damit vor Regen warnt und Einbrüche verhindert! Entdecke auch unseren Camper-Floorplan und triff unseren spannenden Gast, der dir auch einen Einblick in seine Lösungen gibt. Verpasse nicht diese spannende Einführung in die Welt der Smart (mobil) Home-Sicherheit!
Ich möchte euch heute einen allgemeinen Amazon-Link teilen, über den ihr eine Vielzahl von Produkten entdecken könnt. Egal, ob ihr nach Smart Home-Geräten, Gadgets oder anderen nützlichen Artikeln sucht, Amazon hat für jeden etwas zu bieten.
Wenn ihr über diesen Link einkauft, unterstützt ihr meinen Kanal, ohne dass es für euch zusätzliche Kosten verursacht. Das hilft mir, weiterhin spannende Inhalte für euch zu erstellen!
Um Alarmo installieren zu können benötigst du HACS. Wie du HACS installierst, erfährst du in diesem Video:
Wie du Home Assistant auf deinem Raspberry PI 4 oder 5 für z.B. deinen Camper installieren kannst, zeige ich dir in diesem kurzen Video:
Den Kanal von Daniel (smarthomeyourself) findest du hier:
Das ausführliche Alarmo Tutorial von Daniel könnt ihr hier finden:
Vielen Dank auch an Maxx für sein tolles Berechnungstool und natürlich auch für seine Klasse Videos im Blick auf Dashboards und Flurplänen. Schaut bei ihm gerne mal vorbei:
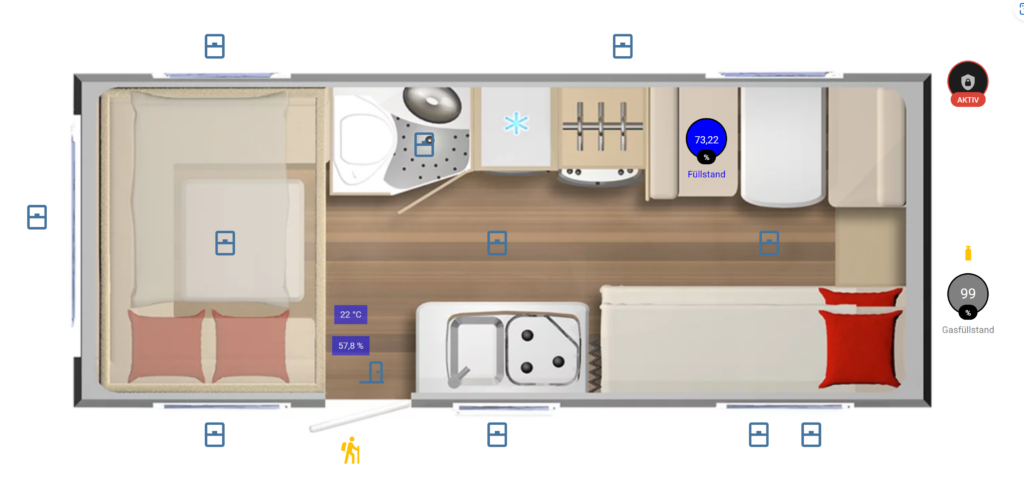
Im Video zeige ich euch , wie ihr einen einfachen Flurplan erstellt. Egal ob Camper oder Haus. Hier habt ihr den Beispielcode (Bildelemente Karte) aus dem Video:
Um die Fenster zu überwachen wurde auch eine kleine Automatisierung vorgestellt.
Den YAML Code dazu findest du hier:
alias: Benachrichtigung , wenn Fenster noch geöffnet ist
description: ""
trigger:
  - platform: state
    entity_id:
      - input_boolean.unterwegs
    to: "on"
  - platform: time_pattern
    minutes: /30
condition:
  - condition: and
    conditions:
      - condition: state
        entity_id: binary_sensor.fenster_und_dachluken
        state: "on"
      - condition: state
        entity_id: input_boolean.unterwegs
        state: "on"
action:
  - service: notify.notify
    metadata: {}
    data:
      message: >-
        Achtung: {{ expand('binary_sensor.fenster_und_dachluken') |
        selectattr('state','eq','on') | map(attribute='name') | list | join
        (',\n') }} ist noch geöffnet
mode: single
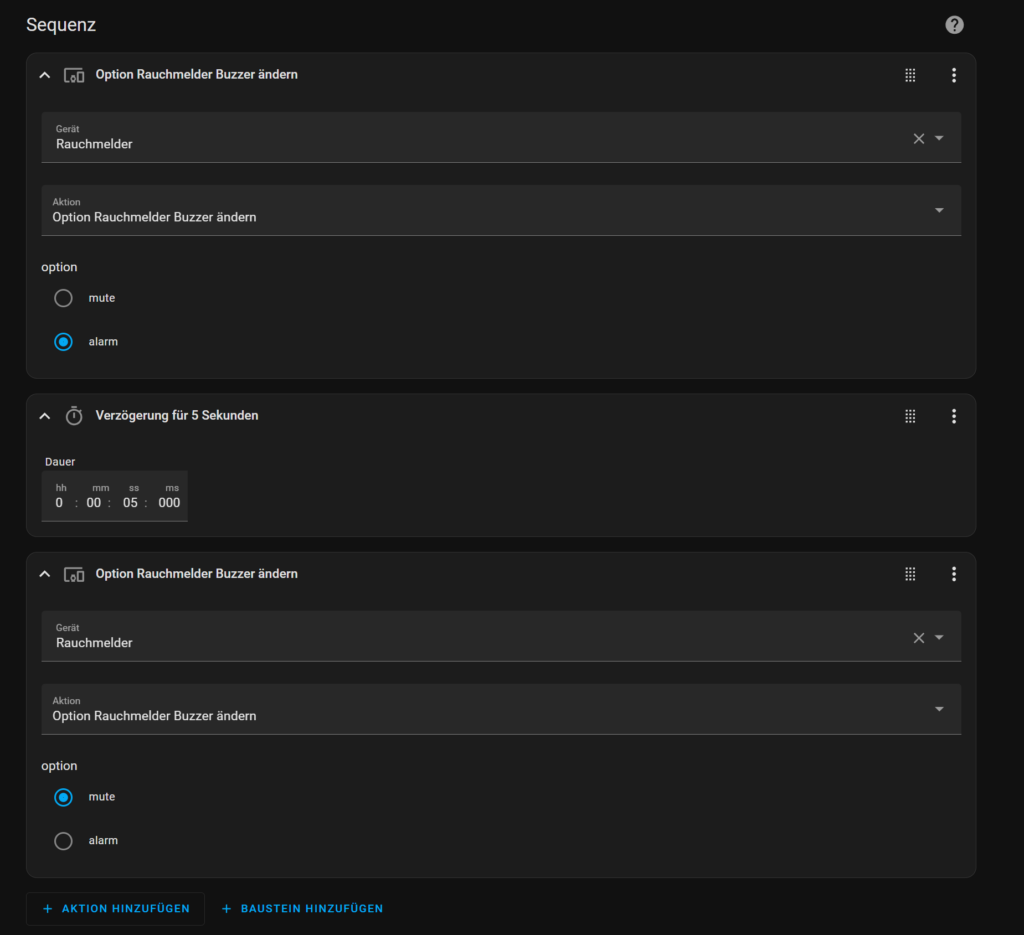
Update 01.07.2024: Da mich schon ein paar Fragen zur Einbindung des Rauchmelders ereilt haben, möchte ich euch das Script für den Aqara Rauchmelder hier noch ergänzend zur Verfügung stellen.